
User Guide


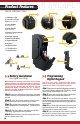
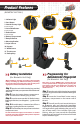

1. Indicator Light
2. Internal Courtesy
Light
(Inside the unit)
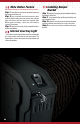
3. Learn Button
(Inside the unit)
4. Mute Button
(Inside the unit)
5. Battery Compartment
(Inside the unit)
6. Bumper Bracket
7. Mounting Bracket
8. Digital Keypad
9. Keyport
10. Wood Screws
11. Thumbscrew
12. Backup Keys
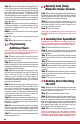
Battery Installation
(For Digital Unit Only)
Step 1 : Open the unit with the backup keys provided,
locate the battery compartment on the interior roof of
the unit.
Step 2: Open the interior battery compartment
cover and remove the battery plug-in cable.
Step 3: Insert the recommended 9V alkaline battery,
following the
Positive (+) and Negative ( - ) guides on the
cable.
Step 4: When the battery is connected you will hear a
single beep, signaling that unit is powered.
Step 5:
Place the battery into the compartment and
reinsert compartment cover.
Programming
Digital Keypad
Your access code can be a single press of one or more
buttons at the same time. Your access code can be a
minimum of 3 entries or maximum of 6 entries.
04
When installing or replacing your battery, always hold the
battery connecting cap while disconnecting or attaching.
Do not pull on the power cables, this could cause the power
supply to become disconnected from the lock.
The lock
manufacturer highly recommends the use of either a
Duracell or Energizer 9V alkaline battery with an expiration
date of 5 years into the future.
Step 1:
Open the unit with the backup key provided or
by using the factory default code. The factory default
code is a single sequential press of 1-2-3-4.
Step 2:
Locate the Learn button next to the battery
compartment on the interior roof of the unit.
Step 3:
Press and hold the Learn button. A beep will
sound and the light will turn green and remain illumina-
ted. This will indicate that the enrollment procedure has
been initiated.
Step 4: The indicator light will remain activated as you
enter the new access code. The code can be a minimum
of three entries or maximum of six entries.
Step 5: Press and hold the Learn button a second
time until the indicator light beeps, turns soild red
and remains illuminated, then release.
Product Features
(DIGITAL SPEEDVAULT ONLY)
4
4
7
6
5
8
9
12
11
10
2
1
3
4