
User Guide


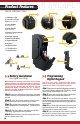

Opening Safe Using
Biometric Swipe Scanner
Deleting Users/Resetting
the Unit
Programming
Additional Users
Leave the unit door open while you program your
safe. An administrator fingerprint will be required for
enrolling any secondary fingerprints/users.
Step 1:
After enrolling the rst two administrator
ngerprints, open the unit by using your backup
key or biometric scanner.
Step 2 :
Press and release the Learn/ Mute button on the
interior roof of the unit. The unit will beep once and the
indicator light will begin to ash green. The secondary user
enrollment procedure has begun.
Step 3:
While indicator light is ashing green, swipe
the administrator ngerprint and you will hear two
beeps indicating the unit is ready for additional
ngerprints to be enrolled. The indicator light will
continue to ash green during steps 2 to 5, if ashing
stops before completing these steps you will need to
repeat from the beginning.
Step 4:
While the indicator light is ashing green, place
the tip of the new ngerprint at the top of the scanner
and make a downward swiping motion taking one to
two seconds per intervals,
until the entire nger has
crossed the scanner. A single
beep indicates a successful
swipe. If indicator light ashes red your swipe was
unsuccessful and you will need to swipe again.
Step 5:
Keep swiping until you hear a double beep. A
double beep indicates a successful enrollment of that
ngerprint. It may take three or more swipes until the
ngerprint is enrolled.
Step 6:
To enroll additional ngerprints/users repeat
steps 2–5. Your unit can enroll a maximum amount of 20
unique ngerprints. An administrator ngerprint will
be required for enrolling any secondary ngerprints/users.
Step 7:
Now you have successfully programmed addi-
tional ngerprints/users.
Installing Your SpeedVault
Step 5: Keep swiping until you hear a double beep. A
double beep indicates a successful enrollment of that
ngerprint. It may take three or more swipes until the
ngerprint is enrolled.
Step 6:
Test your unit to conrm that your ngerprint
was accepted.
Step 7: To add a secondary user/ngerprint repeat
steps 2 – 5.
Step 8: Now you are ready to use your safe.
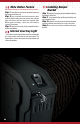
Step 1: Press the Start button at the top of the scanner to
activate the unit. The unit will beep once and the indicator
light will begin to ash green. The unit scanner is now
activated and ready to read your ngerprint.
Step 2: Using any previously enrolled nger, place
your nger at the top of the scanner and swipe in a
downward motion until the entire ngerprint has
crossed the biometric scanner.
Step 3: Your unit will open.
*If the indicator light ashes green and red then your
ngerprint swipe was not accepted and you will need to
try again.
Step 4: While the indicator light is ashing green, place
the tip of your nger at the top of the reader guide,then
swipe your nger in a downward swiping motion taking
one to two seconds per interval. The indicator light will
ash green and you will hear a single beep. If the
indicator light ashes red this indicates an unsuccessful
swipe and you will need to repeat this step as needed. If
the green indicator light stops ashing you will need to
repeat step three.
Step 1: Open the unit with the backup keys provided
or by the biometric scanner and locate the Delete
button on interior roof of the unit.
Step 2: Press and hold the Delete button.
Step 3: While still pressing the Delete button, press
and release the Start button located on the keypad.
Continue to hold the Delete button until the indicator
light stops ashing green and red. Once the indicator
light has stopped ashing, release the Delete button. If
the indicator light ashes red and beeps once, this
indicators the safe has already been reset.
Step 4: Now you are ready to reprogram your unit.
*If you do not reprogram your safe, it will remain in Demo
mode and will automatically open with the push of the
Start button. Individual users cannot be deleted from the
unit. All users will be deleted together during this process.
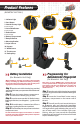
SpeedVault must be mounted at a 90° angle as the door is
gravity operated. The unit can be mounted from the left,
right or back side using the provided mounting holes.
Step 1: Select a location to mount the unit.
Step 2: Secure the Mounting Bracket to desired
location by fastening the wood screws through the wall
mounting holes.
Step 3:
After securing the Mounting Bracket, remove
the two thumbscrews located on the bottom of the
closed unit.
Step 4: Unlock the unit with the backup key and remove
the drop down compartment from the shell of the unit.
Step 5: Secure and fasten the shell of the unit to the
Mounting Bracket by using the 3 woodscrews
provided.
Step 6: Reinstall the removed drop down compart-
ment to the shell and restore the small bottom bracket
with the thumbscrews.
Step 7: Your unit is now installed.
08