
Assembly Instructions
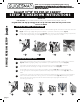

SECURING THE CANOPY TOP TO THE FRAME
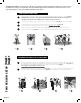
SINGLE PERSON TAKE DOWN
1
2
1
4
3
2
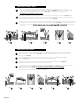
SECURING YOUR CANOPY: To harness your canopy to the ground, insert the included metal stakes into each foot corner.
For additional security, you can purchase from our Customer Support Center anchor bags custom designed to secure
any canopy quickly to each leg for additional weight on any surface.
1AFig. 2AFig. 4AFig. 3AFig.
Lower one side of canopy to lowest level by pressing leg height adjustment button as shown (Fig. 1A).
PLEASE NOTE: As you lower canopy hold height adjustment button and bend down as canopy lowers.
This will prevent extended eaves hitting you as it lowers. Repeat for other side.
Go underneath canopy and press clips to unlock central hub as shown (Fig. 2A). This will unlock frame.
Gently li extension eaves arm and pull corner of the canopy off as shown (Fig. 3A).
Store extension arm in cavity of leg. Repeat for other 3 extension eaves arms.
Position one hand on any frame leg and li slightly walking towards opposite leg corner to fold
canopy frame as shown (Fig. 4A). Store canopy in wheeled carry bag. Please see instructions below.
TWO PERSON SETUP
Place canopy frame in desired location. With partner, stand on opposite sides of frame. While holding legs,
li slightly off ground taking steps backwards to extend frame at full arms-length as shown (Fig. 1A). With
partner hold eaves and walk backwards to open frame as much as possible (Fig. 1B).
Be careful not to pinch fingers as frame opens!
Unfold canopy top and place it over open frame (Fig. 2A). Secure canopy top by attaching fastening loops
(12 total) to eaves and ceiling assembly as shown
(Fig. 2B). Your canopy top is now secure to frame.
1AFig. 2AFig. 2BFig. 1BFig.
page 2