
Assembly Instructions

SETUP & TAKEDOWN INSTRUCTIONS
EasyLi 13’
x
13’ 170 POP-UP CANOPY
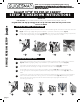
SECURING THE CANOPY TOP TO THE FRAME
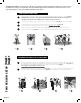
SINGLE PERSON SETUP
SINGLE PERSON CANOPY SETUP
THANK YOU FOR PURCHASING A GUIDESMAN INSTANT CANOPY!
Please carefully review the following instructions and familiarize yourself with parts
included and how to operate your GUIDESMAN canopy. Reference parts list for names of
each part noted in instructions.
SKU#272-1151
Parts Included: Fully assembled frame (1), Canopy top (1), Wheeled Carry Bag (1), Stakes (4)
EasyLi 13'X13' 170 Pop-Up Canopy can be set up and taken down with one person or two.
Please see below.
1
1
Place canopy frame in desired location. Position one hand on frame leg and other hand on lower eaves as shown
(Fig.1A). Li frame leg slightly taking steps backwards to open frame as much as possible (Fig. 1B).
Unfold canopy top and place over open frame (Fig. 2A). Secure canopy top by attaching fastening loops (12 total)
to eaves and ceiling assembly as shown (Fig. 2B). Your canopy top is now secure to frame.
2
2
3
4
Place canopy in desired location. Position one hand on frame leg and other hand on lower eaves as shown in
(Fig.1A). Li frame leg slightly taking steps backwards to open frame as much as possible (Fig. 1B).
Each leg has 3 height adjustments. Li up outer leg and slide out inner leg (Fig. 2A) to first level.
Repeat on same side resulting in one high side and one low side as shown (Fig. 2B).
Please make sure canopy top is over eaves on all 4 sides as pictured (Fig. 2B)
. Go underneath high side
of canopy and push center EasyLi hub upwards until clamps snaps into place as shown (Fig. 3A) to lock in
frame.
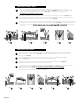
Located at top of each leg is an extension arm. Pull extension arm all the way out until you see black shaped
ball at end of extension arm. Place canopy corner on end of arm as shown (Fig. 4A). Pull arm gently down
until it locks into position. Repeat for other 3 extension arms. Adjust leg height to desired level.
Your canopy is now set up.
1AFig. 2AFig.
2B
Fig.
1AFig.
2B
Fig.
3AFig. 4AFig. 1BFig.
2A
Fig.
1BFig.
page 1