
Assembly Instructions

SET UP & TAKE DOWN INSTRUCTIONS
7’
ₓ
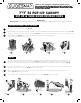
7’ 36 POP-UP CANOPY
SECURING THE CANOPY TOP TO THE FRAME
SET UP
THANK YOU FOR PURCHASING A GUIDESMAN INSTANT CANOPY!
Please carefully review the following instructions and familiarize yourself with parts
included and how to operate your GUIDESMAN canopy. Reference parts list for names
of each part noted in instructions.
SKU#272-1150
Parts Included: Fully Assembled Frame (1), Canopy Top with Integrated Wall (1), Backpack Carry Bag (1), Stakes (4)
1
2
Place the canopy in the desired location (Fig. 1A).
While holding the legs li slightly off the ground taking a few steps backwards to extend frame at full arm’s length as shown (Fig. 2A).
Unfold the canopy top and place it over
the open frame (Fig.3A). Secure each corner by attaching the corner of the canopy top to the
black fastening strip (Fig.3B). Pull all 4 corners down until completely over black fastening strip.
Your canopy top is now secure to the frame.
3
1
2AFig. 3AFig. 3BFig. 1AFig.
1AFig. 1BFig. 2AFig.
3A
Fig.
4A
Fig.
2
3
4
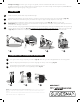
Place the canopy in the desired location for shade. Position one hand on any frame leg just below the black fastening strip and
place your other hand on the lower eaves bar as shown (Fig. 1A). Li the frame leg slightly off the ground so all legs except the
leg directly across bearing the weight clears the ground. Take steps backwards to open the frame as much as possible (Fig. 1B).
At the top of the leg, place one hand on the top corner pushing down and with the other hand just below the latch slider liing up
until it locks into position as in picture (Fig.2A). Repeat on other 3 legs.
Triple telescoping leg has 3 height adjustments. Li outer leg up and slide out the inner middle leg. To fully extend, slide out
inner leg (Fig. 3A). Repeat for other 3 legs.
Secure integrated wall to frame by wrapping fastening strips around legs (Fig.4A). Adjust until taught.