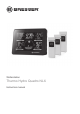
Wetterstation Thermo Hydro Quadro NLX Instruction manual
Visit our website via the following QR Code or web link to find further information on this product or the available translations of these instructions. www.bresser.de/P7000023 WARRANTY www.bresser.
1 Imprint Bresser GmbH Gutenbergstr. 2 46414 Rhede Germany http://www.bresser.de If you wish to submit a warranty claim or service request, please refer to the “Warranty” and “Service” information in this document. Please be aware that any requests or submissions sent directly to the manufacturer cannot be processed. Errors excepted. Subject to technical modifications. © 2020 Bresser GmbH All rights reserved. Reproduction of this document, including extracts, in any form (photocopied, printed etc.
Manual description: Quickstart_7000023_Thermo-Hydro-Quadro-NLX_en-US _BRESSER_v062020a With any service inquiries, please state these information. 3 About this Instruction Manual NOTICE These operating instructions are to be considered a component of the device. Please read the safety instructions and the operating instructions carefully before use. Keep these instructions for renewed use at a later date.
Disconnect the device from the power supply by pulling the power plug when it is not used or in case of longer interruption of operation and before starting any work on maintenance and cleaning. Position your device so that it can be disconnected from the power supply at any time. The power socket should be installed near the device and should be easily accessible as the mains cable plug is used to disconnect the device from the power supply.
DANGER Risk of explosion Improper use of this product can cause an explosion. The following safety information must be observed at all times to prevent an explosion. Do not expose the device to high temperatures. Use only the supplied power supply or the recommended batteries. Do not short-circuit the device or batteries or throw them into a fire! Excessive heat or improper handling could trigger a short circuit, a fire, or an explosion.
ferent brands or with different capacities. Remove the batteries from the unit if it has not been used for a long time. Never use rechargeable batteries.
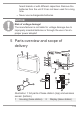
3 SET button (basic settings) 5 DOWN button (decrease value or initiate RCC signal reception) 7 SNZ/LIGHT button (set snooze function / display brightness) 9 DC connection socket for coaxial power connector 11 Display (Sensor) 13 Battery compartment cover 15 Battery compartment 4 6 8 UP button (increase value) CH button (channel selection) Battery compartment 10 Battery compartment cover 12 Function indicator 14 Wall mount fixture 16 RESET button (reset all settings) 17 Slide control for channel 18 Sta
6 Screen display 2 3 1 12 4 5 13 6 14 7 8 9 15 10 16 11 17 18 Illustration 2: Screen display 1 3 Current time Display of seconds or symbol for the alarm time (depending on the selected mode) 5 Temperature indoors (in °C or °F) 7 Symbol for the humidity 9 Temperature outdoors (in °C or °F) (remote sensor 1) 11 Humidity outdoors (in %) (remote sensor 1) 2 4 Symbol for enabled alarm Trend symbol 'falling' 6 Symbol for the temperature 8 Indoor humidity (in %) 10 Symbol for the sensor connecti
13 Outdoor temperature (in 14 Humidity outdoors (in %) °C or °F) (remote sensor (remote sensor 2) 2) 15 Temperature outdoors 16 Humidity outdoors (in (in °C or °F) (remote %) (remote sensor 3) sensor 3) 17 Weather trend symbol 18 Weather forecast graph(better, steady, worse) ics (12 hours) 7 Before starting operation NOTICE Avoid connectivity disruptions! To avoid connectivity disruptions between the devices, consider the following points before starting operation. 1.
exchanged in only one of the devices (i.e. the remote sensor) the signal can’t be received or can’t be received correctly. Note, that the effective range is vastly affected by building materials and position of the main and remote units. Due to external influences (various atomic devices and other sources of interference), the maximum distance can be greatly re-duced. In such cases we suggest to position the main unitand the remote sensor at other places.
8. Wait until the indoor temperature is displayed on the base station. NOTICE! When switching from mains power supply to battery power supply or vice versa, the power supply is being disabled for a short moment for technical reasons. Exception: permanent battery operation. Remote sensor 9. Remove the battery compartment cover. 10. Insert the batteries into the battery compartment. Ensure that the battery polarity (+/-) is correct. 11. Set the channel selector switch to the desired channel.
2. If no atomic signal is still received, the time setting must be made manually. Read the detailed manual for more information about manual time and alarm setting (see download information on page 2). 10 Alarm setting Alarm time setting 1. In normal display mode, press SET button to switch to alarm time display (AL). 2. Press and hold SET button for approx. 3 seconds to enter alarm time setting mode. 3. Digits to be set are flashing. 4. Press UP or DOWN button to change the value. 5.
11 Receiving measurements automatically Once the power supply is enabled, the base station will display the measurement readings for indoors. Readings from the outdoor sensor will be displayed within 3 minutes after powering it on. If no signal is received, proceed as follows: Press the CH button for about 3 seconds to initate reception of measurements again. 12 Display brightness regulation 1. In normal display mode, press SNOOZE/LIGHT button, to activate the full display brightness for 10 seconds. 2.
14 FCC Compliance Statement This device complies with Part 15 of the FCC Rules. Operation is subject to the following two conditions: (1) this device may not cause harmful interference, and (2) this device must accept any interference received, including interference that may cause undesired operation. Changes or modifications not expressly approved by the party responsible for compliance could void the user’s authority to operate the equipment.
15 Disposal Dispose of the packaging materials properly, according to their type, such as paper or cardboard. Contact your local waste-disposal service or environmental authority for information on the proper disposal. 16 Warranty www.explorescientific.com/warranty 17 Specifications Power supply Mains adapter Batteries needed 6x AAA (Micro), 1.5V Transmission frequency 433 MHz Transmission range 30 m DIMENSIONS & WEIGHTS Total length 122 mm Total width 28 mm Total height 186 mm Net weight (without access.