
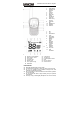
User's Manual

solvents or abrasives etc.
Do not attempt to modify the radio. The radio is designed to
comply with CE and R&TTE.
The LCD display is made of glass and maybe damaged if
dropped or impacted.
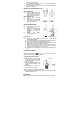
INSTALLING / REMOVING BELT CLIP
Installing Belt Clip
Slide the Belt clip into the
slot as shown in Figure 1. A
“click” indicates the Belt
Clip is locked into position.
Removing Belt Clip
Pull the belt clip latch
forward
While pulling the belt clip
latch, push up the belt clip
as shown in Fi
g
ure 2.
Fi
g
ure 1 Fi
g
ure 2
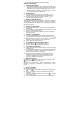
INSTALLING BATTERIES
Slide down the Battery
compartment cover.
Install the rechargeable
batteries by following the
orientation as shown in
Figure 3.
Replace the Battery
compartment cover.
WARNING
Follow the polar directions and insert 4 x AAA Ni-MH
rechargeable batteries.
Incorrect positioning can damage both the batteries and unit.
Don’t try to recharge non-rechargeable batteries.
Make sure the battery compartment cover is securely locked
in place when you are charging the batteries.
Dispose of used batteries safely and in a way that will not
harm the environment, never try to burn them or put them
anywhere, they could get burnt or punctured.
Don’t leave dead batteries in you unit. They might leak if you
do.
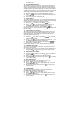
CHARGING BATTERIES
When the “Battery level
’ icon is low, you need to charge the
battery with the enclosed AC/DC adaptor .
Charging with AC/DC adaptor
Plug the adaptor into the wall
socket and the other end into
the earphone jack on the right
side of the radio.
The unit will automatically turn
off and the LCD “Battery” Icon
will flash.
Each adaptor can connect 2
sets of radio for char
g
in
g
.
To charge fully from empty require about 8 ~ 10 hours.
After charged, unplug the adaptor from the socket and the radio
will automatically turn on.
WARNING
To avoid damage to the radio use only original accessories.
Figure 3
Figure 4