MODEL: ITVS-750B(E-696B) WOODEN MUSIC CENTER WITH RECORDABLE CD PLAYER IMPORTANT SAFETY INSTRUCTIONS .......................................................................................................2 PRODUCT OVERVIEW ................................................................................................................................3 SETUP / BASIC OPERATION .......................................................................................................................
CAUTION: To reduce the risk of fire or electric shock, do not expose this appliance to rain or moisture. WARNING: To prevent electric shock, do not use this (polarized) plug with an extension cord, receptacle or other outlet unless the blades can be fully inserted to prevent blade exposure WARNING: Invisible laser radiation when open and interlock failed or defeated. Avoid direct exposure to laser beam.
-This lightning flash with arrowhead symbol within an equilateral triangle is intended to alert the user to the presence of non-insulated “dangerous voltage” within the product’s enclosure that may be of sufficient magnitude to constitute a risk of electric shock. -Warning: To reduce the risk of electric shock, do not remove cover (or back) as there are no user-serviceable parts inside. Refer servicing to qualified personnel.
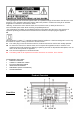
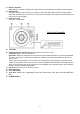
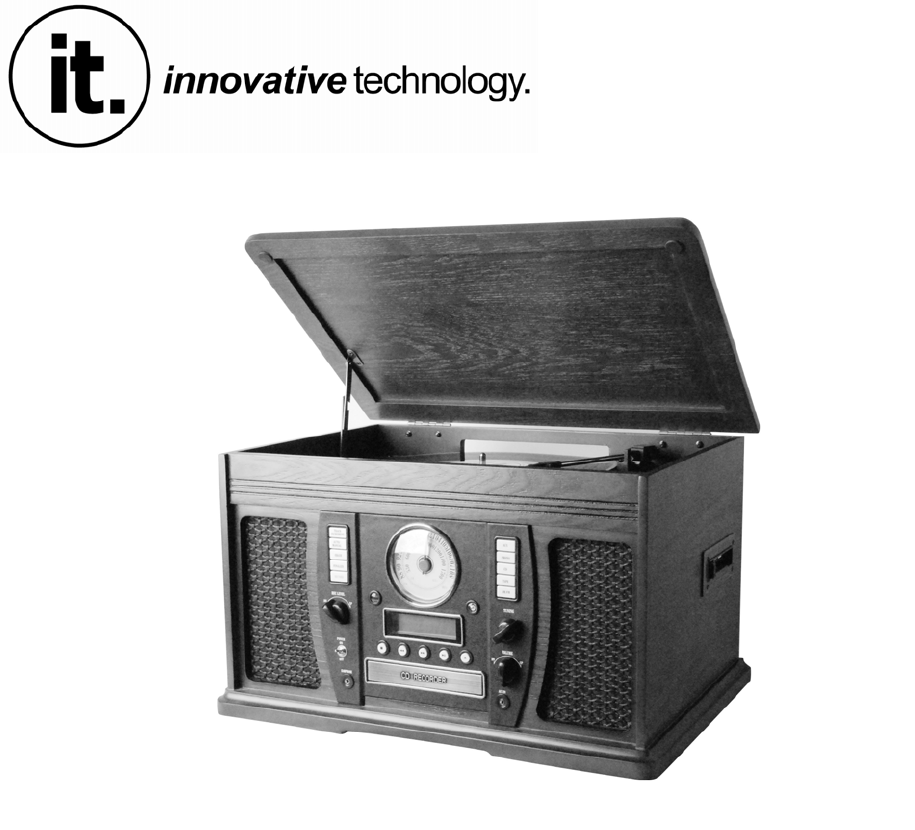
1. “POWER ON/OFF” Switch to turn the unit on or off. 2. “PHONO” Press to play a vinyl record. 3. “AUX”, “BT” & AUX IN Jack Press “AUX/BT” to listen to an external source connected to the AUX IN jack or Bluetooth. 4. “AM/FM” Press to listen to the radio. Press again to switch between AM and FM mode. 5. “CD” Press to play a CD. 6. “TAPE” Press to play a cassette. 7. REMOTE SENSOR. When using the remote control, point it towards this sensor. 8. RADIO TUNER DISPLAY 9.
A. FM wire antenna While tuned to a station in FM mode, extend the wire and reposition to adjust for best reception. B. AUX IN jacks For audio sources with RCA jacks, use plug on end of the RCA cable into these jacks and the other into the audio source. Be sure to connect the white plug to the white jack (Left) and the red plug to the red jack (Right). C. AC Power Cord Plugs into a wall outlet. Parts of the Turntable A. Turntable. B.
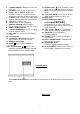
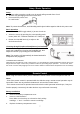
Setup / Basic Operation Setup 1. Remove white protective needle cover by gently pulling towards front of unit. 2. Remove any packaging materials from the unit. 3. Connect the AC power cord to a wall outlet. Note: To prevent interference, avoid bundling audio signal cables together with the AC power cord. Basic Operation 1. Switch the POWER toggle switch (1) to turn the unit on. 2. Select the source by pressing the corresponding mode button (AUX / BT / PHONO / AM/FM / CD / TAPE) (2). 3.
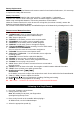
Battery Replacement When the distance required between the remote control unit and main unit decreases, it is necessary to replace the battery with new ones. Battery Precautions Be sure to insert the batteries with correct positive “+” and negative “-” orientation. ALWAYS use batteries of the same type. Never mix different types of batteries together. When using rechargeable batteries, refer to the precautions on their labels.
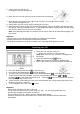
5. Gently push tone arm clip (5) to the right to release the tone arm. 6. Raise the cue lever (6) to lift the tone arm off the tone arm support. 7. Move the tone arm gently to the edge of the record (or the starting point of a track). The turntable will begin to turn. 8. Gently lower the tone arm by slowly releasing the cue lever. 9. When playback is finished, the tone arm will automatically return to its holder, and indicator light will light up, Then the turntable will stop.
Display Each time the DISPLAY button is pressed, the display mode will cycle between the following options: - Track Number + Track Play Time (Default Display Mode) - Track Play Time Countdown - Track Play Time - CD Play Time Countdown Repeat Playback Each time the REPEAT button is pressed, the repeat mode will cycle through the following options: REPEAT ALL (Repeat the entire CD) The entire CD will be played repeatedly. REPEAT 1(Repeat one track) or The current track will be played repeatedly.
5. Press the PROGRAM button again to set the current track. 6. “P-02” is displayed. Repeat steps 4 thru 5 to program the additional tracks. 7. When the selection of track numbers has been finished, press the PLAY button ( program playback. ) to start 8. To cancel the program mode, press the STOP ( ). To check the programmed order or In the stop mode, press ( been programmed.
source. Important: If both the front and rear AUX INs are connected to AUX IN cables at the same time, only the front one will be active. AUX OPERATION Please use this function to record from other sources such as CDs, karaokes and radio. We also recommend using this function to make the cassette tape to CD recording much easier. Please use the included AUX cable and connect one end to the AUX jack on the front.
BEFORE RECORDING Audio from the PHONO, TAPE or AUX sources can be recorded on the CD recorder. Prepare the audio source for recording 1. Select the desired audio recording source by pressing the corresponding selector button. (“PHONO,” “TAPE,” or “AUX”) 2. Prepare the appropriate audio source for normal play (external audio device / vinyl record / cassette tape). 3. Load a CD-R / CD-RW and close the CD tray. 4. Make sure “NO TOC” and “CD-R”(or “CD-RW’) appear on the top left of the display.
6) Adjust your recording volume to about middle (you can adjust on your next recording if too loud or too low). ). 7) Place the needle on the record and then press “play/pause” button (it looks like this 8) Now you are recording. 9) When the last song is recorded from the one side of vinyl, press the “play/pause” button ( ) to pause. 10) When paused, flip the record to the other side and place the needle back to play. 11) Press the “play/pause” button again to resume recording.
2. Test play the audio source to be recorded and adjust “REC LEVEL” Knob to set the recording volume so that its loudest output does not exceed the “OVER” indicator on the meter on the lower right of the display. Note: Be sure not to set the recording volume too low – doing so will result in very low playback volume levels. 3. Once the recording volume level is set, reset the audio source so it is ready for recording. Entering Recording (Play) Mode 1. Press the PLAY/PAUSE ( ) button to begin recording.
few minutes in some cases. ERASING A CD-RW (CD-RW ONLY) Erasing processes will only work on an unfinalized CD-RW disc. If a CD-RW disc has been finalized, you will need to unfinalize it prior to erasure. With a CD-RW, it is possible to erase either the last recorded track, or the entire disc. All erasing processes are permanent – they cannot be undone. Unfinalizing a Finalized CD Note: Skip this process if the CD-RW has not been finalized. 1.
Handling Vinyl Records • Do not touch the record’s grooves. Only handle records by the edges or the label with clean hands. Touching the record surface will cause your record’s quality to deteriorate. • To clean a record, use a soft anti-static cloth to gently wipe the record surface. • Keep records in their protective sleeves when not in use. • Always store records upright on their edges • Avoid placing records in direct sunlight, close to a heat source (radiators, stoves, etc.
Specifications GENERAL Power Requirements Power Consumption Dimensions (W x H x D) Weight AC 120 V~ 60 Hz 42W 510x300x340mm (approx.) 12 kg. (approx.) AMPLIFIER Output Power Frequency Response 5W+5W 60 to 20, 000 Hz SPEAKER SYSTEM Type Impedance Input Power 1-way 4 ohms Max.
Troubleshooting Guide Symptom Possible Cause Solution • Unit • Unit • Connect will not power on. GENERAL • No volume level is set too low. input selector does not match the playback source. in sound output. • It TAPE • The • The sound output speakers. • Noise/Distortion fails to respond. • The tape does not play. • Cannot AM/FM RADIO listen to any station, or signal appears weak. CD PLAYER PHONO • The unit is too close to a TV set or another interfering device.
FCC Statement Warning: Changes or modifications to this unit not expressly approved by the party responsible for compliance could void the user authority to operate the equipment. NOTE: This equipment has been tested and found to comply with the limits for Class B digital device, pursuant to part 15 of the FCC Rules. These limits are designed to provide reasonable protection against harmful interference in a residential installation.
INDUSTRY CANADA This device complies with Industry Canada licence-exempt RSS standard(s). Operation is subject to the following two conditions: (1) this device may not cause interference, and (2) this device must accept any interference, including interference that may cause undesired operation of the device. Under Industry Canada regulations, this radio transmitter may only operate using an antenna of a type and maximum (or lesser) gain approved for the transmitter by Industry Canada.
Innovative Technology Electronics Corp. Limited Warranty: 90 Days Labor, One Year Parts Innovative Technology Electronics Corp. (IT) warrants the product to be free from “Defects” in materials under normal use for a period of “One Year” from the date of the original purchase. The Warranty is “Not” transferable. IT agrees, within the initial “90 Day” period, to repair or replace the product if it is determined to be defective at “No Charge”.
750120505E 23