OPERATION MANUAL Retro Stereo with Turntable & Bluetooth MODEL: E-606D 1
CAUTION RISK OF ELECTRIC SHOCK DO NOT OPEN AVERTISSEMENT: RISQUE DE CHOC ÉLECTRIQUE – NE PAS OUVRIR. - This lightning flash with arrowhead symbol within an equilateral triangle is intended to alert the user to the presence of non-insulated “dangerous voltage” within the product’s enclosure that may be of sufficient magnitude to constitute a risk of electric shock. - Warning: To reduce the risk of electric shock, do not remove cover (or back) as there are no user-serviceable parts inside.
dropped. 15. -This lightning flash with arrowhead symbol within an equilateral triangle is intended to alert the user to the presence of non-insulated “dangerous voltage” within the product’s enclosure that may be of sufficient magnitude to constitute a risk of electric shock. -Warning: To reduce the risk of electric shock, do not remove cover (or back) as there are no user-serviceable parts inside. Refer servicing to qualified personnel.
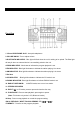
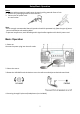
Product Overview Front View 1. 3.5mm HEADPHONE JACK - Accepts headphones. 2. VOLUME KNOB - Turn to adjust volume. 3.BLUETOOTH INDICATOR - Blue light will flash when the unit is waiting to be paired. The Blue light will stay lit when an external device is successfully paired to the unit. 4.PROG INDICATOR - Illuminates to indicate the program playback is set. 5.FM INDICATOR - Blue light illuminates to indicate the station playing is in stereo. 6.
(Note: This indicator only works in CD mode.) 18.Function -Select AM/FM/BLUETOOTH/PHONO mode 19. DISC TRAY Rear View 20. FM wire antenna While tuned to a station in FM mode, extend the wire and reposition to adjust for best reception. 21.AUX-in socket 22.USB socket 23. AC Power Cord Connect the AC plug into a wall outlet. It’s strongly recommended that this product should be operated only from the type of power source indicated on the marking label. Parts of the Turntable A. Turntable B. Spindle C.
Cleaning to Compact Disc Handing the Discs: This unit has been designed specifically for sound reproduction from compact discs bearing the mark. No other discs can be used. 1. Always place the compact disc in the disc tray with the label facing upward. 2. To remove a disc from its storage case, press down on the centre of the case and lift the disc out, holding it carefully by the edge. 3. Fingerprints and dust should be carefully wiped off the disc recorded surface with a clean cloth (not included). 4.
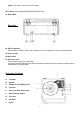
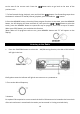
Setup/Basic Operation Setup 1. Remove white protective needle cover by gently pulling towards front of unit. 2. Remove any packaging materials from the unit. 3. Connect the AC power cord to a wall outlet. Note: -You’re strongly recommended that this product should be operated only from the type of power source indicated on the marking label. -To prevent interference, avoid bundling audio signal cables together with the AC power cord. Basic Operation 1. Power on.
Listening to a Vinyl Record 1 Press the FUNCTION button to select the PHONO function, PHONO indicator will light. 2.Select player speed. 3. Put a record onto the turntable (use the 45 rpm adaptor provided when playing a single record). 4. Uplift the lift handle. 5. Slide the Auto Turn / Auto Stop Switch to select auto turn or auto stop. Auto Turn: Slide the switch on AUTO position, when the record reaches to its end, the turntable will keep on turning.
Listening to a CD 1. Press the FUNCTION button to select CD function. 2. Open the tray, and place the CD on the tray. 3. Close the tray and start playing the CD. The CD will start automatically playing from the first track. 4. Stopping the CD play. 5. Pausing the CD play. Pressing the PLAY/PAUSE button will restart the CD where it was paused Do not switch the unit off while playing a CD as this will damage the unit. .
to the start of the current track. Press the button twice to go back to the start of the previous track. 7. To fast forward during playback, press and hold the button. Fast forwarding stops when the button is released. To rewind (reverse) playback, press and hold the button. 8. Press the MEMORY button, the unit will have program function.
Listening to an External Audio Device (BT Mode) External devices which have a built-in Bluetooth feature can be connected to this apparatus and play through the speakers. GETTING CONNECTED 1.Press the Function button to select the Bluetooth mode. 2. Set the Bluetooth function of your external device ON. 3. Set to search Bluetooth device on your external device. NOTE: The effective distance between your external device and this apparatus is 10 meters. 5.
• • • • • • • • Discs should be returned to their cases after use to protect from dust and scratches. Do not expose discs to direct sunlight, high humidity, or high temperature for extended periods of time. Printable CD-R and CD-RW discs are not recommended, as the label side may become sticky and damage the unit. Use a soft oil-based felt-tipped pen to write information on the label side. Never use a ball-point or hard-tipped pen, as doing so may damage the recorded side.
USB TO PC RECORDING Audacity Software The provided CD disc contains the following software: (1)Audacity_for_MAC---------For Mac (2)Audacity_for_WIN ---------For Windows The software is compatible with Window XP, VISTA, 7 and 8, 10 requires appropriate drives and Mac. NOTE: - Read about Audacity on Windows 8, 7 and Vista. Windows 2000, NT, and 95 are not supported. -Windows 10 is supported, but subject to all enabled devices having Windows 10-compatible drivers designed for the device.
3. Double click the audacity-win-2.1.2 to install the audacity software. 4. Select the setup language first and click on OK to continue. Note: The language choice in the Windows EXE Audacity installer only selects the language for the installer. 5. The Audacity Setup Wizard will appear. Click on Next to install the software. 6. Continue to click on the Next buttons.
7. Click on the Install button to start installation.
8.. Click on Next to continue. 9. Click on Finish to complete installation.
10. You can now open the Audacity software and start recording your files. : Note 1. Once you set up Audacity, you do not need to re-set it with each use. 2. The “Audacity-win-2.1.2.exe” (helpfile included) is available for Windows 8/ Windows 7/ Windows 10 requires appropriate drivers / Windows Vista/ Windows XP. 3. If you cannot run the exe document, please go to the website below and download the file from it directly. http://www.audacityteam.org/download/windows 4.
Configuring Audacity for Microsoft Windows Audacity Interface Audacity Control Buttons Use the attribute controls button at the top of the screen to go to pause, Play, Stop, Beginning, End Record etc. Use the File, Edit, View, Transport, Tracks, Generate, Effect and Analyze menus to Save, Export, and edit the music. 1. Click the ( ) button to pause the recording; 2. Click the ( ) button to play; 3. Click the ( ) button to stop the recording; 4. Click the ( ) button to skip to start; 5.
Audacity Preferences 1. Click the “Edit” on the Audacity interface, select “Preferences”. In the pop-up window of the Audacity Preferences, tabs of Devices, Playback, Recording, Quality, Interface, Tracks, Spectrograms, Import / Export, Extended Import, Projects, Libraries, Directories, Warnings, Effects, Keyboard, Mouse and Modules are listed on the left side of the window as shown in the picture below.
2. Click ‘Devices’ on the left side and detailed contents of the Devices will appear on the right hand side of the interface. arrow on “Device” below Playback and choose “Realtek High Definition Audio” Click the or “Microphone Sound Mapper- Output”. Click the arrow on ‘Device’ below ‘Recording’ and choose ‘‘USB PnP Audio Device’. arrow on ‘Channels’ to select ‘2(Stereo)’. Do not click OK until you finish all of the settings.
3. Click ‘Recording’ on the left side and the detailed contents will display on the right side. Click the checkbox beside ‘Software Playthrough: Listen while recording or monitoring new track’. Click the checkbox beside ‘Sound Activated Recording’ and adjust the Sound Activation Level (dB) to -36. NOTE: Once the ‘Sound Activated Recording’ is selected, the Pause button will not work during recording. You can Click “Interface” on the left side to select Sound Activation Level.
4. Before exporting a MP3 file, you need to find ‘lame’ first. If the program does not show the MP3 Library, make sure the Audacity driver disc is inside your computer. Click ‘Libraries’ on the left side, then in ‘MP3 Export Library’ interface, click ‘Locate…’ button to find ‘lame_enc.dll’. 5. You can download the ‘lame’ software from the website. Click ‘Download’ and a website will be opened automatically. Open the website to download ‘lame_enc.dll’: click on LAME download page.
Jump straight to Windows download’ in the top line. Left click 'Windows download’ and it will jump to the download chapter for Windows. Audacity LAME is free, so you can click ‘libmp3lame-win-3.99.3.zip’ under ZIP OPTION to download. Click Save, select the Folder you want to save it in, then click Save again to save it. Close the webpage, then click OK to close the Audacity preference. Minimize Audacity interface, then open the Folder where you saved the libmp3lame-win-3.99.3.
NOTES: Once you move it to the Desktop you do not need to do this again. After opening lame_enc.dll the first time it may not be necessary to open lame_enc.dll the next time you record. Go back to Audacity and click on Edit, then Preferences. Click on Libraries in MP3 library. Click on Locate, then click on ‘Browse’. Click on Desktop, then click on Lame_enc.dll to highlight it. Then click Open. Click on OK on locate Lame box. Click OK on Audacity Preferences to close and to complete your settings.
RECORDING OPERATION To download music and save into computer: 1. Place the record on the turntable. 2. Move the tone-arm over to the record to start playing. 3. Click the Record ( ) button to start recording. The waves (left and right tracks) will show on the interface. 4. At end of a song, click the “pause” ( ) button on the computer and press the Stop button on the turntable, move the cursor to the wave area and left click at the end of the song.
For example, if the “stop” button has been pressed by accident at the end of the first song, do not click anything in Audacity. Prepare another song, click “Transport” tab and select “Append Record”. The second song will continue to record on the same track at the end of the first song. You now have a music download on your computer but the music needs to be saved and converted to WAV, OGG, or MP3 formats before exporting. GENERAL PROBLEMS FOR WINDOWS VERSION 1.
• In Sounds and Audio Devices Properties interface Volume window will display, select the Audio tab to reveal the settings. In Sound recording, select USB PnP Audio Device and click the Volume button to set the recording input level. The WAVE IN window will appear. • In WAVE IN interface Adjust the recording volume to about 50% as per illustrated below. The fluctuating wave will show on the interface when recording.
2. If you do not hear any sound when the turntable is connected and you wish to listen to the music and /or video, it is possible that the default playback device has been changed to USB PnP Audio Device when the turntable connects to the PC. Recommended: Remove the USB cable from the PC. Alternative: This solution requires you to change the setting manually every time you connect the USB cable to the PC.
•For Vista and Windows 7 users: Click “Start” and go to the Control Panel. Find and click “Sound” icon. Sound window will be opened and the “Playback” window will be seen. You will see that the Speaker USB PnP Audio Device is set as default. To ensure the sound, click a playback device (e.g., Speaker High Definition Audio), then click “Set Default” and click OK. The sound should now work. •For Other Windows versions users (e.g.: Windows XP): Click “Start” and find “Settings”, “Control Panel”.
DIVIDING TRACKS After you have finished downloading, you may play back the songs through your computer before exporting. In stop mode, simply click ( ) SKIP TO START button and click then the ( ) PLAY button. 1. Press ( ) button to return to the beginning of the first song. 2. Move cursor to the wave graphic area, left click mouse and hold then drag from left to right. Release the mouse when the highlight reaches the end of the first song. Highlighted 3.
5. In the next window, fill in the information in the window entitled “Edit Metadata”. Then click “OK”. Wait a few seconds before exporting the selected audio. Second song to be divided and saved: 1. Move cursor to the wave graphic at the beginning of the second song. Left click mouse and hold then drag from left to right until you reach and highlight the end of the second song. 2. Click "file" tab then select "Export Selected Audio...". 3. Follow above steps to divide songs, export and save, one-by-one.
EXPORT AND SAVE FOR WAV AND OGG FORMATS (AFTER RECORDING IS COMPLETE) When the song is finished, click ( ) on the screen to stop playing. You can export and save tracks individually, or export and save into one file. To export and save individually: 1. Highlight the song that you want to save then click the file tab on the audacity interface. 2. Select “Export Selected Audio...
5. Wait for a few seconds until the export & saving is completed. Setting the language 1. Click Edit and select Preferences. 2. Another window titled with Audacity Preferences will appear. Click the Interface tab and click the pull down arrow to select the language you wanted.
3. Then click OK to close the window. The new setting will only be active in the next start - that means you need to close the Audacity and re-open the software again. AUDACITY FOR MAC USERS System Requirements Audacity for Mac is a Universal Binary for OS X 10.6 and later. Audacity runs best with at least 1 GB RAM and a 1 GHz processor (2 GB RAM/2 GHz on OS X 10.7 and later). For lengthy multi-track projects, we recommend a minimum of 2 GB RAM and 2 GHz processor (4 GB RAM on OS X 10.7 and later). 1.
2. Select Audacity_for_mac for Macintosh system. TIPS: To check your computer OS version, you can click the Apple icon then select “About This Mac”. The next window will display and the processor type and the OS version will display as below. 3. Double click on the Audacity_for_mac folder. 4. Then double click "audacity-macosx-ub-2.1.2.dmg". Wait a few minutes until this window disappears. Then another window will appear.
Drag the "Audacity" folder in to "Applications" as the instruction show on the window. 5. Double click the Audacity folder and in the Audacity window, files will be displayed in the folder. 6. Double click the Audacity icon to start the software running, alternatively, drag the “orange ball wearing headphones” icon down onto the desktop toolbar. Click on this icon to run Audacity.
CONFIGURING AUDACITY FOR MAC Audacity Interface for Mac Audacity Interface---Settings and controls At the top of the main Audacity window, to the right of the play control buttons, you will see the input and output level meters (labeled L and R). Under the output level meter, is an icon that looks like a microphone. Next to the microphone is a black arrow that points down. Click this arrow and select Start Monitor.
AUDACITY CONTROLS AND BUTTONS Use the attribute control button at the top of the screen to go to Beginning, Play, Record, Pause, Stop and End. Use the File, Edit, View, Transport, Tracks, Generate, Effect and Analyze menus to Save, Export, and Edit the music. 1. Click the ( ) button to skip to start; 2. Click the ( ) button to play; 3. Click the ( ) button to record; 4. Click the ( ) button to pause the recording; 5. Click the ( ) button to stop the recording; 6.
2. In the window of Audacity Preferences click “Devices” on the left hand side. Then on the right side within the Recording Device column, set Device to “USB PnP Audio Device”, Channels to “2 (Stereo)”. NOTE: If you cannot find the " USB PnP Audio Device" in the Device list, close the Audacity Software and re-open and try again. Ensure that the turntable is connected to the computer. 3. Click “Recording” on the left.
meter to -36 db. NOTE: Once the ‘Sound Activated Recording’ is selected, the Pause button will not work during recording. 4. Click “Quality” on the left then on the right side in the Sampling column, select “44100 Hz” in Default Sample Rate and select “16-bit” in Default Sample Format. 5. Click “Libraries” on the left then on the right side in MP3 Export Library column, check if the program has detected and shown the MP3 Library Version there. If shown, skip and forward to step 6.
If “MP3 export library not found” is displayed, you must find the “LAME”. Click “Locate…” button then a window named “Locate Lame” appears to find where the “LAME” is. Click the “Browse…” button to find it. If you cannot find it or the LAME file you found is not compatible, click the “Download” button and a website will show automatically. Scroll down the webpage to find a title named “Mac OS X”. Click the “LAME download page” and another website will show automatically.
Scroll down the webpage. You will notice a form showing the LAME for all version systems. Find a title named “For Audacity 1.3.3 or later on Mac OS X 10.4 and greater (Intel or PPC), and audacity 1.2.5 on OS X 10.4 and later (Intel)” and then click “Lame Library v3.98.2 for Audacity on OSX.dmg” or "here" to download the file. Then locate LAME and click OK. 6. Click OK to close the Preferences interface.
4. At end of the song, click “pause” ( ) button on computer and press Stop button on turntable, move cursor to the wave area and left click at the end of the song. For the next song, replace the album or move tone-arm to another desired song. Press Play button on the turntable to start playing the next song. Immediately press “pause” ( ) button on computer and downloading will continue and another R/L track will appear on the interface.
DIVIDING TRACKS 1. Press ( ) button to return to the beginning of the first song. 2. Move cursor to the wave graphic area, left click the mouse and hold then drag from left to right. Release the mouse when the highlighter has reached the end of the first song. 3. Click "File" tab then select "Export Selected Audio...". 4. The window will pop up a dialog box for you to complete the Metadata. Click OK button when completed. 5.
6. Edit Metadata window will appear. Complete the information then click OK. Wait for a few minutes until the saving is complete. EXPORT AND SAVE FILES (AFTER RECORDING IS COMPLETED) When the recording is finished, click the ( ) on the screen and stop the cassette playback. You have a music download on your computer now. You may play back the song through your computer. Simply click the ( 1. ) to play.
“Export Audio”. 2. A window will pop up after clicking Export. It will default to the MP3 format, but you also can select other formats by clicking the arrow located at the right of the MP3 Files. 3. Complete the “Save As” and Save-in location, click the Save button and the Edit Metadata window will display. Complete the information if necessary then click OK and wait a few minutes until it is finished saving.
TROUBLESHOOTING GUIDE If you experience any problems with your unit, kindly consult the following guide prior to calling your dealer. NO SOUND: • If you are not getting any sound into the software application, go back to the preferences as shown above and make sure that you have selected the USB PnP Audio Device for the recording device in the devices. • Power Cycle: Close Audacity, turn off the turntable, unplug the USB Cable. then plug in the USB Cable, turn on the turntable and reopen Audacity.
In the new interface, find the “Sound” icon and double click it. Adjust the Output volume under “Sound Effects” Under “Input”, select “USB PnP Audio Device” and adjust the “Input volume” POOR SOUND QUALITY: • Check your stylus to make sure it is secured to the tone arm. The stylus must be connected to the tone arm whenever using the turntable. • Make sure that your RCA plugs are plugged into a source or not touching bare metal.
Specifications GENERAL Power Requirements……………….……AC 120 V~ 60 Hz Power Consumption……………………..19 W Dimensions(L x Wx H)…………………. 360 mm x345 mmx165mm (approx.) Weight……………………………….…. 11.7 Ibs. (approx.) AMPLIFIER Output Power……………………………....2.0 W + 2.0 W Frequency Response………………….….60 TO 20, 000 Hz SPEAKER SYSTEM Type…………………………………….….1-way Impedance………………………………..8 ohms Input Power……………………………….Max. 3 W FM/AM RADIO FM Frequency Range…………………………88 to 108 MHz AM Frequency Range……………………..…..
Troubleshooting Guide BLUETOOTH CD PLAYER TUNER UNIT GENERAL In case of trouble with the unit, please look through this chart and see if you can solve the problem by yourself before calling your dealer. Problem Cause Solution Power does not come on when the power switch is pressed. Unit is unplugged. Connect the unit to the AC power supply. No sound comes out of the speakers. The volume is turned down (to MIN). The input selector does not match the playback source. Adjust the volume.
No sound. PHONO USB-PC Poor sound quality Decline in turntable audio performance. Have not selected the USB PnP Audio Device for the recording device in the devices. Microphone slider it is not at full volume The stylus no connected to the tone arm USB cable near any other cable The turntable stylus is worn out. 51 Go back to the preferences as shown above and make sure that you have selected the USB PnP Audio Device for the recording device in the devices.
FCC Statement This device complies with Part 15 of the FCC Rules. Operation is subject to the following two conditions: (1) This device may not cause harmful interference, and (2) this device must accept any interference received, including interference that may cause undesired operation. NOTE: This equipment has been tested and found to comply with the limits for a Class B digital device, pursuant to Part 15 of the FCC Rules.