
User Guide


5
7
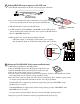
Setting the open limit (Push to open installation only):
1. DIP switch #1 should be in the ON position.
2. Turn the ON/OFF switch to the ON position on the MASTER arm.
3. Turn the ON/OFF switch to the ON position on the SLAVE arm.
4. Wait 15-20 seconds for the receiver to ‘warm-up’.
5. Press the remote (assuming that the remote has already been ‘learned’). The SLAVE arm or
both arms (depending on your sequence setting) should be opening.
6. Press the remote again to stop the gate at the desire opened position. Note: whichever gate
reached its desired opened position first that will be the first one to be programmed.
If the SLAVE arm is stopped at the desired opened position, press the ‘SET LIMIT’ on the
SLAVE arm for 5 seconds.
If the MASTER arm is stopped at the desired opened position, press the ‘SET LIMIT’ on the
MASTER arm for 5 seconds.
Press the remote again and allow both gates to return to the fully closed positions.
7. Repeat step 5 for the side that has not been programmed in the previous step.
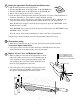
O
N
/
O
FF
Disconnect
Receiver Wires
ON/OFF
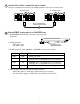
Obstruction setting:
1. Obstruction sensitivity must be set for each operator. See main manual for details.
Accessories inputs connections:
1. Accessories can be connected to either the master or SLAVE operator. See main
manual for details on the functionality of accessories inputs.
8
9
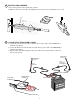
Replace Access Cover and Remount Openers:
1. When everthing is connected and all adjustments are made
replace the control board access cover. Carefully bring all
wires out the back of the opener through the strain relief
slot and tighten the cover screws with a hand held screw
driver to avoid stripping the screw holes.
2. Turn each opener over to the right side up position to pre-
vent water from rain and sprinkler systems from entering
the openers and damaging the electrical systems.
Strain Relief Slot
To avoid stripping screw
holes - tightening screws
by hand with a hand held
screwdriver is recommended.