
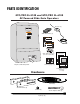
User Guide


11
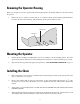
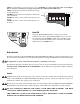
Removing the Operator Housing
Before you can gain access to the operator frame and its mounting holes, the housing will have to be removed from
the operator.
1. Remove the (2)
3
/8” chrome acorn nuts and (2)
3
/8” washers from the operator housing (this hardware is
located on the front of the housing). Lift the housing off the operator and set it aside.
Acorn nuts
Washers
Mounting the Operator
1. Lift the operator and align its mounting holes over the
1
/2” diameter concrete mounting anchors. Lower the
operator into position and fasten it to the mounting anchors with (4)
1
/2” washers and nuts (not provided).
2. Step down on the foot pedal to disengage chain sprocket (see GTO FOOT PEDAL RELEASE on page 1).
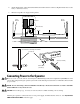
Installing the Chain
1. Bolt or weld (when correct position is determined) the chain brackets (included) on the operator side of the
gate (see illustration on next page).
2. Insert a chain adjuster bolt (included) in each bracket. Secure chain adjuster bolt using the (2)
1
/2” nuts
(included), one on each side of the bracket. Do not overtighten the nuts; they will be used to adjust chain
tension.
2. Attach chain to one chain adjuster bolt. Use #40 chain with the GTO/PRO SL-5100, and #50 chain with the
GTO/PRO SL-6100.
3. Thread chain through chain sprockets (foot pedal release should already be activated). Attach chain to second
chain adjuster bolt. Allow a minimum of 1 inch slack in chain for every 10 feet of gate.