
User Guide

Solar Panel Installation
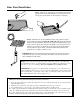
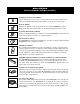
Step 1: Slide the
1
/4" bolts (F) into each channel, position the
pipe (D) between the bolts and place two clamps (C) over the
curved pipe onto the bolts. Secure with the
1
/4" nuts (E).
IMPORTANT: the solar panel must be positioned facing the path of the sun, due
south and in an open area away from shade. It should receive at least 8 hours of
direct sunlight for a full charge.
HINTS for Obtaining Maximum Output from Your Solar Panel
1. Place the panel facing due south in the path of the sun, where full sun will strike its face throughout the
day(minimum 8 hours).
2.
Mount the panel using the curved pipe provided to maintain the proper angle to the sun.
3. For optimal efficiency, wipe the face of the panel frequently with a soft, damp cloth.
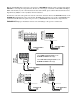
The output of the Solar Panel is variable during the day depending on the intensity of the sun and the angle
of the rays striking the panel. The output may vary from a few millivolts to as much as 22 volts. To check
the output, simply disconnect the solar panel leads from the control board and connect them directly to a dc
voltmeter. In bright sunlight the panel output should read at least 18 volts dc.
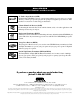
Step 2: Determine the site for installation of the solar panel. It is impor-
tant to install the solar panel facing the path of the sun where full sun will
strike its face throughout the day. The curved pipe (D) maintains the proper
angle to the sun. Secure the solar panel assembly to a wooden post or fence
using two pipe clamps (C) and #2 lag screws (B) as shown in the illustra-
tion. If your fence post is metal, you will need alternative hardware not
provided, (i.e. U-clamps or metal screws).
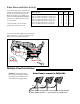
HINT: If the solar panel must be placed more than 10 ft. from the control box (but
less than 250 feet away), use multi-stranded, 16 gauge (AWG), direct burial, low-volt-
age wire (see Accessory Catalog). Never use telephone wire or solid core wire.
IMPORTANT: To provide secure and moisture resistant splices for solar panels, key
pads, push buttons and other accessories use a direct burial splice kit for underground
splices and an above ground splice kit for above ground splices. These splice kits can
be found at hardware and electrical supply stores.