
User Guide

Heater Installation:
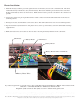
1. Install the heater(s) with the green side against the side of the battery closest to the controller board. The white
foam insulation layer should face away from the battery. The heater should be pressed between the control box
divider and the battery surface as shown above. Make sure the heater is pressed as far down in the control box as
possible.
2. Connect the yellow wire pair in parallel with the 18VAC connection from the GTO transformer in the fi rst two
terminal positions.
3. If using two heaters, both should be connected as above. This will result in three wires in each terminal position
4. Tape the thermostat (metal switch in clear plastic sleeve) to the top of the battery as shown with double sided tape
supplied in kit
5. Make sure heater wires do not short to other circuits or become pinched by hardware in the control box.
If you have any questions or concerns, please contact our Technical Service Department at 1-800-543-1236 or 850-575-4144.
GTO, Inc. • 3121 Hartsfi eld Road • Tallahassee, Florida 32303
Telephone (850) 575-0176 • Fax (850) 575-8912 • website www.gtoinc.com
The contents of all material available on this installation manual are copyrighted by GTO, Inc. (“GTO”), unless otherwise indicated. All rights are reserved by GTO, and content may not be
reproduced, downloaded, disseminated, published, or transferred in any form or by any means, except with the prior, written permission of GTO. Any reprinting of GTO publications is by
permission only. Copyright infringement is a violation of federal law.
GTO®, GTO/PRO®, Mighty Mule® are registered trademarks of GTO, Inc. Professional Access Systems™ is a trademark of GTO, Inc. and are the exclusive property of GTO, Inc. (“GTO”).
All rights are reserved by GTO, and these marks may not be used, in any for without the prior, written permission of GTO.
Battery Heater
Battery Heater
Thermostat
Thermostat
Battery Heater Wires
Battery Heater Wires in Terminals