
User's Manual


18
Mighty Mule 202
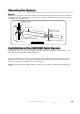
Installation of the Closed Position Stops
The Mighty Mule® Gate Opener firmly holds the gate in the closed position using the
positive stop plate. The positive stop helps stabilize the gate leaf in the closed position.
To further enhance the stability and security of your gate, install the optional
Mighty Mule® Automatic Gate Lock (see Accessory Catalog).
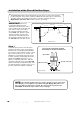
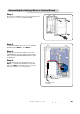
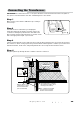
Step 1
Detach the gate operators from the gates
and move the gates to their closed position
(Illustration A). Using appropriate hardware
for your type of gate (U-bolts for tube or chain
link; screw or bolts for wood or metal - this
hardware is not included) attach the closed
position stop plate (horizontally) about mid
height on the FIRST gate frame. Do not
tighten it completely at this time. Slide the
stop plate toward the frame of the SECOND
gate leaf until they touch (Illustration B). Once
you have moved the stop plate to the correct
position, tighten its hardware completely.
1Z]aSR>]aWbW]\
Ab]^>ZObSa
5ObS6W\US
1=<B@=:0=F
5ObS6W\US
BVSUObSZSOTQO\]^S\
c^b]Ò[Of
=^bW]\OZ5`]c\RAb]^
PS\SObVUObS
BVSUObSZSOTQO\]^S\
c^b]Ò[Of
47@AB5/B3 A31=<25/B3
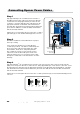
IMPORTANT: You need
to determine which side of the
driveway you will mount the control
box. From this point on the gate and
gate opener on the same side as
the control box will be referred to
as the FIRST gate and gate opener.
The gate and gate opener on the
opposite side of the driveway from
the control box will be referred to as
the SECOND gate and gate opener.
Illustration A
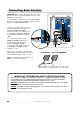
NOTE: The optional ground stop post is used to provide a secure point for the
SECOND gate to close against. If you will be using the Mighty Mule Gate Lock
accessory with your gate opener system, the closed position ground stop is
REQUIRED, as shown in Steps 2 and 3 on the next page.
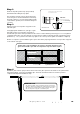
Closed Position Stop Plate mounted
horizontally on metal post with U-bolts.
SECOND Gate Frame
FIRST Gate Frame
TOP VIEW
FRONT VIEW
Illustration B