Roll-Up II 1 Table of Contents Standard Operating Information Parts Checklist Introduction What You Need to Use Roll-Up II Care and Handling Transporting the Roll-Up II Installing the Roll-Up II Using the SuperSet Menu Changing the Tablet’s Orientation Configuring for Specific Application Programs Table 1: SuperSet Menu Codes for Applications Table 2: Configuration Details for SuperSet Menu Codes Introduction to the Custom Configuration Menu Communication Options Output Format Options Mode Options Using th
Roll-Up II 2 Flow Control Remote Commands GTCO Roll-Up II Command Summary Functional Control Commands Format Selection Commands Alarm Commands Diagnostic Commands CalComp Emulation Commands Summagraphics Emulation Commands Command Mode Basics A Hint for Programmers Advanced Programming Information Coordinate Formats Binary Formats GTCO/CalComp Binary Format Summagraphics Binary Format Low Resolution Binary Format Cursor Button Codes in Binary Formats ASCII Formats Cursor Button Codes in ASCII Formats Measu
Roll-Up II 3 Standard Operating Information Parts Checklist Roll-Up II digitizing tablet Transducer (stylus or 4-button cursor or 16-button cursor) Computer interface cable with 9-pin connector 9- to 25-pin adapter Power supply TabletWorks CD Accessory pouch Deluxe Travel Bag (optional) Cardboard tube, insert and end caps NOTE: The Deluxe Travel Bag is intended to be used only in conjunction with the heavy gauge cardboard tube, insert and end caps supplied.
Roll-Up II 4 What You Will Need to Use Roll-Up II PC with an RS-232C serial communication port. (Signal levels must conform to EIA RS2320 specifications.) Graphic application software that accepts digitizer input via the computer’s RS-232C serial port. Care and Handling of Roll-Up II The Roll-Up II was designed to be both portable and durable. As with any product, it requires proper care and handling for reliable operation.
Roll-Up II 5 factory-supplied shipping tube. When correctly rolled, only the digitizer’s black back will be exposed. 3. Insert the rolled digitizer into the shipping tube and allow it to fully unroll against the inside of the tube. Place the factory-supplied insert into the center of the rolled digitizer for support. 4. Place the accessories in the accessory case and put it inside the hollow insert. Set the factory-supplied end caps on the tube to seal it.
Roll-Up II 6 5. Connect the interface cable to the appropriate jack on the connector panel. (The connector is keyed and will fit only the correct jack.) 6. Join the 9-pin connector of the interface cable to the serial port on the computer. If necessary, use the 9- to 25-pin adapter to connect to a PC-compatible (DTE male) port. 7. Orient the tablet (see Changing the Tablet’s Orientation section) as desired. 8.
Roll-Up II 7 If necessary, install the appropriate digitizer driver(s) from the Digitizer Driver Diskette supplied (AutoCAD, Windows and mouse drivers are included). Insert the diskette into drive A or B. From the DOS prompt, type a:\install or b:\install and follow the on-screen instructions. NOTE: Install only the drivers necessary for Roll-Up II to work with the application software. 10. Begin digitizing.
Roll-Up II 8 Configuring for Specific Application Programs To configure Roll-Up II for use with specific application programs: 1. In Table 1, find the application program being used with Roll-Up II. Note the corresponding SuperSet Code. If the application program is not listed in Table 1, find the configuration settings that apply to the application program in Table 2 and use that SuperSet Code.
Roll-Up II 9 Table 1: SuperSet Menu Codes for Selected Application Programs NOTE: This tablet has been updated to reflect the most current information available at the time of the release of Roll-Up III. The wt superscript indicates WinTab-compliant applications. SuperSet Code 99 now designates a non-Plug-N-Play Mode. Plug-N-Play serial connections and USB support are not available on the Roll-Up II.
Roll-Up II 10
Roll-Up II 11
Roll-Up II 12
Roll-Up II 13
Roll-Up II 14
Roll-Up II 15
Roll-Up II 16
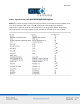
Roll-Up II 17 Table 2: Configuration Details for SuperSet Menu Codes NOTE: MAX = 140 coordinates/second lpi = lines per inch lpmm = lines per millimeter
Roll-Up II 18
Roll-Up II 19
Roll-Up II 20 Example: Configuring for Specific Application Programs To configure Roll-Up II to operate with Autodesk’s AutoCAD application program: 1. Find the entry for AutoCAD in Table 1. The SuperSet code is 01. 2. Select on the SuperSet Menu. This places the digitizer in Select Mode. 3. Choose on the SuperSet Menu. This enters the first digit of the SuperSet code for AutoCAD. 4. Select on the SuperSet Menu. This enters the second digit of the SuperSet code for AutoCAD. 5.
Roll-Up II 21 Communication Options Baud: The rate, in bits/second, at which characters are transmitted across the RS232C serial interface. Choices are: 1200, 2400, 4800, 9600, 19200 and 38400. Data Bits: Data bits represent the actual data being sent from one device to another. Both devices must be set for the same number of data bits. Choices are: Seven (7) or Eight (8). Stop Bits: Each character has one or two stop bits, which tell the receiving device that a character is complete.
Roll-Up II 22 Space: Defines whether the Space (Sp) character (hex 20) is included in the ASCII output report as a delimiter between the X and Y coordinate values. This option is available only in GTCO formats. Choices are: Include or Exclude. Decimal: Defines whether the period character (hex 2E) is included in the ASCII output report between the units and tenths digits. This option is available only in Summagraphics formats. Choices are: Include or Exclude.
Roll-Up II 23 To configure Roll-Up II using the Custom Configuration Menu: 1. Remove the Custom Configuration Menu card from its storage location in one end of the housing. Place the card in the active area of the tablet (the entire menu must be in the active area). Hold or temporarily tape the card in place to keep it from moving during the configuration process. 2. Select on the SuperSet Menu.
Roll-Up II 24 retained even if the unit is powered off or reset. However, if another SuperSet code is entered, this temporary configuration is lost and cannot be recalled without configuring Roll-Up II again. To save the configuration in a user-definable location: Choose and then select a two digit value ranging from 90 to 99 on the SuperSet Menu. You will hear four short tones when you successfully save a configuration. Saved configurations allow you to switch between applications quickly.
Roll-Up II 25 Roll-Up II Tones The Roll-Up II produces an “alarm” in the form of audio tones to inform the user of various events. The table below describes the kinds of tones you may hear while operating the digitizer. Table 3: Roll-Up II Tones NOTE: You might also hear tones produced by the Roll-Up II which are sent by the application program. (Programs can send commands to the digitizer to turn the audio tone generator on and off.
Roll-Up II 26 2. Work through the troubleshooting flowcharts on the following pages in this troubleshooting guide. 3. If your system still does not work. Call GTCO CalComp by Turning Technologies Technical Support Department at 1.866.746.3015. Be prepared to discuss the observations you made while troubleshooting. A Technical Support Specialist will help you resolve the problem as quickly as possible. NOTE: Refer to the Roll-Up II Tones table on the previous page while using this guide.
Roll-Up II 27 Procedure B: Troubleshooting
Roll-Up II 28 Procedure C: Troubleshooting
Roll-Up II 29 Using GTCOTEST GTCOTEST is a program that runs on the PC. It can be used to perform communication and diagnostic tests on an installed Roll-Up II. GTCOTEST is provided on the diskette with your system. 1. Select SuperSet Code 01 on the Roll-Up II (9600, N, 8, 1, GTCO Binary, 1000 lpi, Cont, 100). 2. To run GTCOTEST, insert the TabletWorks CD in the CD-ROM drive. GTCOTEST will work only if no Wintab drivers are installed.
Roll-Up II 30 9. If GTCOTEST indicates that the digitizer is functioning properly, check your software application setup and SuperSet code for accuracy. If you have any questions about your results or need assistance running GTCOTEST, contact our Technical Support Department.
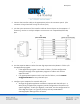
Roll-Up II 31 Figure 3: Power Supply Connector Figure 4: RS-232C Interface
Roll-Up II 32 Figure 5: 9- to 25-Pin Adapter Advanced Operating Information Roll-Up II Interfacing The following information is not required for normal Roll-Up II operation. Connecting Roll-Up II to a computer is usually a straight forward process (see Installing Roll-Up II section in this manual). If you do not have a typical interfacing situation, the information in this section will offer assistance to setting up the Roll-Up II and connect it to another device.
Roll-Up II 33 Character Format and Baud Rate Character format and baud rate govern how bits are assembled to form characters and the speed of transmission. Both Roll-Up II and the computer must have identical formats and rates. These are the parameters you must set for both devices: Data Bits: Data bits represent the actual data being sent from one device to another. Both devices must be set for the same number of data bits. Choices are: Seven (7) or Eight (8).
Roll-Up II 34 buffer full; a modem to indicate carrier detect; and a time-shared computer that services multiple users on a time-available basis. There are two kinds of flow control: ■ Software flow control is often used over communication links where only a 3-wire cable is used (Transmit Data, Receive Data, Ground) or over telephone lines. The Roll-Up II is equipped for software flow control. It will immediately stop sending data when it receives an ASCII XOFF character (CTRL-S, hex 13).
Roll-Up II 35 GTCO CalComp by Turning Technologies Roll-Up II Command Summary
Roll-Up II 36 Functional Control Commands Reset Code: RS The Reset command will reset the Controller to the last known configuration, clearing all previous commands sent to the Controller. If a SuperSet Menu configuration has been selected, the Reset command will reset the Controller to the SuperSet Menu value.
Roll-Up II 37 Read Current Coordinate Code: hex 02 (Ctrl-B) The Read Current Coordinate causes the Roll-Up II to output a coordinate while it is in Remote Request Mode. This command can be sent to the Roll-Up II only when it is digitizing and only when Remote Request Mode is in Command Mode. Please note that this command is not two ASCII characters. It is the one-byte-long STX character, CTRL-B (hex 02). Roll-Up II responds to the Read Current Coordinate command by transmitting one format.
Roll-Up II 38 Set Digitizing Rate Code: Rx Coordinates can be sent from the Roll-Up II at rates from 5 to 140 coordinates per second. The second character in this command sets the rate, as shown in the table below. Actual rates are limited by the communication baud rate and coordinate type you have selected. The rates shown here are, therefore, maximum rates.
Roll-Up II 39 Format Selection Commands ASCII Format Output Code: AS Command causes coordinates to be transmitted in ASCII. ASCII coordinates can be modified by the Low/High/Highest Resolution, Pushbutton, Space, Carriage Return and Line Feed commands and by menu settings. Binary Format Output Code: BI Command causes coordinates to be transmitted in binary format. Binary coordinates can be modified by the Low/High/Highest Resolution commands and by menu settings.
Roll-Up II 40 Space Include Space Exclude Code: SI Code: SE Carriage Return Include Carriage Return Exclude Code: CI Code: CE Line Feed Include Line Feed Exclude Code: LI Code: LE These commands control the presence of the corresponding characters in ASCII formats. Pushbutton codes and where they appear in coordinates are described in the Advanced Programming Information section. When included, the space is an additional character separating the X and Y components of the coordinate data.
Roll-Up II 41 The size is encoded as four digits: two digits representing vertical size in inches followed by two digits representing horizontal size in inches. For example, the 36” x 48” Roll-Up II sends the digits 3648 in response to this command. Read Tablet Diodes Code: RD Diagnostic command causes the Roll-Up II to examine the attached tablet and send the results to another device for display. A “1” means a diode is present and a “0” represents a diode is missing.
Roll-Up II 42 CalComp Emulation Commands Roll-Up II recognizes a subset of the CalComp 9500 command set. Space does not permit a detailed description of CalComp commands. However, most of the commands in this subset have equivalent Roll-Up II commands. For further information about the operation of those commands, please refer to the Roll-Up II command or function description in the GTCO CalComp by Turning Technologies Roll-Up II Command Summary.
Roll-Up II 43
Roll-Up II 44 Summagraphics Emulation Commands Roll-Up II recognizes a subset of the Summagraphics UIOF command set. Space does not permit a detailed description of Summagraphics commands. However, most of the commands in this subset have equivalent Roll-Up II commands. For further information about the operation of those commands, please refer to the Roll-Up II command or function description in the GTCO CalComp by Turning Technologies Roll-Up II Command Summary.
Roll-Up II 45
Roll-Up II 46 Command Mode Basics To enter GTCO CalComp by Turning Technologies Command Mode: Send an ASCII CTRL-A (hex 01) character to the Roll-Up II. When the Roll-Up II receives the CTRL-A, two things happen: Digitizing stops and new coordinates are not generated. If Command Mode is invoked during transmission of a coordinate, that coordinate transmission will be completed.
Roll-Up II 47 Roll-Up II sends a “>” (hex 3E) as a prompt to the commanding device. The Roll-Up II is now ready to accept commands. A command consists of two upper case ASCII letters or numbers followed by a delimiter. The delimiter lets the Roll-Up II know the command is complete. There are two kinds of delimiters: (carriage return, hex 0D): indicates end of current command and more commands will follow. If the command just sent is valid, it will be carried out.
Roll-Up II 48 2. Send the command one character at a time. The Controller will respond by echoing each character. Waiting for the character to be echoed will ensure that the Controller has received the character and is waiting for the next one. 3. Once the command is complete, send a or (hex 1B) to exit command mode. 4. If you send a , go into a loop and grab one byte at a time until a > prompt is received. Then continue sending commands as described in step 2.
Roll-Up II 49 Advanced Programming Information NOTE: The following information is not required for normal Roll-Up II operation. If you are programming for the Roll-Up II product line, the topics listed below will be useful: Coordinate Formats Measurement Scales Digitizing Modes Programming Examples These topics refer to commands that put Roll-Up II in a different operating state. The previous Remote Commands section contains detailed information about remote commands.
Roll-Up II 50 Binary formats use the high order bit in each byte as a synchronization bit. The first byte in each format has its high order bit set to 1. The remaining bytes have their high order bits set to 0. The application program must examine the high order bit of each byte to determine when a format begins. Roll-Up II can produce two kinds of binary formats: one is compatible with GTCO Roll-Up II and CalComp digitizers, and the other is compatible with Summagraphics digitizers.
Roll-Up II 51 To set up the GTCO/CalComp Binary Format: Custom Configuration Menu: 1. Select GTCO Binary or CalComp Binary (under Output Format Options). 2. Choose the desired resolution (under Mode Options). GTCO Commands: 1. Send command BI for Binary format. 2. Send command IN for English or command MT for metric measurements. 3. Send command HR for 1000 lpi/40 lpmm or command H1 for 2000 lpi/100 lpmm resolution.
Roll-Up II 52 Table 5: Summagraphics Binary Format Low Resolution Binary Format Low resolution binary format conforms to an existing industry standard method of encoding small digitizer coordinate data. It is a fast, efficient and commonly used format. Low resolution binary formats are appropriate for applications needing low precision and using tablets up to 20” x 20”. This format is five bytes long and is frequently transmitted at 9600 baud.
Roll-Up II 53 Table 6: GTCO Low Resolution Binary Format Cursor Button Codes in Binary Formats Cursor button codes are always included in binary formats. You can define certain pushbuttons on your transducer to represent information that is relevant to your task. For example, the buttons on a 4-button cursor could represent four line widths or four colors. By examining the button code in the format, the application program can use this information appropriately.
Roll-Up II 54 Table 7: Cursor Button Codes for 4-Button Cursor Table 8: Cursor Button Codes for 16-Button Cursors ASCII Formats ASCII is a commonly used method for encoding text. ASCII coordinate formats can be directly displayed on most printers and terminals, and can be easily handled by QBASIC programs. On the other hand, ASCII coordinate formats are longer than binary ones, so they take longer to transmit and they occupy more space when stored in memory.
Roll-Up II 55 Table 9, Table 10 and Table 11 show the range of ASCII formats available on the Roll-Up II. Besides the GTCO formats, emulations are provided for CalComp (in four variations) and Summagraphics ASCII formats. All the formats are influenced by the resolution currently in effect (higher resolutions require an additional digit of X and an additional digit of Y).
Roll-Up II 56 Custom Configuration Menu: Select the “Exclude” option for the corresponding character. GTCO Commands: Send command PE to exclude the Cursor Button Code character. Send command SE to exclude the Space character. Send command CE to exclude the Carriage Return character. Send command LE to exclude the Line Feed character.
Roll-Up II 57 Table 11: Summagraphics ASCII Formats Cursor Button Codes in ASCII Formats When the cursor button code is included in an ASCII format, the character transmitted in the format depends on the button pressed. Table 7 and Table 8 show which character will be sent. Instructions in the previous sections show how to include or exclude the cursor button character in certain of the ASCII formats. Measurement Scales You can choose either English or metric scaling for the coordinates you digitize.
Roll-Up II 58 Table 12: Measurement Scales Digitizing Modes Digitizing mode refers to the method Roll-Up II uses to determine when to output a coordinate format. Six digitizing modes are available, but only one can be used at a time: Point Mode Line Mode (sometimes called Switched Stream Mode) Continuous Mode (sometimes called Stream Mode) Line Incremental Mode Continuous Incremental Mode Remote Request Mode Table 14 will help you compare digitizing modes.
Roll-Up II 59 Table 14: Results of Active Area and Pushbutton Changes in Digitizing Modes Point Mode In Point Mode, one coordinate is sent when a transducer button is pressed. Output occurs only when the transducer is in the active area. To select Point Mode: Custom Configuration Menu: Select the Point option under Mode. GTCO Commands: Send command PT.
Roll-Up II 60 Line Mode In Line Mode, coordinates are sent as long as a transducer button is pressed. Output occurs only when the transducer is in the active area. To select Line Mode: Custom Configuration Menu: Select Line Mode. GTCO Commands: Send command LN. To set the rate at which coordinates are sent in Line Mode: Custom Configuration Menu: Select 12, 50 or 100 under Rate. GTCO Commands: Send command Rx (where x = 1-6), as shown in Table 13.
Roll-Up II 61 Line Incremental Mode In Line Incremental Mode, one coordinate is sent when the transducer is moved farther than a preset increment and a transducer button is pressed. Default increment is 0.01”. Output occurs only when the transducer is in the active area. To select Line Incremental Mode: Custom Configuration Menu: Select the “Line Incr” option under Mode.
Roll-Up II 62 Programming Example: To Ready and Display Roll-Up II Formats The following example QBASIC programs will allow users to experiment with reading and displaying Roll-Up II formats: To read and display ASCII formats To read and display high resolution binary formats To send version command and display results Programming Example: To Read ASCII Formats 1. Configure Roll-Up II for 9600, N, 8, 1, GTCO ASCII, Continuous (SuperSet 74). 2.
Roll-Up II 63 Programming Example: To Read High Resolution Binary Formats 1. Configure Roll-Up II for 9600, N, 8, 1, GTCO Binary, Continuous (SuperSet 01). 2.
Roll-Up II 64 Programming Example: To Send Version Command and Display Results This QBASIC program interacts with the Roll-Up II in Command Mode. In this example, the program activates Command Mode, sends the VR command and displays the resulting firmware version transmitted by the Roll-Up II. 1. Configure Roll-Up II for 9600, N, 8, 1, GTCO ASCII, Point (SuperSet 42). 2.
Roll-Up II 65 General Product Information Radio and Television Interference The user is cautioned that any changes or modifications not expressly approved by the party responsible for compliance could void the user’s authority to operate the equipment. This equipment has been tested and found to comply with the limits of a Class B digital device, pursuant to Part 15 of the FCC rules. These limits are designed to provide reasonable protection against harmful interference in a residential installation.
Roll-Up II 66 Bescheinigung des Herstellers/Importeurs Heirmit wird bescheinigt, dass der/die/das 3036R (Geraet, Typ, Bezeichnung) im Uebereinstimmung mit den Bestimmungen der Vfg 1046/1984 (Amtsblattverfuegung) Funk-Entstort ist. Der Deutschen Bundespost wurde das Inverkehrbringen dieses Geraetes angezeigt und die Berechtigung zur Ueberpruefung der Serie auf Einhaltung der Bestimmungen eingeraumt. GTCO CalComp by Turning Technologies, Inc.
Roll-Up II 67 Limited Warranty for Roll-Up II GTCO CalComp by Turning Technologies, Inc. warrants these products to be free from defects in material and workmanship under the following terms. Complete and return the enclosed warranty registration card to ensure that your products are covered with this warranty. Coverage Parts and labor are warranted for two (2) years from the date of the first consumer purchase for the digitizer tablet, controller, transducers and tablet accessories.
Roll-Up II 68 2. Costs for initial technical adjustments (setup), including adjustment of user controls. 3. Certain shipping charges. (Payment of shipping charges is discussed in the next section of this warranty.) 4. Packaging costs. (Customers should keep their boxes.) Warranty Service Procedures 1.
Roll-Up II 69 consequential damages. The price stated and paid for the equipment is a consideration in limiting GTCO CalComp by Turning Technologies liability. Notice Some states and provinces do not allow the exclusion or limitation of incidental or consequential damages, so the above exclusion may not apply to you. This warranty gives you specific legal rights, and you may have other rights, which vary from state to state, or province to province.
Roll-Up II 70 Corporate Headquarters 14557 N. 82nd Street Scottsdale, Arizona 85260 Tel: 1-866-746-3015 Support: 1-866-746-3015 Fax: 480-998-1751 Support: 1.866.746.3015 Copyright© 2014 GTCO CalComp by Turning Technologies, Inc. Roll-Up II is a trademark of GTCO CalComp by Turning Technologies, Inc. All other products and company names are the trademarks or registered trademarks of their respective owners. The information contained in this document is subject to change without notice.