
Manual
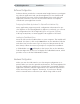
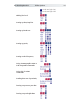

The DrawingBoard VI12 Installation
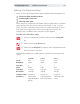
Computer
DrawingBoard VI USB Connection
Transducer
(POINTER)
USB
(USB)
USB Connection
The DrawingBoard VI USB port connection is USB 1.1 and 2.0 compat-
ible. When the digitizer is connected to the USB port, Windows will
recognize that there is a new device connected. If Windows displays the
Found New Hardware prompt, follow the onscreen instructions to com-
plete the driver installation.
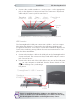
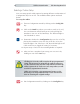
1 Connect the interface cable to the USB jack on the DrawingBoard VI
Connector Panel. The connector is keyed and will fit only the correct
jack. Do not force it.
2 Connect the other end of the USB cable to any one of the USB ports
on your computer or USB hub. Turn the Power Switch on. The
Power is supplied through the USB port. No additional power
source is needed for a USB installation, even when you are using
the DrawingBoard VI with a corded high-accuracy cursor.
digitizer will beep once, indicating it
has power.
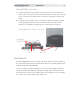
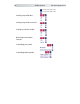
1 Connect the corded transducer – cursor or pen – to the appropriate
jack on the digitizer’s Connector Panel. The connector is keyed and
will fit only the correct jack. Do not force it.
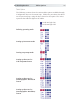
DrawingBoard VI Connector Panel (large format shown here)
Controller
Box
USB
(USB)
Transducer
(POINTER)
Power
(9V DC)
Serial
(RS232)
Power Switch
(I/O)