
Manual


The DrawingBoard VI10 Installation
Preparing the Large Format DrawingBoard VI
Mounting on the Stand
You can place your DrawingBoard VI on a table, desk, or drafting table.
Or, you can mount your DrawingBoard VI on a stand or a pedestal. The
tablet’s Universal Mounting Brackets attach directly to those stands that
have tilt arms. (The old style stands with tilt pads require right-angle
mounting brackets, which are attached to the tilt pads. The tablet’s Uni-
versal Mounting Brackets are then attached to the right-angle mounting
brackets.)
Center the tablet over the attached Universal Mounting Brackets and
screw the Thumbscrews into the T-Nuts in the mounting channel in the
tablet’s frame.
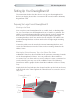
Attaching the Optional Accessory Tray or the Optional Plan Holder
Additional T-Nuts have been included in the perimeter mounting channels
on the DrawingBoard VI frame. You can position the Plan Holder or
Accessory Tray (see Parts and Accessories) where it is most convenient for
you by attaching it to any one of the available T-Nuts. The following
instructions and the graphic below detail the installation of the Accessory
Tray.
Simply slide the Tray Rails into the channel and line up the hole in the tray
with the hole in the T-Nut. Tighten the Thumb Screw to secure the Acces-
sory Tray.
Setting Up Your DrawingBoard VI
The instructions below describe how to set up your DrawingBoard VI.
Before you begin, please take a moment to fill out and mail the Warranty
Registration Card.
Accessory
Tray
Thumb
Screw
T-Nut
Tray
Rails
DrawingBoard VI
Frame