
Instructions for use
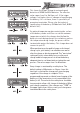

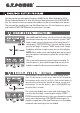


Set discharge current on the left and final voltage on the right.
The discharge current ranges from 0.1A to 7.0A.
Start the discharge process by pressing the START/ENTER
button for more than 3 seconds.
The screen will display the current state of discharge. Alter
the discharge current by pressing the START/ENTER button
during charging. Once you have changed the value, save it by
pressing START/ENTER again. To stop the process, press the
Batt type/Stop key once. An audible sound will indicate you
have ended the process.
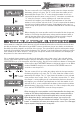
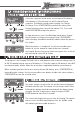
Battery Meter testing can be a very valuable tool for battery
diagnostics. To properly use the battery meter, you must
connect both the charge lead and the balance lead to the
charger.
To begin, press START/ENTER. The charger will provide the
results in the form of a voltage reading. Press increase to
check the total results of the pack. Press increase again to
return to the single cell data.
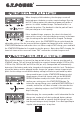
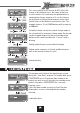
The G.T. X2 Charger provides a data storage and load feature for your
convenience. This feature can store information for up to 5 batteries to be called back
for the process of charging or discharging without having
to reprogram the charger. To alter the values, press START/
ENTER, then change the blinking value using the increase/
decrease buttons.