
Operation Manual


ENGLISH
11
7
Do not operate the appliance without ingre-
dients in the measuring beaker or chopping
bowl.
7
Never place the appliance, attachments,
power cord or plug on hot surfaces such as
gas or electric burners or hot oven surfaces
and never use with hot liquids or food. Let hot
food and liquids cool down to min. 80°C or
less before using the appliance.
7
Do not use the appliance for anything other
than its intended use.
7
Never switch on the appliance for longer
than necessary for processing the food.
7
Never use the appliance with damp or wet
hands.
7
Operate the appliance with delivered parts
only.
7
The appliance is designed to process only
common household quantities.
7
Do not use the appliance if the blades are
damaged or show signs of wear.
7
Make sure that there is no danger that the
power cord could be accidentally pulled or
that someone could trip over it when the appli-
ance is in use.
7
Position the appliance in such a way that the
plug is always accessible.
7
A spatula may be used to remove the food
from the measuring beaker and chopping
bowl. Make sure that the appliance is
switched off before doing this.
7
We do not recommend operating the appli-
ance with dry or hard foods or for ice crush-
ing as this may conclude in dull blades.
7
Remove bones and stones from food to pre-
vent the blades and the appliance from being
damaged.
SAFETY AND SET-UP _________________________
Dear Customer,
Congratulations on the purchase of your new
GRUNDIG Hand Blender BL 6280.
Please read the following user notes carefully
to ensure full enjoyment of your quality product
from GRUNDIG for many years to come.
A responsible approach!
GRUNDIG focuses on contractu-
ally agreed social working condi-
tions with fair wages for both
internal employees and suppliers.
We also attach great importance
to the efficient use of raw materi-
als with continuous waste reduction of several
tonnes of plastic every year. Furthermore, all our
accessories are available for at least 5 years.
For a future worth living.
For a good reason. Grundig.
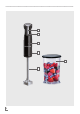
Controls and parts
See the figure on page 3.
A
On/Off button
B
Turbo button
C
Motor unit
D
Attachment release buttons
E
Blending attachment
F
Measuring beaker
AT A GLANCE ________________________________