
Installation and Operating Instructions
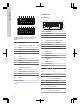
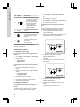
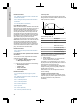
Table Of Contents
- English (GB)
- 1. General information
- 2. Installing the product
- 3. Starting up the product
- 4. Product introduction
- 5. Control functions
- 6. Setting the product
- 6.1 Setting the sensor type
- 6.2 Setting the start level
- 6.3 Setting the stop level
- 6.4 Setting the high level
- 6.5 Stop delay
- 6.6 Power-on delay
- 6.7 Dry-running protection
- 6.8 Using the same level switch for the start and stop level
- 6.9 "Multipump settings"
- 6.10 "Antiseizing"
- 6.11 Signal detection time
- 6.12 Setting the maximum number of restarts with Grundfos GO Remote
- 6.13 Setting the service interval with Grundfos GO Remote
- 6.14 Operating the product
- 6.15 Motor protection
- 6.16 Alarm reset
- 6.17 Setting the buzzer with Grundfos GO Remote
- 6.18 Setting units for Grundfos GO Remote
- 6.19 Setting units for the operating panel with Grundfos GO Remote
- 6.20 GENIbus
- 6.21 Security
- 6.22 Starting the startup wizard with the operating panel
- 7. Servicing the product
- 8. Fault finding the product
- 8.1 Overview of alarm and warning codes
- 8.2 Code 2 (Power phase missing)
- 8.3 Code 4 (Too many motor restarts)
- 8.4 Code 9 (Power phase sequence wrong)
- 8.5 Code 12 (Service needed)
- 8.6 Code 22 (Moisture in motor of pump)
- 8.7 Code 25 (Wrong configuration)
- 8.8 Code 26 (Contactor shorted)
- 8.9 Code 48 (Motor is overloaded)
- 8.10 Code 51 (Blocked)
- 8.11 Code 57 (Missing water in the application)
- 8.12 Code 69 (Winding temperature too high)
- 8.13 Code 72 (Internal fault)
- 8.14 Code 76 (Internal fault)
- 8.15 Code 84 (Memory storage media faulty)
- 8.16 Code 85 (Internal fault)
- 8.17 Code 117 (Door opened)
- 8.18 Code 159 (Communication error CIMxxx)
- 8.19 Code 163 (Drive unit configuration fault)
- 8.20 Code 165 (Signal fault)
- 8.21 Code 191 (High water level)
- 8.22 Code 205 (Level switch inconsistency)
- 8.23 Code 220 (Contactor wear out)
- 8.24 Code 229 (Water on floor)
- 9. Technical data
- 10. Disposing of the product

6.3 Setting the stop level
6.3.1 Setting the stop level with Grundfos GO
Remote
The settings apply to analog sensors. For digital
sensors, the setting is automatically activated.
The stop level is the same for pump 1 and pump 2.
1. Go to Settings > Level control > Stop level
2. Set the stop level.
If you are using the same level for start and stop,
remember to set a stop delay. It will prevent the pump
from starting and stopping too frequently.
6.3.2 Setting the stop level with the operating
panel
The settings apply to analog sensors. For digital
sensors, the setting is automatically activated.
The stop level is the same for pump 1 and pump 2.
1. Press and hold OK until the display starts
flashing.
2. Press OK once.
The current stop level is indicated on the display.
3. Set the stop level using
the Up and Down buttons.
4. Continuously press OK to confirm all other
settings and to exit the setup.
If you are using the same level for the start and stop
level, remember to set a stop delay. This will prevent
the pump from starting and stopping too frequently.
6.4 Setting the high level
6.4.1 Setting the high level with Grundfos GO
Remote
For analog sensors:
1. Go to Settings > Level control > High level.
2. Set the high level.
For digital sensors:
1. Go to Settings > LC 231 IO terminals
2. Select which terminal to configure.
6.4.2 Setting the high level with the operating
panel
The settings apply to analog sensors
1. Press and hold OK until the display starts
flashing.
2. Press OK four times. The current high level is
indicated on the display.
3. Set the high level using the Up and Down button.
For digital sensors, enable or disable the setting.
1. Press OK once to complete the setting.
6.5 Stop delay
The stop delay is the time from when the stop level is
reached until the pump stops. The stop delay
prevents the pump from starting and stopping too
frequently and reduces water hammer in long pipes.
6.5.1 Setting the stop delay with Grundfos GO
Remote
1. Select Settings > Level control > Stop delay >
State
2. Select Stop delay time.
3. Set the Stop delay time.
6.6 Power-on delay
With this function it is possible to delay the startup of
the pump after the power supply has been switched
on. The purpose is to avoid disturbing the main power
network which could happen if several pumps start up
immediately when the power supply is switched on.
6.6.1 Setting the power-on delay with Grundfos
GO Remote
1. Go to Settings > Power-on delay.
2. Set the function to Enabled.
3. Set the time delay.
6.7 Dry-running protection
If the pump is running and the liquid level in the tank
or pit becomes lower than the dry-running level, the
dry-running protection will stop the pump to ensure
that it is not damaged.
Dry-running protection is dependent on a feedback
signal from a level sensor installed in the tank or pit.
6.7.1 Setting the dry-running level with Grundfos
GO Remote
1. Go to Settings > Level control > Dry-running
level.
2. Set the dry-running level.
The dry-running level must be set to a
value which ensures that the pump is
not damaged due to dry-running. The
specific level depends on the installed
pump type. See the installation and
operating instructions for the product.
17
English (GB)