
Installation and Operating Instructions
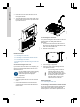
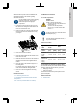
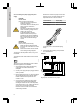
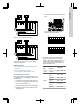
Table Of Contents
- English (GB)
- 1. General information
- 2. Installing the product
- 3. Starting up the product
- 4. Product introduction
- 5. Control functions
- 6. Setting the product
- 6.1 Setting the sensor type
- 6.2 Setting the start level
- 6.3 Setting the stop level
- 6.4 Setting the high level
- 6.5 Stop delay
- 6.6 Power-on delay
- 6.7 Dry-running protection
- 6.8 Using the same level switch for the start and stop level
- 6.9 "Multipump settings"
- 6.10 "Antiseizing"
- 6.11 Signal detection time
- 6.12 Setting the maximum number of restarts with Grundfos GO Remote
- 6.13 Setting the service interval with Grundfos GO Remote
- 6.14 Operating the product
- 6.15 Motor protection
- 6.16 Alarm reset
- 6.17 Setting the buzzer with Grundfos GO Remote
- 6.18 Setting units for Grundfos GO Remote
- 6.19 Setting units for the operating panel with Grundfos GO Remote
- 6.20 GENIbus
- 6.21 Security
- 6.22 Starting the startup wizard with the operating panel
- 7. Servicing the product
- 8. Fault finding the product
- 8.1 Overview of alarm and warning codes
- 8.2 Code 2 (Power phase missing)
- 8.3 Code 4 (Too many motor restarts)
- 8.4 Code 9 (Power phase sequence wrong)
- 8.5 Code 12 (Service needed)
- 8.6 Code 22 (Moisture in motor of pump)
- 8.7 Code 25 (Wrong configuration)
- 8.8 Code 26 (Contactor shorted)
- 8.9 Code 48 (Motor is overloaded)
- 8.10 Code 51 (Blocked)
- 8.11 Code 57 (Missing water in the application)
- 8.12 Code 69 (Winding temperature too high)
- 8.13 Code 72 (Internal fault)
- 8.14 Code 76 (Internal fault)
- 8.15 Code 84 (Memory storage media faulty)
- 8.16 Code 85 (Internal fault)
- 8.17 Code 117 (Door opened)
- 8.18 Code 159 (Communication error CIMxxx)
- 8.19 Code 163 (Drive unit configuration fault)
- 8.20 Code 165 (Signal fault)
- 8.21 Code 191 (High water level)
- 8.22 Code 205 (Level switch inconsistency)
- 8.23 Code 220 (Contactor wear out)
- 8.24 Code 229 (Water on floor)
- 9. Technical data
- 10. Disposing of the product

Related information
2.2.1 Removing the front cover
3.6 Configuring the IO terminals using Grundfos GO
Remote
2.3.5 Connecting an alarm device
You can connect an alarm device, such as a buzzer
or a lamp, to the output relays Alarm 1 and Alarm 2.
The control unit triggers the alarm device when it
detects an alarm or a warning. You can change the
behaviour of the outputs with Grundfos GO Remote
under Relay output 1 and Relay output 2.
Default settings of the terminal blocks
Terminal block Default function
Alarm 1 All alarms
Alarm 2 High level
1. Loosen the screws and remove the front cover.
Be careful not to damage the cable between the
front cover and the back cover.
2. Lead the wires through one of the cable glands.
3. Depending on the type of alarm device, connect
the wires to the relevant terminals. Note that all
wires must be secured inside the cabinet using
cable ties.
• NO (Normally Open) and C (Common)
• NC (Normally Closed) and C (Common).
4. Tie the wires with cable ties.
NC
NC
N
NO
TM070569
3. Starting up the product
3.1 Connecting to Grundfos GO Remote
1. Open Grundfos GO Remote on your device.
Make sure that Bluetooth is enabled.
Your device must be within reach of the product
to establish Bluetooth connection.
2. Press the Bluetooth CONNECT button on
Grundfos GO Remote.
3. Press the connect button on the operating panel.
The blue LED above the connect button is
flashing blue until your device is connected.
Grundfos GO Remote is now loading the data for
the product.
Related information
3.4 How to enable Bluetooth on the operating panel
3.5 How to disable Bluetooth on the operating panel
3.2 Startup wizard on Grundfos GO Remote
The product is designed for Bluetooth communication
with Grundfos GO Remote.
Once you have connected your product to Grundfos
GO Remote, a startup wizard appears. Follow the
instructions to make your settings.
Grundfos GO Remote enables you to set functions
and gives you access to status overviews, technical
product information and current operating
parameters.
3.3 Startup wizard on the operating panel
The first time the control unit is switched on, a startup
wizard will guide you through the basic settings. You
can select the sensor type and sensor levels. For
some products, you can also set the nominal pump
current and number of phases.
If you have an analog sensor, select S-1 and set the
height of the different levels, from dry running to high
level.
If you have a digital sensor, select S-2 and enable or
disable the dry-running level, the start level for pump
2, if available and the high level.
To change settings, use the Up and Down buttons on
the operating panel.
Use the OK button to confirm each setting and
navigate to the next setting.
For filling applications, you must use Grundfos GO
Remote.
Units can only be changed with Grundfos GO
Remote.
10
English (GB)