
Install Instructions
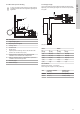
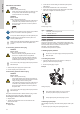

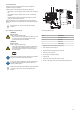
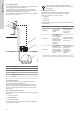
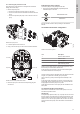


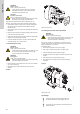
Table Of Contents
- English (GB)
- 1. General information
- 2. Product introduction
- 3. Receiving the product
- 4. Installation requirements
- 5. Mechanical installation
- 6. Electrical connection
- 7. Starting up the product
- 8. Control functions
- 9. Setting the product
- 10. SCALA1 twin booster configuration
- 11. Service
- 12. Starting up after standstill
- 13. Taking the product out of operation
- 14. Storage
- 15. Fault finding
- 15.1 Grundfos Eye SCALA1
- 15.2 The pump does not start
- 15.3 The pump is not running
- 15.4 The pump is running
- 15.5 The pump cuts out during operation
- 15.6 The pump performance is insufficient
- 15.7 The pump starts and stops too frequently
- 15.8 The pump does not stop
- 15.9 The pump gives electric shocks
- 15.10 Twin booster system fault finding
- 15.11 Fault resetting
- 16. Technical data
- 17. Approvals
- 18. Disposing of the product

6. Electrical connection
WARNING
Electric shock
Death or serious personal injury
‐ Switch off the power supply before you start any work
on the product. Make sure that the power supply
cannot be switched on accidentally.
WARNING
Electric shock
Death or serious personal injury
‐ The protective earth (PE) of the power outlet must be
connected to the protective earth of the pump. The
plug must have the same PE connection system as
the power outlet.
‐
All electrical connections must be carried out by qualified
persons in accordance with local regulations.
If the power cable is damaged, it must be replaced by the
manufacturer, the manufacturer's service partner or a
similarly qualified person.
Make sure that the electrical installation supports the rated
current [A] of the product. See the nameplate of this
product.
6.1 Connecting products with a plug
WARNING
Electric shock
Death or serious personal injury
‐ Make sure that the power plug delivered with the
product is in compliance with local regulations.
‐ The plug must have the same protective earth (PE)
connection system as the power outlet. If not, use a
suitable adapter if allowed by local regulations.
Do not turn on the power supply until the pump has been
filled with liquid.
1. Switch off the power supply to the power socket.
2. Connect the plug to the power socket.
6.2 Connecting products without a plug
WARNING
Electric shock
Death or serious personal injury
‐ Power cables without a plug must be connected to a
supply disconnecting device incorporated in the fixed
wiring according to the local wiring rules.
‐ The protective earth (PE) of the power outlet must be
connected to the protective earth of the pump. The
plug must have the same PE connection system as
the power outlet.
Do not turn on the power supply until the pump has been
filled with liquid.
If the product is delivered with a cable but without a plug, connect
the cable to the external main switch or attach a plug.
Connecting the cable to an external main switch
1. Strip the cable.
2. Thread each individual wire to the correct terminal in the
external main switch.
Wiring a plug
1. Strip the cable.
2. Loosen the two screws holding the cable clamp and pull the
cable through.
3. Thread each individual wire to the correct terminal.
4. Tighten the terminal screws and the cable clamp screw. Make
sure not to overtighten the cable clamp screw.
1
2
3
4
TM072505
Example, plug wiring
Pos. Description
1 PE: Earth, yellow and green wire
2 N: Neutral, blue wire
3 L: Live, brown wire
4 Cable clamp
6.3 Motor protection
The pump incorporates current- and temperature-dependent motor
protection. If the pump is blocked or otherwise overloaded, the built-
in thermal switch will cut out. When the motor has cooled
sufficiently, it will restart automatically.
No external motor protection is required.
7. Starting up the product
Do not turn on the power supply until the pump has been
filled with liquid.
7.1 Priming the product
1. Unscrew the priming plug and pour at least 1.7 litres (0.45
gallons) of water into the pump housing.
2. Screw the priming plug on again.
Example:
TM075342
Priming the pump
If the suction depth exceeds 6 m (20 ft), it may be
necessary to prime the pump more than once.
Always tighten priming and drain plugs by hand.
7.2 Starting up the pump
After installing and priming, follow the following steps to start up the
pump.
1. Prime the pump according to the priming instructions.
12
English (GB)