
Install Instructions


9
English (US)
9. User interfaces
Pump settings can be made by means of the following user
interfaces:
Control panel
• Standard control panel.
See section 9.1 Standard control panel.
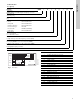
9.1 Standard control panel
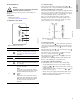
Fig. 11 Standard control panel
9.1.1 Setpoint setting
Set the desired setpoint of the pump by pressing or .
The light fields on the control panel will indicate the setpoint set.
Pump in constant-pressure control mode
The following example applies to a pump in an application where
a pressure sensor gives a feedback to the pump. If the sensor is
retrofitted to the pump, it must be set up manually as the pump
does not automatically register a connected sensor.
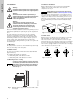
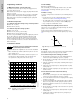
Figure 12 shows that the light fields 5 and 6 are activated,
indicating a desired setpoint of 72.5 psi (5 bar) with a sensor
measuring range from 0 to 145 psi (0 to 10 bar). The setting
range is equal to the sensor measuring range.
Fig. 12 Setpoint set to 72.5 psi (3 bar), constant-pressure
control mode
9.1.2 Start/stop of pump
Stop the pump by pressing . When the pump is stopped, the
"Stop" text next to the button will illuminate. The pump can also
be stopped by continuously pressing
until none of the light
fields are on.
Start the pump by pressing
or by continuously pressing
until the desired setpoint is indicated.
If the pump has been stopped by pressing , it can only be
given free to operation by pressing again.
If the pump has been stopped by pressing , it can only be
restarted by pressing .
The pump can also be stopped with the R100, Grundfos GO
Remote or via a digital input set to "External stop".
9.1.3 Resetting of alarms and warnings
A fault indication can be reset in one of the following ways:
• Via the digital input if it has been set to "Alarm resetting".
• Briefly press or
on the pump. This will not change the
setting of the pump.
A fault indication cannot be reset by pressing or
if the
buttons have been locked.
• Switch off the power supply until the indicator lights are off.
• Switch the external start/stop input off and then on again.
• With the R100/Grundfos GO Remote.
Warning
The product may be so hot that only the buttons
should be touched to avoid burns.
TM05 4848 3512
Pos. Symbol Description
1
Grundfos Eye
Shows the operating status of the pump.
See section 10. Grundfos Eye for further
information.
2 - Light fields for indication of setpoint.
3 Changes the setpoint.
4
Enables radio communication with the
Grundfos GO Remote and other products of
the same type.
5
Makes the pump ready for operation/starts
and stops the pump.
Start:
If the button is pressed when the pump is
stopped, the pump will only start if no other
functions with higher priority have been
enabled.
Stop:
If the button is pressed when the pump is
running, the pump will always be stopped.
When the pump is stopped via this button,
the "Stop" text next to the button will
illuminate.
1
2
3
4
5
Stop
TM06 0692 0214