
User Guide
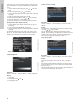
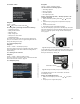
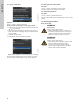
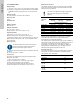
Table Of Contents
- English (US)
- 1. Limited warranty
- 2. General information
- 3. Receiving the product
- 4. Installing the product
- 5. Starting up the product
- 6. Handling and storing the product
- 7. Product introduction
- 8. Control functions
- 9. Setting the product
- 10. Servicing the product
- 11. Fault finding the product
- 12. Technical data
- 13. Accessories
- 14. Disposing of the product
- Français (CA)
- 1. Garantie limitée
- 2. Informations générales
- 3. Réception du produit
- 4. Installation du produit
- 4.1 Lieu d'installation
- 4.2 Outils
- 4.3 Coquilles d'isolation
- 4.4 Installation mécanique
- 4.5 Positionnement du circulateur
- 4.6 Positions du boîtier de commande
- 4.7 Position de la tête du circulateur
- 4.8 Modification de la position du boîtier de commande
- 4.9 Installation électrique
- 4.10 Branchement du câble de l'alimentation électrique
- 5. Démarrage du produit
- 6. Manutention et stockage du produit
- 7. Introduction au produit
- 8. Fonctions de régulation
- 8.1 Aperçu rapide des modes de régulation
- 8.2 Modes de fonctionnement
- 8.3 Modes de régulation
- 8.4 Fonctionnalités supplémentaires pour les modes de régulation
- 8.5 Modes circulateurs multiples
- 8.6 Valeurs de réglage pour les modes de régulation
- 8.7 Précision de l'estimation du débit
- 8.8 Tableau de la précision du débit
- 8.9 Branchements externes
- 8.10 Priorité des réglages
- 8.11 Communication entrée et sortie
- 9. Réglage du produit
- 10. Maintenance du produit
- 11. Détection des défauts de fonctionnement du produit
- 12. Caractéristiques techniques
- 13. Accessoires
- 14. Mise au rebut du produit
- Español (MX)
- 1. Garantía limitada
- 2. Información general
- 3. Recepción del producto
- 4. Instalación del producto
- 5. Puesta en marcha del producto
- 6. Manejo y almacenamiento del producto
- 7. Introducción de producto
- 8. Funciones de control
- 8.1 Breve resumen de los modos de control
- 8.2 Modos de operación
- 8.3 Modos de control
- 8.4 Otras funciones de los modos de control
- 8.5 Modos multibomba
- 8.6 Ajustes de los modos de control
- 8.7 Precisión de la estimación del caudal
- 8.8 Tabla de precisión del caudal
- 8.9 Conexiones externas
- 8.10 Prioridad de los ajustes
- 8.11 Comunicación de entrada y salida
- 9. Ajuste del producto
- 10. Mantenimiento y servicio del producto
- 11. Búsqueda de fallas del producto
- 12. Datos técnicos
- 13. Accesorios
- 14. Eliminación del producto
- Appendix

English (US)
56
9.7.4 "Setup, analog input"
Navigation
"Home" > "Assist" > "Setup, analog input"
Setting, example: Analog input > "Heat energy monitor"
1. To enable the sensor input, select "Heat energy monitor" with
or and press [OK].
2. Follow the step-by-step guide to complete the sensor-input
setup. Start with the unit display, see fig. 64, and end with the
summary display.
3. Check the entered values.
4. Press [OK] to confirm and enable the settings.
Fig. 64 Step by step guide, "Heat energy monitor": Unit display
Learn more about "Heat energy monitor" in section 8.11.5 Heat
energy monitor and "Heat energy" in "Heat energy", page 44.
9.8 "Description of control mode"
Navigation
"Home" > "Assist" > "Description of control mode"
This menu describes the possible control modes.
9.9 "Assisted fault advice"
Navigation
"Home" > "Assist" > "Assisted fault advice"
This menu gives guidance and corrective actions in case of pump
failures.
10. Servicing the product
Before dismantling
Heat energy monitorundef-147
WARNING
Electric shock
Death or serious personal injury
- Make sure that other pumps or sources do not
force flow through the pump even if the pump is
stopped. This will cause the motor to act like a
generator, resulting in voltage on the pump.
WARNING
Electric shock
Death or serious personal injury
- Switch off the power supply for at least 3 minutes
before you start any work on the product.
- Lock the main disconnect switch to the Off
position. Type and requirements as specified in
national, state, and local regulations.