
User Guide
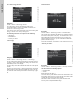

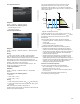
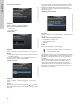
Table Of Contents
- English (US)
- 1. Limited warranty
- 2. General information
- 3. Receiving the product
- 4. Installing the product
- 5. Starting up the product
- 6. Handling and storing the product
- 7. Product introduction
- 8. Control functions
- 9. Setting the product
- 10. Servicing the product
- 11. Fault finding the product
- 12. Technical data
- 13. Accessories
- 14. Disposing of the product
- Français (CA)
- 1. Garantie limitée
- 2. Informations générales
- 3. Réception du produit
- 4. Installation du produit
- 4.1 Lieu d'installation
- 4.2 Outils
- 4.3 Coquilles d'isolation
- 4.4 Installation mécanique
- 4.5 Positionnement du circulateur
- 4.6 Positions du boîtier de commande
- 4.7 Position de la tête du circulateur
- 4.8 Modification de la position du boîtier de commande
- 4.9 Installation électrique
- 4.10 Branchement du câble de l'alimentation électrique
- 5. Démarrage du produit
- 6. Manutention et stockage du produit
- 7. Introduction au produit
- 8. Fonctions de régulation
- 8.1 Aperçu rapide des modes de régulation
- 8.2 Modes de fonctionnement
- 8.3 Modes de régulation
- 8.4 Fonctionnalités supplémentaires pour les modes de régulation
- 8.5 Modes circulateurs multiples
- 8.6 Valeurs de réglage pour les modes de régulation
- 8.7 Précision de l'estimation du débit
- 8.8 Tableau de la précision du débit
- 8.9 Branchements externes
- 8.10 Priorité des réglages
- 8.11 Communication entrée et sortie
- 9. Réglage du produit
- 10. Maintenance du produit
- 11. Détection des défauts de fonctionnement du produit
- 12. Caractéristiques techniques
- 13. Accessoires
- 14. Mise au rebut du produit
- Español (MX)
- 1. Garantía limitada
- 2. Información general
- 3. Recepción del producto
- 4. Instalación del producto
- 5. Puesta en marcha del producto
- 6. Manejo y almacenamiento del producto
- 7. Introducción de producto
- 8. Funciones de control
- 8.1 Breve resumen de los modos de control
- 8.2 Modos de operación
- 8.3 Modos de control
- 8.4 Otras funciones de los modos de control
- 8.5 Modos multibomba
- 8.6 Ajustes de los modos de control
- 8.7 Precisión de la estimación del caudal
- 8.8 Tabla de precisión del caudal
- 8.9 Conexiones externas
- 8.10 Prioridad de los ajustes
- 8.11 Comunicación de entrada y salida
- 9. Ajuste del producto
- 10. Mantenimiento y servicio del producto
- 11. Búsqueda de fallas del producto
- 12. Datos técnicos
- 13. Accesorios
- 14. Eliminación del producto
- Appendix

47
English (US)
Guidelines for setting of PI controller
For most applications, the factory setting of the controller
constants, gain and integral time, ensures optimum pump
operation. However, in some applications an adjustment of the
controller may be required.
You find the setpoint displayed in figures 58 and 59. For further
information about setup, see the "Assist" menu in section
9.7.1 "Assisted pump setup".
Fig. 58 "Controller gain Kp"
Fig. 59 "Control. integr. action time Ti"
Proceed as follows:
1. Increase the gain until the motor becomes unstable. Instability
can be seen by observing if the measured value starts to
fluctuate. Furthermore, instability is audible as the motor
starts hunting up and down.
Some systems, such as temperature controls, are
slow-reacting, meaning that it may be several minutes before
the motor becomes unstable.
2. Set the gain to half the value of the value which made the
motor unstable.
3. Reduce the integral time until the motor becomes unstable.
4. Set the integral time to twice the value which made the motor
unstable.
Rules of thumb
If the controller is too slow-reacting, increase the gain.
If the controller is hunting or unstable, dampen the system by
reducing the gain or increasing the integral time.
Change the control settings by means of the display or Grundfos
GO. You can set both positive and negative values.
9.6.5 "FLOWLIMIT"
Navigation
"Home" > "Settings" > "FLOWLIMIT"
This menu offers the following options:
• Enable FLOWLIMIT function
• Set FLOWLIMIT.
Setting
1. To enable the function, select "Enable FLOWLIMIT function"
with or and press [OK].
2. To set the FLOW
LIMIT
, press [OK].
3. Select digit with and and adjust with or .
4. Press [OK] to save.
You can combine the FLOW
LIMIT
function with the following
control modes:
• Prop. press.
• Const. press.
• Const. temp.
• Constant curve.
For more information about FLOW
LIMIT
, see section
8.4.1 FLOW
LIMIT
.
"Automatic Night Setback"
Navigation
"Home" > "Settings" > "Automatic Night Setback"
Setting
To enable the function, select "Active" with or and press
[OK].
For more information about Automatic Night Setback, see section
8.4.2 Automatic night setback.
undef-079undef-080
3.1.5.0.0.0 FLOW
LIMIT
3.1.6.0.0.0 Automatic Night Setback