
Install Instructions

Operating/Service Instructions
Turn DIV handle clockwise 90° so that it is at a right angle to piping to close valve for
pump servicing.
As part of annual system maintenance, always inspect DIV for corrosion or the presence of
leaks. Replace DIV if either symptom is present. High temperature and high pressure fluids
are hazardous. Relieve system pressure and ensure that system temperature is below
100°F (38°C) before servicing. Install only with flatgaskets like the ones included in this kit.
Discard any other gaskets supplied with pump. To insure that the DIV will work correctly,
make sure the provided white dielectric sleeve is inserted properly (see figure 1). It must
not be removed.
Being responsible is our foundation
Thinking ahead makes it possible
Innovation is the essence
U.S.A.
Grundfos Pumps Corporation
17100 W. 118th Terrace
Olathe, KS 66061
Telephone (913) 227-3400
Fax: (913) 227-3500
www.grundfos.com
Canada
Grundfos Canada, Inc.
2941 Brighton Road
Oakville, Ontario L6H 6C9, Canada
Telephone: (905) 829-9533
Fax: (905) 829-9512
Mexico
Bombas Grundfos de Mexico, S.A. de C.V.
Boulevard TLC #15, Parque Stiva Aeropuerto
C.P. 66600 Apodaca, N.L. Mexico
Telephone: 52-81-8144-4000
Fax: 52-81-8144-4010
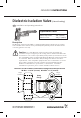
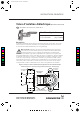
Included Hardware
(4) bolts, (4) nuts, (2) flat gaskets.
Dielectric Sleeve
Flat gasket
Dielectric Isolation
Valve (DIV)
Fig. 1
L-ACS-TL-01 9/06
PRINTED IN CHINA
Caution: Teflon tape or pipe compounds containing teflon greatly reduce
thread friction. Use care not to over tighten threaded connections to prevent
breakage.
For sweat connections:
1. Clean all oxidation and foreign material from tubing using emery cloth.
2. Apply flux to tubing and push DIV onto tubing in desired position.
3. Wrap DIV with a wet rag to prevent over-heating of valve.
4. Heat tubing and DIV with a torch only to temperature required to make solder flow.
5. Allow sweated joint to cool.
6. Mount pump to flange using the provided flat gasket and hardware.
7. Check system for leaks.
Caution: Excessive heat will damage the DIV.
Use soft solder (low temp) only. Valve is not intended to be brazed.
Installation Instructions
Install one DIV on both the suction and discharge ports of the pump.
For threaded connections:
1. Apply pipe compound or thread tape to male threads.
2. Thread DIV onto treated threads and tighten.
3. Mount pump to flange using the provided flat gasket and hardware.
4. Check the system for leaks.