
Installation and Operating Instructions


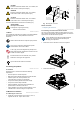
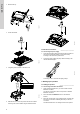
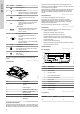
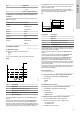
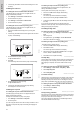
Table Of Contents
- English (GB)
- 1. General information
- 2. Installing the product
- 3. Starting up the product
- 4. Product introduction
- 5. Control functions
- 5.1 Application types
- 5.2 Setting the sensor type
- 5.3 Setting the start level
- 5.4 Setting the stop level
- 5.5 Setting the high level
- 5.6 Stop delay
- 5.7 Power-on delay
- 5.8 Dry-running protection
- 5.9 Using the same level switch for the start and stop level
- 5.10 "Multipump settings"
- 5.11 "Antiseizing"
- 5.12 Signal detection time
- 5.13 Setting the maximum number of restarts with Grundfos GO Remote
- 5.14 Motor protection
- 5.15 Alarm reset
- 5.16 Setting the buzzer with Grundfos GO Remote
- 5.17 Setting units for Grundfos GO Remote
- 5.18 Setting units for the operating panel with Grundfos GO Remote
- 5.19 GENIbus
- 5.20 Security
- 5.21 Starting the startup wizard with the operating panel
- 6. Operating the product
- 7. Servicing the product
- 8. Fault finding the product
- 8.1 Overview of alarm and warning codes
- 8.2 Code 2 (Power phase missing)
- 8.3 Code 4 (Too many motor restarts)
- 8.4 Code 9 (Power phase sequence wrong)
- 8.5 Code 12 (Service needed)
- 8.6 Code 22 (Moisture in motor of pump)
- 8.7 Code 25 (Wrong configuration)
- 8.8 Code 48 (Motor is overloaded)
- 8.9 Code 57 (Missing water in the application)
- 8.10 Code 69 (Winding temperature too high)
- 8.11 Code 84 (Memory storage media faulty)
- 8.12 Code 117 (Door opened)
- 8.13 Code 159 (Communication error CIMxxx)
- 8.14 Code 165 (Signal fault)
- 8.15 Code 191 (High water level)
- 8.16 Code 205 (Level switch inconsistency)
- 8.17 Code 225 (Communication error pump module)
- 8.18 Code 226 (Communication error IO module)
- 8.19 Code 229 (Water on floor)
- 9. Technical data
- 10. Disposing of the product

3. Break off the tap.
TM071977
4. Fit the CIM module.
TM071907
5. If supplied, place the labels on the back cover.
Type:
Kit Funct. module - Geni/RS485Op
0538
9854
CIM XXX
CIM XXX
96824795
V01
Prod. No.
Version
Serial No.
P. C.
TM071908
6. Refit the back cover to the CU product and secure it with the
mounting screw. Secure cables using the cable tie holders.
TM071909
2.3 Electrical connections
STATUS-NOT-SET | Connecting-the-power-supply-(ta)-VwbLbnE.dita
2.3.1 Connecting the power supply
1. Check that the supply voltage corresponds with the needed 24
VDC and ensure that the polarity is connected correctly
according to the label on the product itself.
2. Connect the power cables and pump cables according to the
relevant electrical diagram.
TM070570
Connecting a wire to a terminal with spring clamps
3. Starting up the product
3.1 Setting the product
STATUS-NOT-SET | Connecting-to-Grundfos-GO-Remote-(ta)--Zrs6BU.dita
3.1.1 Connecting to Grundfos GO Remote
1. Open Grundfos GO Remote on your device. Make sure that
Bluetooth is enabled.
Your device must be within reach of the product to establish
Bluetooth connection.
2. Press the Bluetooth CONNECT button on Grundfos GO
Remote.
3. Press the connect button on the operating panel. The blue LED
above the connect button is flashing blue until your device is
connected.
Grundfos GO Remote is now loading the data for the product.
6
English (GB)