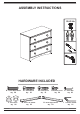
ASSEMBLY INSTRUCTIONS 00:45 Hs HARDWARE INCLUDED A - 8,0x25 Wood Dowel Qty. 26 F - Door Knob Qty. 06 B - 4,0x30 Screw Qty. 30 G - Slide Left 350mm Qty. 03 C - 3,5x30 Screw Qty. 12 D - 3,5x14 Screw Qty. 24 H - Slide Right 350mm Qty. 03 E - 10x10 Nail Qty. 22 I - H Profile 670mm Qty.
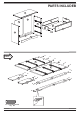
PARTS INCLUDEB 01 08 06 11 06 02 10 09 07 3x 03 05 04 A STEP 1 A A A 03 A A 02 A A A A A A 09 A 05 3x 08 A 3x A 04 A A A A - 8,0x25 Wood Dowel Qty.
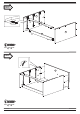
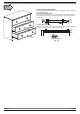
STEP 2 03 B B BB 04 B B 02 05 B B B - 4,0x30 Screw Qty. 06 STEP 3 B B B B B - 4,0x30 Screw Qty.
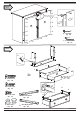
STEP 4 E E E E E E I E E E I E 06 E E 06 E E E E E - 10x10 Nail Qty. 22 E E E E E E I - H Profile 670mm Qty. 01 E E STEP 5 08 B B 09 B B 07 F C B F C B 3x 10 C B - 4,0x30 Screw Qty. 18 11 C D C - 3,5x30 Screw Qty. 12 D D G D - 3,5x14 Screw Qty. 12 D G - Slide Left 350mm Qty. 03 D H F - Door Knob Qty. 06 H - Slide Right 350mm Qty.
STEP 6 Drawer Glide Adjustments: The metal drawer glides are designed to allow for slight adjustments vertically and horizontally, if necessary. Horizontal Glide Adjustment: Remove drawer from chest. Loosen screws indicated on side of metal track. Make needed space adjustment and re-tighten screws and add 2 additional screws in holes as indicted in diagram below: Vertical Glide Adjustment: Remove drawer from chest. Loosen Screws on underside of metal track.