
Instructions / Assembly

www.gronomics.com East Bethel, MN USA 763-753-7374
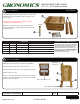
Place the two remaining cooler legs (Item 2) onto the cedar cooler, make
sure the cooler legs are fl ush with the top of the cedar cooler.
Hold cooler legs tight too the cedar cooler sides and install six #8 x
1-1/2” screws through the cedar cooler walls and into the each cooler leg
(see step 3 for screw installation).
NOTE: Install screws within 1/2” to 3/4” from cedar cooler walls.
NOTE. Once the cooler legs are secured, re-install the shock absorber
onto the mount and install clip.
Close the cedar cooler cover.
Cooler Leg Assembly (Continued)
5
2
2
Legs Flush
With Top Of
Cedar Cooler
Stand the cedar cooler upright onto the coolers legs.
With the two screws provided with the bottle opener, install the bottle
opener (Item 3) as shown, approximately 2” down from the cedar cooler
cover.
NOTE: The bottle opener can be installed on the left or right side.
Re-install the plastic cooler into the cedar cooler, make sure the handles
on the plastic cooler are in the down position.
Bottle Opener Installation
6
3
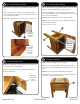
Make sure the cooler legs (Item 2) are fl ush with the top of the cedar
cooler.
Hold cooler legs tight too the cedar cooler sides and install six #8 x
1-1/2” screws (Item 4) through the cedar cooler walls and into the each
cooler leg at the shown locations.
NOTE: Install screws within 1/2” to 3/4” from cedar cooler wall corners.
Cooler Leg Assembly (Continued)
3
2
4
4
Legs (Item 2)
Flush With
Top Of Cedar
Cooler
Install Screws
(Item 4) Within
1/2” to 3/4”
From Cedar
Cooler Wall
Corners
NOTE: The shock absorber can be disconnected from the cedar cooler
cover to aid in ease of screw installation.
Remove the clip from the shock absorber and disconnect the shock
absorber from the mount.
Shock Absorber Disconnect
4
Remove Clip
To Disconnect
Shock
Absorber