MODEL G1079R DRUM SANDER WITH RUBBER CONVEYOR MANUAL INSERT Why a Manual Insert? The Model G1079R is very similar to the Model G1079 except that the G1079R includes a heavy-duty rubber conveyor belt typically found on wide-belt sanders. Besides the parts breakdown and machine data sheet, the information in the Model G1066/G1066Z/G1079 manual is the same for the Model G1079R. This insert is intended to be used WITH the Model G1066/G1066Z/G1079 manual, not as a replacement for it.
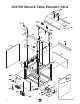
G1079R Stand & Table Elevation Parts ��� ������ �� ��� �� �� �� ��� �� ��� �� �� �� � �� �� �� � ��� �� �� -2- G1079R Drum Sander
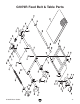
G1079R Feed Belt & Table Parts G1079R Drum Sander -3-
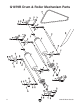
G1079R Drum & Roller Mechanism Parts -4- G1079R Drum Sander
Parts List REF PART # DESCRIPTION REF PART # DESCRIPTION 1 2 3 4 5 6 7 8 8A 9 10 11 12 13 14 15 16 17 18 19 20 21 22 23 24 25 26 27 28 29 30 31 32 33 34 35 36 37 38 39 40 41 42 43 44 45 46 47 FRAME HEX NUT 3/8-16 FLAT WASHER 3/8 SIDE PANEL BUSHING SPROCKET SPROCKET TABLE SCREW 3/4-16 TABLE SCREW SHIM 1/2 X 27 X 1 CHAIN FRONT BRACE SET SCREW 1/4-20 X 1/2 COMPLETE CRANK HANDLE ASSY DUST PORT HOOD REAR BRACE REAR PANEL SET SCREW 1/4-20 X 1/2 MOTOR PULLEY KEY 1/4 X 1/4 X 3 MOTOR, 2 HP HEX NUT 3/8-16 HEX BO
������������� ����� ������������������������������������������������������������������������������������������ ������������ ��������������������������������� ������������������� � � � ����������������������������������������������������������������������������������������������������������������������������������������������������������������������������� ��������������������������������������������������������������������������������������������������������������������������������������������������������
�������������������� � ��������������������� � � � � � � � � � � � � ������������������������������������������������������������������������������������������������������������������������������������������������������ � ����������������������������������������������������������������������������������������������������������������������������������������������� ��������� �������������������������������������������������������������������������������������������������������������������������������������
DRUM SANDER MODEL G1066/G1066Z/G1079 INSTRUCTION MANUAL Model G1066 Model G1066Z COPYRIGHT © MAY, 2002 BY GRIZZLY INDUSTRIAL, INC. WARNING: NO PORTION OF THIS MANUAL MAY BE REPRODUCED IN ANY SHAPE OR FORM WITHOUT THE WRITTEN APPROVAL OF GRIZZLY INDUSTRIAL, INC. THE INFORMATION IN THIS MANUAL REPRESENTS THE CONFIGURATION OF THE MACHINE AS IT IS CURRENTLY BEING SHIPPED. THE MACHINE CONFIGURATION CAN CHANGE AS PRODUCT IMPROVEMENTS ARE INCORPORATED.
WARNING Some dust created by power sanding, sawing, grinding, drilling, and other construction activities contains chemicals known to the State of California to cause cancer, birth defects or other reproductive harm. Some examples of these chemicals are: • Lead from lead-based paints. • Crystalline silica from bricks, cement, and other masonry products. • Arsenic and chromium from chemically treated lumber. Your risk from these exposures varies, depending on how often you do this type of work.
Table Of Contents 1. 2. 3. 4. 5. 6. 7. 8. PAGE SAFETY SAFETY RULES FOR POWER TOOLS ............................................................................2-3 SAFETY RULES FOR THE DRUM SANDER ......................................................................4 CIRCUIT REQUIREMENTS 220V OPERATION ................................................................................................................5 FUSING................................................................................
SECTION 1: SAFETY For Your Own Safety Read Instruction Manual Before Operating This Equipment The purpose of safety symbols is to attract your attention to possible hazardous conditions. This manual uses a series of symbols and signal words which are intended to convey the level of importance of the safety messages. The progression of symbols is described below. Remember that safety messages by themselves do not eliminate danger and are not a substitute for proper accident prevention measures.
Safety Instructions For Power Tools 9. USE PROPER EXTENSION CORD. Make sure your extension cord is in good condition. Conductor size should be in accordance with the chart below. The amperage rating should be listed on the motor or tool nameplate. An undersized cord will cause a drop in line voltage resulting in loss of power and overheating. Your extension cord must also contain a ground wire and plug pin. Always repair or replace extension cords if they become damaged.
Additional Safety Instructions For The Drum Sander • DO NOT allow anyone to stand at the outfeed end when feeding your stock. • NEVER leave the machine running unattended. • DO NOT jam workpiece into the machine during operation. Firmly grasp the workpiece in both hands and ease it into the machine using light pressure. • NEVER operate the sander without an adequate dust collection system in place and running. • • DO NOT wear loose clothing while operating this machine.
SECTION 2: CIRCUIT REQUIREMENTS 220V Single-Phase Grounding The Model G1066/G1066Z/G1079 features 220V single-phase motors. The G1066/G1066Z 5 HP motor will safely draw about 25 amps under load. The G1079 2 HP drum motor requires 12 amps for safe operation. All sanders feature 1/4 HP feed motors that draw approx. 3 amps under load. In the event of an electrical short, grounding reduces the risk of electric shock by providing a path of least resistance to disperse electric current.
Extension Cords Wiring Diagram We do not recommend the use of extension cords on 220V equipment. It is much better to arrange the placement of your equipment and the installed wiring to eliminate the need for extension cords. Should it be necessary to use an extension make sure the cord is rated Hard Service (grade S) or better. Refer to the chart in Section 1: Safety to determine the minimum gauge for the extension cord. The extension cord must also contain a ground wire and plug pin.
SECTION 3: GENERAL INFORMATION Commentary Most important, we stand behind our machines. If you have any service questions or parts requests, please call or write us at the location listed below. We are proud to offer the Grizzly Model G1066/G1066Z/G1079 Drum Sander. Your machine is part of a growing Grizzly family of fine woodworking machinery.
Unpacking Piece Inventory The Model G1066/G1066Z/G1079 Drum Sander is shipped from the manufacturer in a carefully packed carton. If you discover your machine is damaged after you have signed for delivery, and the truck and driver are gone, you will need to file a freight claim with the carrier. Save the containers and all packing materials for possible inspection by the carrier or its agent. Without the packing materials, filing a freight claim can be difficult.
Hardware Recognition Chart ⁄ '' 58 10 # WASH Button Head Screw Flange Bolt ⁄ '' 7 16 21⁄2'' 23⁄4'' 3 WASH S WA H ASH DIA ER 8mm ASH W ASHE 6mm DI ER ASH ASHE R DIA ⁄ '' 14 D ER I ASH 21⁄4'' ⁄ '' 5 16 ET AM LINES ARE 1⁄16'' INCH APART LINES ARE 1MM APART 2 10mm R DIA ET AM 13⁄4'' 4mm MET G1066/G1066Z/G1079 Drum Sander 11⁄2'' D ER IA TE ME R 16mm ⁄ '' ⁄ '' ⁄ '' ⁄ '' ⁄ '' 1'' 11⁄4'' 5 16 7 16 9 16 34 78 MET 12mm '' '' '' '' ⁄ '' 38 METE 10mm ⁄ ⁄ ⁄ ⁄ 14 38 12
Clean Up The unpainted surfaces are coated with a waxy oil to protect them from corrosion during shipment. Remove this protective coating with a solvent cleaner or citrus-based degreaser such as Grizzly’s G7895 Degreaser. To clean thoroughly, some parts may need to be removed. Avoid chlorine-based solvents as they may damage painted surfaces should they come in contact. Always follow the manufacturer’s instructions when using any type of cleaning product.
SECTION 4: ASSEMBLY Beginning Assembly Dust Ports Most of your new drum sander has been assembled at the factory, but some parts must be assembled or installed after delivery. We have organized the assembly process into steps. Please follow along in the order presented in this section. The Model G1066/G1079 Drum Sander comes equipped with two 4'' dust ports as shown in Figure 2. Apply double sided tape between the plastic dust ports and the sheet metal cover, then secure in place with sheet metal screws.
Crank Handle G1066Z Control Panel The crank handle is normally installed on the front right lead screw shaft, and is held in place with two setscrews already threaded into the handle, as shown in Figure 3. The crank handle can be installed on the right or left side of the machine to maximize operator comfort and convenience. To mount the control panel to the base unit on the Model G1066Z: 1. Match the holes in the control arm mounting plate to the threaded holes on the side of the the sander. 2.
SECTION 5: ADJUSTMENTS Keep loose clothing out of the way of machinery and keep hair pulled back. Disconnect power to the machine when performing any adjustments or maintenance. Failure to do this may result in serious personal injury. Wear safety glasses during the entire adjustment process. Failure to comply may result in serious personal injury. Figure 6. Sanding drum parallel to feed belt. In order to make the above adjustments, it is necessary to know how to adjust the bearing blocks.
3. Tighten the lock nuts and recheck the alignment using the same hardwood block. Tightening the lock nuts will pull the drum downward slightly. Be sure to adjust to compensate for this movement. Do not over tighten the lock nuts. The bearing blocks can break if over tightened. 4. For Models G1066/G1079 repeat steps 1-3 for the other drum. Tighten the lock nuts. Model G1066Z has micro-adjustment knobs on the sides of the machine for rear drum adjustments. See Figure 9.
5. Stop and mark the location of the table elevation handle with a felt pen or piece of tape. In the same manner, mark the height of the table in relation to the body of the sander. Both of these marks will indicate this exact table position (we will refer to it as reference height #1). Having reference height #1 marked is crucial to all subsequent steps. 6. Lower the table exactly 2 turns.
Pressure Rollers The spring tension of the pressure rollers can be adjusted to reduce snipe. (Note: roller pressure is also affected by the drum height.) To provide increased operator control, the Model G1066Z features height adjustment controls for the feed roller. These controls are located on the underside of the roller pressure spring controls and consist of a hex bolt and jamnut setup, exactly like the roller pressure spring tension controls.
Dust Scoop V-Belt The Model G1066/G1079 is equipped with a dust scoop located next to the rear sanding drum. The Model G1066Z features a dust scoop for each drum. Dust scoops reduce the amount of dust that accumulates on the workpiece as it travels through the sander. Dust scoops are adjustable and should be set approximately 1⁄32'' above the bottom of the rear drum for optimum effectiveness. The sanding drums are driven by two V-Belts on the Models G1066 & G1066Z and one V-Belt on the Model G1079.
Paper Replacement G1066/G1079 4. Unwind the old sandpaper and use it as a pattern or use the pattern in Figure 14 to cut a piece of 6" wide sandpaper of the desired grit. It is necessary to cut a triangular portion of the paper away at each end. The Model G1066/G1079 is designed for 6" wide sandpaper rolls. The outfeed sanding drum is wrapped in felt to slightly increase the drum diameter and to provide a smooth sanded surface.
8. Hold the loose end against the right side of the contact drum and wrap with duct tape to secure. Double-check the drum to make sure there are no bubbles or overlapping edges and your gapping is correct. 9. Repeat steps 1-6 for the other drum. Paper Replacement G1066Z The Model G1066Z is designed for 3" wide hook and loop sandpaper rolls. 10. Mount the hood and reconnect the flex-hose to the dust collection ports. To change sandpaper on the G1066Z: Important Tips For Changing Sandpaper 1.
Dust Collection The dust collection ports are located on the top of the sanding head cover and each measures 4" in diameter. It will be necessary to attach 4" dust collection pipes over these ports. Flex-hose is recommended because it will ease removal of the sanding head cover when paper changes and adjustments are necessary. Grizzly offers 4" flexhose to connect this machine to a dust collection system. The flex-hose easily attaches with a 4" hose clamp.
Conveyor Belt The conveyor belt tension and tracking adjustments are controlled by the adjustment bolts located at each end of the front and rear conveyor rollers. If the conveyor belt is too loose or tracks off to one side, adjust as follows: 1. If the conveyor belt is slipping, turn both infeed adjustment bolts counter-clockwise. See Figure 16. 2. If the conveyor belt tracks toward the right side, turn the adjustment bolt located at the infeed right corner.
SECTION 6: OPERATIONS G1066Z Control Panel Keep loose clothing out of the way of machinery and keep hair pulled back. Disconnect power to the machine when performing any adjustments or maintenance. Failure to do this may result in serious personal injury. Before plugging in the Model G1066Z familiarize yourself with the control panel.
Test Run G1066/G1079 Once the assembly is complete and the adjustments are done to your satisfaction, you are ready to test the machine. Your new Model G1066/G1079 Drum Sander is a relatively simple piece of equipment to set up and run. Under most sanding conditions, a normal cut is no more than 1⁄64". This depth can be achieved by approximately 1⁄4 turn of the table height handle. Attempts to remove too much can cause jamming, wood burning, rapid paper wear or tearing, poor finish and belt slippage.
G1066Z Your new Model G1066Z Drum Sander provides a great amount of operator control during operation. To utilize this control, you should be familiar with the variable speed and the load meter before using the drum sander. Variable Speed The variable speed dial located on the control panel allows you to increase the feed rate from 020 FPM. The correct speed to use depends on the type of stock you are using (hardwood vs. softwood) and the stage of finish you are at with that stock.
Hook & Loop Sandpaper Although hook & loop sandpaper is convenient and easy to install, care must be taken not to overload it while sanding by taking excessively heavy cuts. Excessively heavy cuts will cause the underlying hooks and loops to slightly depress and deform under the sandpaper, resulting in small surface grooves and ridges on all subsequently sanded pieces.
SECTION 7: MAINTENANCE Lubrication Disconnect power to the machine when performing any adjustments or maintenance. Failure to do this may result in serious personal injury. General Make a habit of inspecting your Model G1066/G1066Z/G1079 each time you use it. Check for the following conditions and repair or replace when necessary. • Loose mounting bolts. • Worn switch. • Worn or damaged cords and plugs. • Damaged V-belt. • Any other condition that could hamper the safe operation of this machine.
Bearing Replacement The tools necessary for this job are a large round shaft screwdriver and a bench vise. Replace bearing as follows: 1. Remove the roller housing from the drum sander and clamp it tightly in a bench vise. 2. Insert the screwdriver into the center hole of the bearing as shown in Figure 18. Lever the bearing until it turns perpendicular to the housing. Once the bearing is turned 90° from the housing, it should slide free with little effort.
SECTION 8: CLOSURE The following pages contain general machine data, parts diagrams/lists, troubleshooting guide and Warranty/Return information for your Model G1066/G1066Z/G1079 Drum Sanders. If you need parts or help in assembling your machine, or if you need operational information, we encourage you to call our Service Department. Our trained service technicians will be glad to help you.
MACHINE DATA SHEET Customer Service #: (570) 326-3806 • To Order Call: (800) 523-4777 • Fax #: (800) 438-5901 MODEL G1066 DRUM SANDER Design Type ......................................................................................................Floor Model Overall Dimensions: Height ......................................................................................................................43" Width.................................................................................................
G1066 STAND & TABLE ELEVATION -30- G1066/G1066Z/G1079 Drum Sander
G1066 FEED BELT & TABLE G1066/G1066Z/G1079 Drum Sander -31-
G1066 DRUM & ROLLER MECHANISM -32- G1066/G1066Z/G1079 Drum Sander
G1066 PARTS LIST REF 01 02 03 04 05 06 07 08-1 08A 09 10 11A 12 13 14 15 16 17 18 19 20 22 23 24 29 30 31 32 33 34 35A 36 37 38 39 40 41 42 43 44 45 46 47 48 49 50 51 53 58 59 60 PART # DESCRIPTION P1066001 PN08 PW02 P1066004 P1066005 P1066006 P1066007 P1066008-1 P1066008A P1066009 P1066010 PSS28 P1066012 G1838 P1066014 P1066015 P1066016 PSS07 P1066018 PK02 P1066020 PB21 P1066023 PW02 PHTEK1 P1066030 FRAME HEX NUT 3⁄8"-16 WASHER 3⁄8" SIDE PANEL BUSHING SPROCKET SPROCKET TABLE LEAD SCREW SHIM ELEVATION
-34- G1066/G1066Z/G1079 Drum Sander
MACHINE DATA SHEET Customer Service #: (570) 546-9663 • To Order Call: (800) 523-4777 • Fax #: (800) 438-5901 MODEL G1066Z DRUM SANDER W/VARIABLE SPEED CONVEYOR Design Type ......................................................................................................Floor Model Overall Dimensions: Height ..................................................................................................................441⁄2" Width ......................................................................
G1066Z -36- G1066/G1066Z/G1079 Drum Sander
G1066Z G1066/G1066Z/G1079 Drum Sander -37-
G1066Z -38- G1066/G1066Z/G1079 Drum Sander
REF PART # 1 2 3 4 4A 5 6 7 8 8A 9 10 11 12 13 13A 14 15 16 17 18 19 20 21 22 23 24 26 27 28 29 30 31 31A 31B 32 33 34 35 36 37 38 39 40 41 42 43 44 45 46 47 48 P1066001 PN08 PW02 P1066Z004 P1066Z004A PW01 P1066006 P1066007 P1066008 PW01 P1066009 P1066010 PSS02 P1066012 P1066013 P1066Z013A P1066Z014 P1066015 P1066Z016 PSS07 P1066018 PK23M P1066Z020 PN08 PB18 P1066023 PW02 PW02 PN08 P1066Z028 PHTEK7 P1066Z030 DESCRIPTION FRAME HEX NUT 3⁄8"-16 FLAT WASHER 3⁄8" SIDE PANEL SIDE PANEL FLAT WASHER 1⁄2" SPROC
REF PART # 137 138 139 140 141A 141B 143 144 145 146 147 201 201A 202 202A 204 206 207 212 214 216 217 218 219 220 221 222 223 224 225 226 227 228 229 230 231 232 233 234 235 236 237 238 239 240 241 PS06 PN04M PHTEK8 PW03 PLABEL-22 PLABEL-17 P1066Z143 PLABEL-11 PLABEL-13 PLABEL-14 PLABEL-22 P1066Z201 P1066Z201A P1066Z202 P1066Z202A P1066Z204 P1066Z206 P1066Z207 P1066Z212 P1066Z214 P1066Z216 P1066Z217 P1066Z218 P1066Z219 P1066Z220 P1066Z221 P1066Z222 P1066Z223 P1066Z224 P1066Z225 P1066Z226 P1066Z227 P1066
G1066/G1066Z/G1079 Drum Sander -41-
MACHINE DATA SHEET Customer Service #: (570) 326-3806 • To Order Call: (800) 523-4777 • Fax #: (800) 438-5901 MODEL G1079 16" DRUM SANDER Design Type ......................................................................................................Floor Model Overall Dimensions: Width ........................................................................................................................27" Height ..........................................................................................
G1079 STAND & TABLE ELEVATION G1066/G1066Z/G1079 Drum Sander -43-
G1079 FEED BELT & TABLE -44- G1066/G1066Z/G1079 Drum Sander
G1079 DRUM & ROLLER MECHANISM G1066/G1066Z/G1079 Drum Sander -45-
G1079 PARTS LIST REF 01 02 03 04 05 06 07 08 08A 09 10 11 12 13 14 15 16 17 18 19 20 21 22 23 24 25 26 27 28 29 30 31 32 33 34 35 36 37 38 39 40 41 42 43 44 45 46 47 48 -46- PART # P1079001 PN08 PW02 P1079004 P1066005 P1066006 P1066007 P1079008 P1066008A P1079009 P1079010 PSS28 P1066012 G1838 P1079014 P1079015 P1079016 PSS08 P1079018 PK12M P1079020 PN08 PB21 PB05 PW02 PN05 P1066115 P1079027 PN14 PHTEK1 PS24 DESCRIPTION FRAME HEX NUT 3⁄8"-16 WASHER 3⁄8" SIDE PANEL BUSHING SPROCKET SPROCKET W/SHAFT TABL
G1066/G1066Z/G1079 Drum Sander -47-
TROUBLESHOOTING GUIDE PROBLEM SOLUTION Sanding Paper Clogs Too Quickly PAM® cooking spray applied to the sandpaper will reduce clogging and improve the effectiveness of cleaning sticks. 1. 2. 3. 4. 5. 6. 7. Sanding paper grit too fine Too much material is removed at once Dirty board surface Insufficient dust collection Stock is too oily Board contains too much moisture Sandpaper worn out Sandpaper tearing 1. 2. 3. 4. 5.
Maintenance Notes Date Approximate Hours Of Use G1066/G1066Z/G1079 Drum Sander Maintenance Performed -49-
WARRANTY AND RETURNS Grizzly Industrial, Inc. warrants every product it sells for a period of 1 year to the original purchaser from the date of purchase. This warranty does not apply to defects due directly or indirectly to misuse, abuse, negligence, accidents, repairs or alterations or lack of maintenance.
WARRANTY CARD Name ____________________________________________________________________________________ Street ____________________________________________________________________________________ City ______________________________________________________________State________Zip_________ Phone Number_______________________E-Mail_______________________FAX________________________ MODEL #____________________Serial#_______________________Order#_____________________________ The following information is given on
FOLD ALONG DOTTED LINE Place Stamp Here GRIZZLY INDUSTRIAL, INC. P.O.