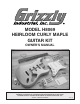
MODEL H8069 HEIRLOOM CURLY MAPLE GUITAR KIT OWNER'S Manual Copyright © december, 2006 By Grizzly Industrial, Inc. Revised OCTOBER, 2013 (BL) Warning: No portion of this manual may be reproduced in any shape Or form without the written approval of Grizzly Industrial, inc. #BL8551 printed in KOREA V1.10.
Some dust created by power sanding, sawing, grinding, drilling, and other construction activities contains chemicals known to the State of California to cause cancer, birth defects or other reproductive harm. Some examples of these chemicals are: • • • Lead from lead-based paints. Crystalline silica from bricks, cement and other masonry products. Arsenic and chromium from chemically-treated lumber. Your risk from these exposures varies, depending on how often you do this type of work.
Table of Contents SECTION 1: SAFETY........................................................................................................................ 2 SECTION 2: INTRODUCTION.......................................................................................................... 3 Foreword..................................................................................................................................... 3 Contact Info..................................................................
SECTION 1: SAFETY Always wear safety glasses or goggles when operating equipment. Everyday glasses or reading glasses are not safety glasses. Be certain the safety glasses you wear meet the appropriate standards of the American National Standards Institute (ANSI). Because there are various ways to cut and join wood, you can make substitutions for the methods stated in this plan. We try to suggest the easiest methods possible. However, only you know your skills with each piece of machinery.
SECTION 2: INTRODUCTION Foreword Contact Info We are proud to offer the Model H8069 Heirloom Curly Maple Guitar Kit. This kit is part of a growing Grizzly family of fine woodworking products. When assembled according to the guidelines set forth in this manual, you can expect years of enjoyment from your guitar. If you have any comments regarding this manual, please write to us at the address below: We are pleased to provide this manual for the Model H8069.
SECTION 3: PARTS INVENTORY Parts & Inventory 1 REF PART# DESCRIPTION 1 2 3 4 5 6 7 8 9 10 11 12 13 14 15 16 17 18 19 20 21 22 23 24 25 26 27 28 PH8069001 PH8069002 PH8069003 PH8069004 PH8069005 PH8069006 PH8069007 PH8069008 PH8069009 PH8069010 PH8069011 PH8069012 PH8069013 PH8069014 PH8069015 PH8069016 PH8069017 PH8069018 PH8069019 PH8069020 PH8069021 PH8069022 PH8069023 PH8069024 PAW04M PAW01.
Supplies/Tools Most wood components in this kit are fully machined at the factory and are ready for assembly. A small amount of sanding and finishing is needed to complete your guitar.
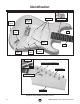
Identification Pickups Tremolo Bridge Strap Button Neck Pocket Audio Jack Fret Volume Knob Tremolo Arm Tone Knobs Neck Five-Way Switch Figure 4. Model H8069 controls. String Slot Tuner or Tuning Machine Nut Tuning Post String Retainers Headstock Figure 5. Model H8069 headstock features.
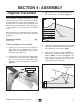
SECTION 4: ASSEMBLY Peghole Placement 3. The headstock is rough machined to fit all six tuners on one side. These instructions will guide you through the placement of the pegholes. The pegholes must be drilled slightly undersized so that the bushings will be tight. Correct placement of the pegholes will make the tuner installation easier. 113⁄16 A We recommend you read through the assembly section to gain an overview of the process before beginning. 1. 2.
6. Shaping Headstock Space the centers of the remaining pegholes ⁄16" apart, as shown in Figure 7, and 1/2" from the edge of the headstock. 15 15 ⁄16 " 15 ⁄16 " 15 ⁄16 " After you have drilled the tuner holes, you can cut the unfinished headstock to your own design. 15 ⁄16 " 15 ⁄16 " Components Needed Qty Guitar Neck........................................................ 1 To shape the headstock: Figure 9. Peghole spacing. 7. 1. Trace the headstock on a piece of paper.
Sanding Body The guitar body was sanded at the factory, but it is up to you to do the final sanding before the finish is applied. To get a good finish, the body should be sanded with a series of sandpaper grits up to #320 grit. Components and Hardware Needed: Qty Guitar Body........................................................ 1 To sand the guitar body: 1. Wear a NIOSH-approved respirator and ANSI-approved safety glasses when sanding wood! 2.
Finishing Neck Finishing options include stains, lacquers, varnishes and oil finishes. Traditionally, this style of guitar has a clear finish on the neck. Finishes can be applied with a spray gun, brush, rag, or a spray can. Finish materials and books on finishing instruments can be ordered through Grizzly Industrial or numerous luthier supply catalogs. Components and Hardware Needed: Qty Guitar Neck........................................................ 1 Figure 11. Scraping finish off of the fretboard.
5. Apply several thin coats of the finish, following the manufacturer's instructions. Multiple thin coats usually produce a better quality finish than one heavy coat. 6. Dry sand the entire body with #400 grit wet/ dry sandpaper after at least three coats of finish have been applied. DO NOT sand through the finish—be careful on the edges. 7. NOTICE Dust particles suspended in the air will settle on wet finishes, causing less than satisfactory results.
3. Align the tuners perpendicular to the edge of the headstock and parallel to each other as shown in Figure 13. Use a strip of masking tape to secure their position on the headstock. —If there is not a predrilled hole in the cavity in Step 1, use a 3/32" bit to drill a hole into the cavity and through the body. 2. Push the thicker black audio jack wire through the hole shown in Figure 15. Ground Wire Tuner Mounting Hole Figure 13. Tuners aligned to edge of headstock. 4.
Mounting Neck Components and Hardware Needed: Qty Guitar Body........................................................ 1 Neck................................................................... 1 Silver Neckplate................................................. 1 Chrome Screws 5 x 45mm................................. 4 Unless otherwise indicated, we strongly recommend using a drill press for the majority of drilling to obtain the most precise results.
Tremolo Bridge 3. Insert a 5 x 45mm screw through the plate so it hangs down to the side of the neck and body. 4. Gently mark the screw tip depth with a pencil. Note: You may want to cover the screw tip marking location with masking tape to avoid scratching the finish. 5. Set the neck fretboard face down on the drill press table, lower the bit to touch the mark (placed in Step 4), then set the drill press to stop at this mark. Neck and Body (Assembled).............................. 1 Chrome Screws 3.
4. Secure the spring hanger to the guitar body with two 4 x 40mm screws as shown in Figure 23. Tighten the screws until the spring hanger is 1" from the wall of the cavity. Note: These screws are used to adjust the spring tension. 5. 6. Clean the spring hanger solder point to remove grease and dirt, then solder the black ground wire to the spring hanger as shown in Figures 22 & 23. Stretch the four springs from the spring hanger to the tremolo bridge as shown in in Figure 23.
Strap Buttons Mounting Back Plate The strap buttons are positioned on the guitar as shown in Figure 25. Once mounted, the slot in the back plate must align with the string holes in the tremolo bridge. This will simplify the string installation and removal process. Bass Horn Qty Components and Hardware Needed: Neck and Body (Assembled).............................. 1 Chrome Screws 3.1 x 12mm.............................. 6 Back Plate..........................................................
Installing Nut Winding Strings Components and Hardware Needed: Qty Neck and Body (Assembled).............................. 1 Nut .................................................................... 4 Components and Hardware Needed: Qty Neck and Body (Assembled).............................. 1 Strings................................................................ 6 To install the nut: The correct position of the guitar strings is shown in Figure 28.
2. Guide the string through the tremolo bridge, across the saddle (Figure 30), over the nut, and through the hole in the corresponding tuning post. 1st String 6. Use wire cutters (optional) to cut off the excess string. 7. Repeat the above process for the remaining strings. Mounting Pick Guard Components and Hardware Needed: Qty Neck and Body (Assembled).............................. 1 Chrome Screws 3.1 x 12mm............................ 11 Figure 30. 1st string installed.
String Retainers The string retainers mount between the 1st and 2nd strings and between the 3rd and 4th strings (Figure 33). String retainers are designed to hold the strings down against the nut to enable correct tuning. Components and Hardware Needed: Qty Neck and Body (Assembled).............................. 1 String Retainers.................................................. 2 Bushings 4 x 5 x 3mm........................................ 2 Chrome Screws 2.5 x 14mm..............................
SECTION 5: SETUP General 2. Guitar set up is an art that requires skill, patience, and experience. If you have the patience, you can acquire the skill and experience. If you don't have the patience, you may want to have your guitar set up by a qualified guitar technician. This section presents an overview of setup practices. We highly recommended that you research more in-depth methods.
String Height Correct string height is crucial for maximizing the playability of your electric guitar. The string height is the distance between the top face of the fret and the bottom face of the string (Figure 35). 2. Adjust the wedge until there is a 3⁄8" gap between the tremolo block and the back of the tremolo cavity as shown in Figure 36. 3.
Pickup Height Tuning Pickup height can have a dramatic effect on the audio output signal. The closer the strings are to the pickup, the higher the audio output signal will be. If the strings are too close, distortion is caused by magnetic interference from the electronic components. Tuning is an important guitar concept. If the guitar is not in tune, the resulting sound is unpleasant. These instructions explain how to tune by ear.
4. Tune the 4th string by playing the 5th string while it is being pressed (fretted) at the 5th fret, and then play the open 4th string. Adjust the 4th string tuner until the notes match. 5. Perform the same tuning step on the 3rd and 4th string. 6. When tuning the 2nd string, fret the 3rd string at the 4th fret instead of the 5th fret.
SECTION 6: REFERENCE INFO Accessories NOTICE Refer to our website or latest catalog for additional recommended accessories. H0818—Fine Prepolishing Paste, 1.85 lb H4873—Medium Prepolish Liquid, 1 Qt H0821—High Gloss Polishing Liquid, 1 Qt Menzerna professional polishing compounds will remove any fine scratches from the finish and give your instrument the incredibly high gloss finish that you are looking for.
H3901—Behlen Jet Spray™ Clear Lacquer– Flat H3903—Behlen Jet Spray™ Clear Lacquer– Satin H3937—Behlen Top Coat Lacquer - Satin H3938—Behlen Sanding Sealer, 13 Oz. Behlen Master Top Coat Lacquer Sealer is an alcohol and water resistant, high solid nitrocellulose lacquer sealer. Use to seal and protect Behlen solvent based stains and other Master Aerosols. Master Topcoat Lacquer Sealer performs like a spray gun applied finish. 13 fl. oz. Cannot ship air.
Premier Red Mirror Finish Slicon Carbide Waterproof Sandpaper Model H8912—1000 Grit, 50 Pack Model H8913—1200 Grit, 50 Pack Model H8914—1500 Grit, 50 Pack Model H8915—2000 Grit, 50 Pack Ideal for producing very fine finishes in wet applications. Ultimate flexibility, and environmentally stable; resists humidity-caused curling. 50 sheets per package.
H4412—The Guitar Handbook The Guitar Handbook is the complete guide to playing the guitar — from simple chords to advanced improvisations. Its unique learning program combines step-by-step photographs with a chord dictionary containing over 800 easy-to-follow fingerings. It is also a comprehensive manual on guitar hardware and performance technology, sound equipment and special effects. 256 pages.
Electrical Components Tone Controls Ground to Tremolo Bridge Five Way Switch Volume Control To Audio Jack Figure 59. Pick guard wiring. Black Wire Solder Point White Wire Solder Point Figure 60. Audio jack wiring. Ground to Tremolo Bridge To Audio Jack Figure 61. Ground wiring. Available in color online at www.grizzly.
Wiring Diagram COLOR KEY BLACK Bk WHITE Wt RED Pick Guard Pickup Wt Bk Available in color online at www.grizzly.com Pickup Bk h ay -W 5 Wt tc wi S Wt Wt Volume Control Wt Wt Pickup Wt Wt Tone Control Bk Bk Bk Bk Wt Wt Wt Bk Tone Control Wt Bk Spring Hanger Ground Audio Jack Bk Figure 62. Model H8069 wiring diagram.
WARRANTY AND RETURNS Grizzly Industrial, Inc. warrants every product it sells for a period of 1 year to the original purchaser from the date of purchase. This warranty does not apply to defects due directly or indirectly to misuse, abuse, negligence, accidents, repairs or alterations or lack of maintenance.
WARRANTY CARD Name _____________________________________________________________________________ Street _____________________________________________________________________________ City _______________________ State _________________________ Zip _____________________ Phone # ____________________ Email _________________________________________________ Model # ____________________ Order # _______________________ Serial # __________________ The following information is given on a voluntary basis.
FOLD ALONG DOTTED LINE Place Stamp Here GRIZZLY INDUSTRIAL, INC. P.O.