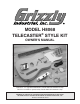
MODEL H8068 TELECASTER® STYLE KIT OWNER'S MANUAL Telecaster® is a registered trademark of Fender Musical Instruments Corp. This kit is not made or sponsored by Fender Musical Instruments Corp. COPYRIGHT © NOVEMBER, 2006 BY GRIZZLY INDUSTRIAL, INC. WARNING: NO PORTION OF THIS MANUAL MAY BE REPRODUCED IN ANY SHAPE OR FORM WITHOUT THE WRITTEN APPROVAL OF GRIZZLY INDUSTRIAL, INC.
�������������������������������������������������������������������� �������������������������������������������������������������������� ������������������������������������������������������������������� ������������������������������������������� �� ���������������������������� �� ������������������������������������������������������������������ �� ���������������������������������������������������� ������������������������������������������������������������������ �������������������������������������
Table of Contents SECTION 1: SAFETY ....................................................................................................................... 2 SECTION 2: INTRODUCTION ......................................................................................................... 3 Foreword .................................................................................................................................... 3 Contact Info ................................................................
SECTION 1: SAFETY Always wear safety glasses or goggles when operating equipment. Everyday glasses or reading glasses are not safety glasses. Be certain the safety glasses you wear meet the appropriate standards of the American National Standards Institute (ANSI). Because there are various ways to cut and join wood, you can make substitutions for the methods stated in this plan. We try to suggest the easiest methods possible. However, only you know your skills with each piece of machinery.
SECTION 2: INTRODUCTION Foreword Contact Info We are proud to offer the Model H8068 Telecaster ® Style Guitar Kit. This kit is a part of a growing Grizzly family of fine woodworking products. When assembled according to the guidelines set forth in this manual, you can expect years of enjoyment from your guitar. If you have any comments regarding this manual, please write to us at the address below: We are pleased to provide this manual for the Model H8068 Telecaster ® Style Guitar Kit.
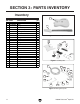
SECTION 3: PARTS INVENTORY Inventory 1 REF PART# DESCRIPTION 1 2 3 4 5 6 7 8 9 10 11 12 13 14 15 16 17 18 19 20 21 22 23 24 Guitar Body Neck Pickguard Silver Neckplate Black Neckplate Setter Tuning Machines Audio Patch Cable Control Plate Bridge Plastic Bushings Output Jack Cover Strings Strap Buttons #7 x 1-3/8" SS Screws #5 x 5/8" SS Screws #3 x 3/8" SS Screws #2 x 3/8" SS Screws #4 x 15/16 SS Screws Bushing 3/32" x 3/16" x 3/32" String Retainer String Nut Ferrules Hex Wrench 4mm Hex Wrench 1.
Supplies/Tools The majority of the wooden components in this kit are fully machined from the factory and are ready for assembly. A small amount of sanding and finishing is required to complete your guitar.
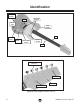
Identification Strap Button Pickups Bridge Control Plate Tone Knob Strap Button Fret Volume Knob Three-Way Switch Pick Guard Neck Figure 4. Model H8068 controls. Tuner or Tuning Machine Tuning Peg Headstock String Retainer Figure 5. Model H8068 headstock features.
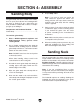
SECTION 4: ASSEMBLY Sanding Body The guitar body has been sanded at the factory, but it is up to you to do the final sanding before the finish is applied. To get a good finish, the body should be sanded with a series of sandpaper grits up to #320 grit. 6. Note: If you want to stain your guitar, the stain should be applied now before continuing with the next step. Stains cannot be applied to the guitar body after the sanding sealer is applied. 7. Components and Hardware Needed: Qty Guitar Body ...........
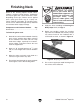
Finishing Neck Some of the finishing options include stains, lacquers, varnishes and oil finishes. Traditionally this style of guitar has a clear finish on the neck. Depending on the type, finishes can be applied with a spray gun, brush, rag, or a spray can. Finish materials and books on finishing instruments can be ordered through Grizzly Industrial or numerous luthier supply catalogs. Components and Hardware Needed: Qty Guitar Neck .......................................................
Finishing Body This guitar looks incredible with a clear finish to highlight the wood grain patterns. The surface can be stained prior to finishing or a transparent pigment can be added to the finish. These instructions guide you through a very basic finishing process. Books describing different guitar finishing techniques are available through luthier supply catalogs, or through your local library. Clear finish materials and books on finishing can be ordered through Grizzly Industrial.
Mounting Neck Components and Hardware Needed: Qty Guitar Body ....................................................... 1 Neck .................................................................. 1 Silver Neckplate ................................................ 1 Black Neckplate Setter ...................................... 1 #7 x 13 ⁄ 8" Stainless Steel Screws ...................... 4 3. Set the guitar facedown on top of two 4x4's (cut to 12") for support. 4.
Another way to determine neck mounting hole depth (Optional): 1. Insert the neck into the neck pocket. 2. Place the neckplate and neckplate setter on top of the body so a mounting hole protrudes beyond the body and neck. 3. Insert a #7 x 1 ⁄8" screw through the plates so it hangs down to the side of the neck and body. 4. 1. Lower the 1⁄8" drill bit over the center of a pilot hole and drill the hole. 2. Repeat Step 1 for each of the three remaining pilot holes.
Positioning Pick Guard, Control Plate & Bridge The following steps require you to mark the guitar body. To avoid damaging the finish, place masking tape on the guitar body and gently mark the tape. In the following steps the bridge, control plate, and pick guard will be installed temporarily to correctly orient them. Components and Hardware Needed: Qty Guitar Body and Neck ....................................... 1 Pick Guard ......................................................... 1 Control Plate .........
8. Insert the bridge into the bridge cavity and align the bridge with the guitar center line. 9. Using the long straightedge, measure 251⁄2" from the fretboard side of the nut slot (Figure 13) along the center line to the bridge point (Figure 14), and mark this location on the guitar. 11. Align the control plate, pick guard, and bridge so the bridge is parallel to the control plate (leave an even distance between the pickguard and bridge). 12.
Installing Ferrules The strings can be installed optionally through the body using the ferrules. One advantage of using the ferrules is that the strings will sustain notes longer. Ferrules can be mounted flush (Figure 16) or above (Figure 17) the surface of the guitar. Components and Hardware Needed: Qty Guitar Body ....................................................... 1 Ferrules ............................................................. 6 To install the ferrules: 1.
Mounting Tuners Components and Hardware Needed: Qty Neck .................................................................. 1 Tuners ................................................................ 1 Stainless Steel Screws #2 x 3/8" ........................ 2 Bushings ............................................................ 6 Shim To install the tuners: 1. 2. Figure 19. Peghead supported with shim.
Wiring Pickups This guitar comes with a control plate that has most of the components soldered in place. You only need to solder the pickup wires onto the three way switch and volume control. If done incorrectly, soldering the wires may cause damage to the components. If you are unsure of your skills; do your research, practice on scrap wires, or take it to a professional. Components and Hardware Needed: Qty Guitar Body ....................................................... 1 Control Plate ................
Installing Output Jack Installing Bridge and Control Plate Components and Hardware Needed: Qty Output Jack ....................................................... 1 Output Jack Cover............................................. 1 Stainless Steel Screws #3 x 3/8" ........................ 2 To reduce humming, the ground wire must contact the bridge plate. To install the output jack: 1. Thread the output jack onto the jack cover. 2.
Strap Buttons Installing Nut The strap buttons are positioned on the guitar as shown in Figure 24. Components and Hardware Needed: Qty Guitar Body ....................................................... 1 Nut ................................................................... 4 Neck .................................................................. 1 Black Neckplate Setter ...................................... 1 Silver Neckplate ................................................
Winding Strings Strings can be installed through the body using the ferrules or they can be installed through the bridge. Components and Hardware Needed: Qty Guitar ................................................................. 1 Strings ............................................................... 6 2. Thread the string through the hole in the top of the guitar and through the bridge. 3. Guide the string across the saddle, over the nut, and through the hole in the corresponding tuner. 4.
To install the strings using only the bridge: 1. Slide the 1st string through the corresponding hole in the bridge (Figure 29). 2. Repeat Steps 3-8 in the previous subsection. Retainer and Bushing Figure 30. String retainer locations. To install the string retainer: Figure 29. 1st string installed. 1. Place the string retainer on top of the 1st and 2nd string near the second tuner. 2. Using a 1⁄16" drill bit, drill 1⁄4" deep holes straight through the holes in the string retainers.
SECTION 5: SETUP General Guitar set up is an art that requires skill, patience and experience. If you have the patience, you can acquire the skill and experience. If you don't have the patience, you may want to have your guitar set up by a qualified guitar technician. To adjust the bow of the guitar neck: 1. Tighten the strings to playing tension. 2. Place a straightedge from the 1st fret to the 17th. Measure any gaps between the straightedge and the frets with the feeler gauge.
String Height The 1st string measurement should be 3/64", the 6th string measurement should be 5/64". —If the string heights are correct, then continue to the next sub-section. Tools Needed Qty Hex Wrench 1.5mm ............................................1 Guitar Capo ........................................................1 Metal Straightedge .............................................1 Steel Ruler (1⁄64" Resolution) ...............................
Pickup Height Tuning Pickup height can have a dramatic effect on the audio output signal. The closer the strings are to the pickup, the higher the audio output signal will be. If the strings are too close, distortion is caused by magnetic interference from the electronic components. Tuning is an important guitar concept. If the guitar is not in tune, the resulting sound is unpleasant. These instructions explain how to tune by ear.
4. Tune the 4th string by playing the 5th string while it is being pressed (fretted) at the 4th fret, and then play the open 4th string. Adjust the 4th string tuner until the notes match. 5. Perform the same tuning step on the and 3rd string. 6. When tuning the 2nd string, fret the 3rd string at the 4th fret instead of the 5th fret. 7. Tune the 1st string in the same manner as the 6th, 5th, 4th, and 3rd strings. Adjustment Screws Figure 37. Saddle adjustment screws.
SECTION 6: REFERENCE INFO Accessories G7984—Face Shield H1298—Dust Sealed Safety Glasses H1300—UV Blocking, Clear Safety Glasses H2347—Uvex® Spitfire Safety Glasses H0736—Shop Fox® Safety Glasses Safety Glasses are essential to every shop. If you already have a pair, buy extras for visitors or employees. You can't be too careful when it comes to shop safety! H1300 H1302 H4979 H4977 H1298 Figure 40. Our most popular earmuffs.
H6976—The Fender Telecaster® The 'Tele' is the senior member of a family of instruments whose sounds and looks helped revolutionize the world of popular music. This book relates the story of Telecaster® Guitars since 1950—everything you ever wanted to know is explored through lots of color and black and white photos, charts and interviews. 80 pages.
Electrical Components To Bridge Ground (Pickup) To Front Pickup To Output Jack Tone Control Volume Control Three Way Switch Figure 46. Control plate wiring. Figure 47. Output jack wiring.
Electrical Components Pickup Pick Guard Bridge Pickup Ground Tone Control Output Jack Volume Control Three-Way Switch Figure 48. Model H8068 overall wiring.
Wiring Diagram ��������� ������ �� ����� �� ����� �� �� ���������� �������� ����� �� ������������ �� �� �� �� �� �� �� �� ������ ������� ������� �� �� �� �� �� ���� ������� ������ ������ �� ������ ���� �� �� Figure 49. Model H8068 wiring diagram.
WARRANTY AND RETURNS Grizzly Industrial, Inc. warrants every product it sells for a period of 1 year to the original purchaser from the date of purchase. This warranty does not apply to defects due directly or indirectly to misuse, abuse, negligence, accidents, repairs or alterations or lack of maintenance.
������������� ���������������������������������������������������������������������������������� � ������������������������������������������������������������������������������������ ����� ����������������������� ������������������������������� ���� ��������������������� ���������������������������� ������ ������������������������ ��������������������������� ���������������������������� ������������������������������� ��������������������������� �������������������������������������������������������������
���������������������� ����� ����� ���� ������������������������ ������������� �������������������������� ���������������������� ����������������������������������� ����������������������������������� ������������������������������������� �������������������������������������� ��������������������������������������
����������������������������������������������������������������������� ������������������������������������� ������������������������������������ ����������������� �������������������������������� ��������������������������������� ���� ��������������������� ������������������