
Cordless Sander User Manual
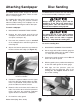

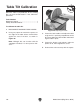


Calibrating Miter
Gauge
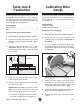
Table Gap &
Parallelism
Tools Needed:
To set the table gap and parallelism:
1.
2.
3.
Figure 24
4.
5.
IMPORTANTDO NOT turn the disc sander
ON until you have verified that it does not
touch the table at any point in its rotation!
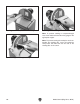
Figure 24.
3
⁄
16
"
(Top View)
Sanding Disc
Table
Tools Needed:
To calibrate the miter gauge:
1.
2.
Table Gap &
Parallelism
3.
Figure 25
4.
5.
6.
Figure 25.