
Instruction Manual

4.
Note: When figuring out the correct width,
don't forget to account for blade kerf and the
inaccuracy of the fence scale while the auxil-
iary fence is installed.
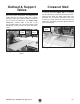
5.
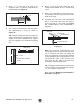
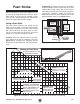
Figure 88
Auxiliary
Fence
Fence
Resaw
Barrier
Workpiece
(Front View)
Figure 88
The danger of kickback increases relative to
the depth of a cut. Reduce the risk of kick-
back by making multiple passes to achieve
the desired depth of cut. Failure to follow
these warnings could result in serious per-
sonal injury.
Always use push sticks or push paddles to
increase safety and control during opera-
tions which require that the blade guard
and spreader must be removed from the
saw. ALWAYS replace the blade guard after
resawing is complete.
8. ON
9.
6.
7.
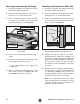
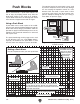
Figure 89
11. OFF
12.
Auxiliary
Fence
Fence
Resaw
Barrier
1
/
8
" Connection
Workpiece
Figure 89.
10. Steps 7–9
Figure 89