
Instruction Manual

3.
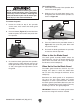
Figure 67
4.
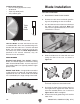
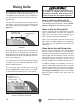
When to Use the Blade Guard
When Not to Use the Blade Guard
IMPORTANT
Figure 68.
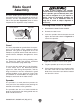
Re-installing Pawls
1.
2.
Figure 68
We do not recommend removing the pawls
during normal operations unless absolutely
necessary. In most situations, removing the
pawls will increase your risk of serious per-
sonal injury in the event of kickback.
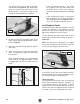
Figure 67.
3.
To remove the pawls:
1.
2. Figure 67