
Use and Care Manual


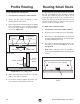


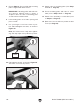
Table Of Contents

Model T28048 (Mfd. Since 06/17)
-33-
5. Create countersunk mounting holes in zero-
clearance fence board (see Figure 45) so
low-profile shoulder screws removed from
fence boards can be used to secure new
fence to fence assembly in the same manner.
ALWAYS use hold-downs or featherboards
and push sticks when shaping small or nar-
row stock. These devices keep your hands
away from spinning router bit and sufficient-
ly support stock to allow a safe and effective
cut, reducing risk of personal injury.
6. Secure zero-clearance fence board and
router bit guard to fence assembly, then
make sure fence is parallel to the table T-slot
(see Squaring Fence & Table on Page 28).
7. Check for proper clearance, connect router to
power, then make test cut to verify results.
Free-Hand Routing
Irregular or free-hand routing takes a high degree
of skill and dexterity and is done without the pro-
tection and aid of the fence assembly and router
bit guard. The most dangerous part of free-hand
routing is beginning the cut, when the router bit
first contacts the workpiece. It tends to jerk or kick
back, presenting an injury hazard to the operator.
Free-hand or irregular routing greatly
increases the chance that the operator may
lose control of the workpiece, which could
result in serious personal injury. Therefore,
a starting pin or block and a custom guard
or workpiece holding jig MUST be used.
Workpiece
Feed Direction
Swing
Starting Pin
Rub
Collar
R
o
t
a
t
i
o
n
Figure 46. Illustration of free-hand routing using
a starting pin.
To reduce the likelihood of kickback when free-
hand routing, use the starting pin or block (see
Figures 46 & 47 for examples). This will allow
you to anchor and slowly pivot the workpiece into
the bit as the cut is started, making the operation
more stable and safe.
Zero-Clearance Fence Board
Table
Countersunk
Holes for Fasteners
Figure 45. Countersunk holes for mounting zero-
clearance fence board.