
Use and Care Manual


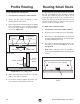


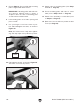
Table Of Contents

Model T28048 (Mfd. Since 06/17)
-31-
Edge Jointing
Jointing the edge of a board involves using a
straight cutting router bit to remove wood from the
face of the board. The result is a perfectly flat and
square edge.
To joint edge of a workpiece:
1. DISCONNECT MACHINE FROM POWER!
2. Secure straight cutting bit into router accord-
ing to manufacturer's instructions.
3. Install smallest table insert possible.
4. Raise bit just above top of workpiece, then
rotate it by hand until cutting flute is perpen-
dicular to fence boards.
5. Insert fence board spacers between outfeed
fence board and fence assembly (see
Using Fence Board Spacers on Page
29). The width of the spacers controls the
amount of material removed with each pass
(see Figure 41).
IMPORTANT: To reduce the risk of kickback,
DO NOT take more than
1
⁄16" off during any
pass.
Straightedge
Spacer
Outfeed
Fence Board
Straight
Router Bit
(Enlarged)
Infeed
Fence Board
Top View
Bit
Flute
Figure 41. Fence setup for edge jointing.
6. Place straightedge against outfeed fence
board, then adjust fence assembly so straight-
edge is also against bit flute (see Figure 41).
Top View
Cutting Direction
Spacer
Workpiece
Figure 42. Edge jointing operation.
Workpiece
Feed Direction
Bit
Rotation
Always feed workpiece against router bit
rotation direction, as illustrated below.
Otherwise, workpiece could be aggressive-
ly pulled from your hands, drawing them
into spinning router bit.
To reduce risk of hand injury from acci-
dental contact with spinning router bit,
ALWAYS make sure fence and router guard
are properly positioned and secured before
connecting router to power (does not apply
to free-hand routing).
7. Make sure fence boards are square with
table T-slot (see Squaring Fence & Table on
Page 28), lock fence assembly in place, and
tighten all knobs.
8. Connect router to power, then perform cut
(see Figure 42).