
Use and Care Manual
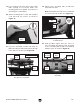
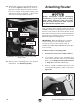
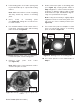

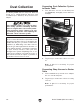

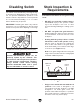
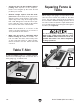
Table Of Contents

Model T28048 (Mfd. Since 06/17)
-21-
7. Remove base plate from router
(see Figure 26).
Note: Make sure to keep fasteners used to
secure base plate to router.
4. Lift mounting plate out of table opening and
lay it bottom-side-up on a protected working
surface.
Note: Make sure surface is clear of anything
that may scratch top surface of mounting
plate.
5. Place router on mounting plate
(see Figure 25), taking into account access
to router controls.
6. Use erasable marker to mark center curve of
router base, router base plate, and mounting
plate as shown in Figure 25.
8. Center router base plate on mounting plate
(see Figure 27), keeping marks made in
Step 6 aligned. To center router base plate,
position it so distance edge-to-edge on right
and left side are equal, and distance edge-to-
edge on top and bottom are equal.
Note: It may be necessary to slightly adjust
alignment if holes in router base plate over-
lap or are too close to starter pin holes (see
Figure 27).
9. Use router base plate as template to mark
holes on bottom-side surface of mounting
plate, as shown in Figure 27.
Figure 27. Marking holes on mounting plate.
Mounting
Plate
Starter
Pin Hole
Router
Base
Plate
10. Use center punch to score marks made in
Step 9.
Figure 26. Example of removing base plate from
router.
Router
Base Plate
Figure 25. Marking center curve of router base,
router base plate, and mounting plate.
Mounting
Plate