
Use and Care Manual


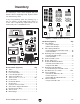


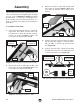
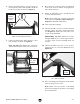

Table Of Contents

-18-
Model T28048 (Mfd. Since 06/17)
13. Lay straightedge across mounting plate, plate
insert, and table surfaces in pattern shown in
Figure 14.
14. Adjust set screws (see Figure 15)
so that ends of straightedge lay flat on
table surface at all positions of pattern
(see Figures 14 & 16).
15. Repeat Steps 13–14 as needed until mount-
ing plate is aligned with table surface.
IMPORTANT: Mounting plate and table sur-
face must be aligned evenly to ensure a
workpiece does not catch on mounting plate
or table surface and kickback.
16. Lift mounting plate out of table opening and
place it aside.
17. Use your finger to hold set screws in posi-
tion and hand-tighten hex nuts, as shown in
Figure 17.
Note: Set screws move easily when tighten-
ing. This step helps to keep them in position.
18. Fully tighten hex nuts, as shown in Figure 18.
This locks set screws in position.
Straightedge
Mounting
Board
Table Surface
Figure 14. Pattern for aligning mounting plate.
Figure 15. Adjusting set screws to align
mounting plate with table surface.
Mounting
Plate
Support
Bracket
Figure 17. Hand-tightening hex nuts.
Support
Bracket
Figure 18. Locking set screws in position.
Figure 16. Using straightedge to align mounting
plate with table surface.
Mounting Plate
Table Surface