
Use and Care Manual


-34-
Model G1014Z/G1014ZX (Mfd. Since 07/17)
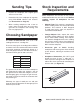
4. While holding the back end of the workpiece
against the backstop with both hands, and
while keeping your fingers away from the
belt, slowly feed the workpiece into the belt,
as shown in Figures 56 & 57.
Figure 56. Sanding workpiece in horizontal
position.
Figure 57. Sanding edge of workpiece in
horizontal position.
Note: Apply even pressure and move the
workpiece back and forth across the sanding
belt.
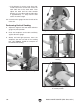
Contour Sanding
To perform contour sanding:
1. Make sure the sanding belt is tensioned—if it
is not already tight.
2. Make sure the belt tracking is correctly set
(see Tracking Belt on Page 40).
3. Loosen the knobs that secure the idler roller
guard and sleeve guard assembly, then
remove the guard.
4. Turn the sander ON.
Figure 58. Example of contour sanding.
5. Slowly feed the workpiece into the curved
end of the belt and continue moving the
workpiece profile along the contour until you
achieve your desired shape, as shown in
Figure 58.
6. Re-install the idler roller and sleeve guard.
Do not operate this equipment when wear-
ing loose clothing, gloves, neckties, rings,
bracelets or other jewelry that might get
caught in the moving belt. Serious personal
injury may result. You must re-install the
idler roller and sleeve guard before perform-
ing edge or horizontal sanding operations.
Sanding surfaces can cause serious per-
sonal injury if they come in contact with
fingers, hands or other body parts. Use
extreme care to provide a safe distance
between the belt and any part of your body.