
Use and Care Manual


-20-
Model G1014Z/G1014ZX (Mfd. Since 07/17)
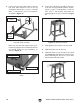
5. Fasten the two short upper braces and the
two short lower braces to one of the leg
assemblies with the (8)
5
⁄16"-18 x
1
⁄2" carriage
bolts,
5
⁄16"-18 hex nuts, and
5
⁄16" flat washers,
as shown in Figure 15.
Figure 15. Short upper and lower braces
fastened to leg assembly.
Short Lower
Brace
x 8
Short
Upper
Braces
Figure 17. Stand assembled.
7. Final tighten all the fasteners on the stand.
8. Tighten the lock nuts on the feet.
Make sure the two short upper braces over-
lap the long upper braces and that the braces
are placed inside the leg assemblies, as
shown in Figure 16.
Figure 16. Short brace overlapping long upper
brace.
6. Fasten the second leg assembly to the brac-
es on the first leg assembly with the remain-
ing (8)
5
⁄16"-18 x
1
⁄2" carriage bolts,
5
⁄16"-18 hex
nuts, and
5
⁄16" flat washers, then place the
stand upright on its feet, as shown in Figure
17.
Short Upper Brace
Long Upper Brace
Area of Overlap
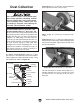
9. (Optional) Place a level on top of the stand
(see Figure 18) and adjust the stand if need-
ed by shimming the feet so it is level from
front-to-back and side-to-side.
Figure 18. Leveling stand.