
User Manual

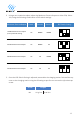


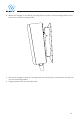

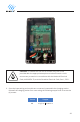
Table Of Contents
- 1. Introduction & Unpacking
- 2. Installation Planning and Service Wiring:
- 3. Adjustable Maximum Current Output
- 4. Installation
- 5. Wiring Connection
- 6. EasyEvPlug Holster and Cable Management System
- 7. Charging Status Indicators and Buzzers
- 8. Operation
- 9. General Product Care and Use Information
- 10. Warranty and Return Policy

11
1. With the front cover placed to the side, locate the DIP switch on the charging station circuit
board. The DIP switch is a 3-position switch on the main circuit board, located directly to
the left of the LED.
CAUTION: The LED pipe is attached to the front cover. When the
front cover is removed, place it on a flat surface facing down to avoid
damage to the LED pipe.
UPDOWN DOWN
3.2 Generation 1 Grizzl-E (3 DIP Switches)
The Generation 1 Grizzl-E has 3 DIP switches located at the top left corner of the circuit board.
If your Grizzl-E has 4 DIP Switches please see 3.3 Generation 2 Grizzl-E (4 DIP Switches) on
page 13.
WARNING: Do not touch live electrical parts. Disconnect the power
supply to the charging station before adjusting the DIP Switches.
Failure to do so may result in physical injury or damage to the power
supply system and the charging station.