
User manual

S07.0.1X.6C-04 Operating Manual GEWAS 181 A page 4 of 6
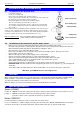
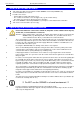
water connection
sieve sealing ring
solenoid valve
sealing ring
hose connection
6 Installation and commissioning
6.1 Installation of the solenoid valve
- Lock water feed lines.
- Insert sieve sealing ring.
Please take care having clean sealing surfaces.
- Screw solenoid valve via turn able connecting nut on the water sup-
ply. Keep the solenoid valve in desired position.
- Check leak tightness by turning on the water supply.
In case of leakage repeat the process above.
- Screw water connection tube onto the outlet of the solenoid valve
(use existing sealing ring or make sure that the tube itself is prop-
erly sealed! ).
The brushing can be hand tightened if the installation was carried out cor-
rectly. In case of leakage check weather sealing ring has been inserted
correctly or all sealing surfaces are clean, also check weather installation
has been carried out correctly. Repeat installation process if.
Hint for commissioning: The solenoid valve will only be opened if the
control unit device has been turned on.
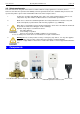
6.2 Installation of the control unit and the water sensor
- Make a rule to read the operating and maintenance advices before starting up the device.
- Use bail to hang the device on desired place, align the device. Remove the protective film from the adhesive
tape at the device’s back and press on the device for locating the device.
- Place the water sensor and fixate it when needed.
Please take care that the sensor electrodes do not touch any metallic surfaces, this may cause errors.
- Connect water sensor to the control unit.
- When not already done turn on water supply for the solenoid valve.
- Plug the control unit’s adapter plug into a socket outlet with protective contact.
- Turn on the control unit via power switch and pressing service button at the same time.
A red LED indicates the device is operating and the solenoid valve has opened.
- Check water connection tubes for leakage.
- Connect washing machine resp. dishwasher to the protective contact socket of the control unit.
- FUNCTION TEST: Check the alarm function via bypassing the water sensor electrodes (e.g. via touching both
electrodes).
The device will now start its alarm; the solenoid valve will be closed. Turn off and on the control unit.
! Well done, your GEWAS device is now ready for use !
7 Function
When a water film at the water sensor exceeds 0.5 mm, the control unit will automatically initiate an audible alarm,
will be closing the solenoid valve and will turn off the device connected to the power sockets of the device.
To remove the alarm the control unit has to be turned off.
When the water sensor is disconnected from the device, the alarm will also be initiated.
8 Operating elements
Switch „POWER“
Position 0: GEWAS-control unit is switched off, protective contact socket is powered off, solenoid valve is closed
Position 1: GEWAS-control unit is switched off , monitoring is active, water can flow.
protective contact socket is powered except there is an alarm condition
Button „SERVICE“
In normal operation (no alarm) the valve is operated in a low power mode.
In case of calcification or similar soiling the valve may be locked in position. With the SERVICE button the operation
current can be raised for a short time, which helps a blocked low power valve to operate regular again.