
Corp. Fan User Manual


6
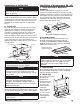
Installation of Roof Mounted Unit
Arrangement DBC,
continued
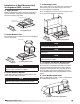
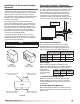
Supply Duct with
Duct Adapter Installed
Exhaust Duct Installed
Sealant
Sealing Ductwork
Installing Supply Unit
Complete Combination Installation
NOTE
Installing the exhaust fan prior to the supply unit will
allow for easier installation of options.
NOTE
NFPA 96 requires that the exhaust fan be hinged.
NOTE
The use of all lifting lugs and a set of spreader bars
is mandatory when lifting unit.
NOTE
Be sure to complete the outdoor venting installation
instructions.
NOTE
Some units come with the weatherhood attached
and step 8 may not apply.
8. Assemble and Attach Weatherhood
The weatherhood can now be assembled and/or
attached to the unit. Detailed assembly instructions
can be found with the weatherhood. If the optional
evaporative cooling module was selected, this step
does not apply, refer to the Installation Instructions
for the Optional Evaporative Cooling Module section,
page 7.
9. Seal Weatherhood Seam
Using an appropriate sealant, seal the seam between
the weatherhood and the unit.
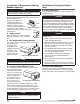
7. Install Supply Unit
Use a crane and a set of spreader bars hooked to the
factory lifting lugs to lift and center the unit on the
extension/equipment support(s).
Use self-tapping sheet metal screws to fasten the unit
to the extension/equipment support(s).
6. Install Exhaust Options
Install optional hinge kit with restraining cables and
grease trap with drain connection.
Exhaust Fan
Installing Exhaust Fan
5. Install Exhaust Fan
Fasten exhaust fan to curb extension with self-tapping
sheet metal screws.
4. Apply Sealant
Apply an appropriate sealant around the perimeter of
the curb and duct adapter(s) to isolate fan vibration
and prevent water penetration.
®
Model IG / IGX Make-Up Air