Operator Manual 1007NT 10-Foot No-Till Drill Manufacturing, Inc. www.greatplainsmfg.com ! Read the operator’s manual entirely. When you see this symbol, the subsequent instructions and warnings are serious - follow without exception. Your life and the lives of others depend on it! 28454 Illustrations may show optional equipment not supplied with standard unit.
Blank
iii Great Plains Manufacturing, Inc. Table of Contents Important Safety Information............................ 1 Safety Decals ...............................................................5 Introduction ...................................................... 11 Description of Unit ......................................................11 Intended Usage ......................................................11 Models Covered .....................................................11 Document Family..........
iv 1007NT Disc Scraper Adjustment ....................................... 36 Seed-Lok™ Lock-Up.............................................. 37 Opener Depth (Press Wheel Height) ..................... 37 Troubleshooting ...............................................38 Maintenance and Lubrication..........................41 Maintenance .............................................................. 41 Materials Clean-Out ................................................... 42 Main Box Clean-Out.............
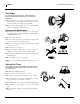
Great Plains Manufacturing, Inc. 1 Important Safety Information Look for Safety Symbol The SAFETY ALERT SYMBOL indicates there is a potential hazard to personal safety involved and extra safety precaution must be taken. When you see this symbol, be alert and carefully read the message that follows it.
2 1007NT Great Plains Manufacturing, Inc. Wear Protective Equipment ▲ Wear protective clothing and equipment. ▲ Wear clothing and equipment appropriate for the job. Avoid loose-fitting clothing. ▲ Because prolonged exposure to loud noise can cause hearing impairment or hearing loss, wear suitable hearing protection such as earmuffs or earplugs. ▲ Because operating equipment safely requires your full attention, avoid wearing entertainment headphones while operating machinery.
3 Great Plains Manufacturing, Inc. Keep Riders Off Machinery Riders obstruct the operator’s view. Riders could be struck by foreign objects or thrown from the machine. ▲ Never allow children to operate equipment. ▲ Keep all bystanders away from machine during operation. Transport Machinery Safely Maximum transport speed for implement is 20 mph (32 kph). Some rough terrains require a slower speed. Sudden braking can cause a towed load to swerve and upset. ▲ Do not exceed 20 mph.
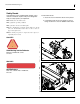
4 1007NT Great Plains Manufacturing, Inc. Tire Safety Tire changing can be dangerous and should be performed by trained personnel using correct tools and equipment. ▲ When inflating tires, use a clip-on chuck and extension hose long enough for you to stand to one side–not in front of or over tire assembly. Use a safety cage if available. ▲ When removing and installing wheels, use wheel-handling equipment adequate for weight involved. Practice Safe Maintenance ▲ Understand procedure before doing work.
5 Great Plains Manufacturing, Inc. Safety Decals Your implement comes equipped with all lights, safety reflectors and decals in place. They were designed to help you safely operate your implement. ▲ Read and follow decal directions. ▲ Keep lights in operating condition. To install new decals: 1. Clean the area on which the decal is to be placed. 2. Peel backing from decal. Press firmly on surface, being careful not to cause air bubbles under decal. ▲ Keep all safety decals clean and legible.
6 1007NT Great Plains Manufacturing, Inc.
7 Great Plains Manufacturing, Inc.
8 1007NT 838-102C Great Plains Manufacturing, Inc.
9 Great Plains Manufacturing, Inc.
10 1007NT Great Plains Manufacturing, Inc. 818-587C 28457 Caution: General Instructions front face, top front tool bar, near center; one total 818-719C Caution: General Instructions front face, top front tool bar, near center; one total 28457 838-092C Caution: Tire Inflation for 265/70B16.
Introduction Great Plains Manufacturing, Inc. 11 Introduction Great Plains welcomes you to its growing family of new product owners. This drill has been designed with care and built by skilled workers using quality materials. Proper setup, maintenance and safe operating practices will help you get years of satisfactory use from the machine. Description of Unit The 1007NT is a 10 foot pull-type seeding implement designed for no-till conditions.
12 1007NT Great Plains Manufacturing, Inc. Owner Assistance If you need customer service or repair parts, contact a Great Plains dealer. They have trained personnel, repair parts and equipment specially designed for Great Plains products. Your machine’s parts were specially designed and should only be replaced with Great Plains parts. Always use the serial and model number when ordering parts from your Great Plains dealer.
Great Plains Manufacturing, Inc. Preparation and Setup 13 Preparation and Setup This section helps you prepare your tractor and drill for use.
14 1007NT Great Plains Manufacturing, Inc. Hitching Tractor to Drill In lowered (field) position, with the drill frame set at the desired height via depth control valve (see page 29), the tongue must be level. When hitching for the first time: • it is necessary to adjust hitch height (page 74), and You may be severely injured or killed by being crushed between the tractor and drill. Do not stand or place any part of your body between drill and moving tractor.
Preparation and Setup Great Plains Manufacturing, Inc. 15 Hydraulic Hose Hookup Connect hydraulic system to tractor before lifting the drill. Escaping fluid under pressure can have sufficient pressure to penetrate the skin. Check all hydraulic lines and fittings before applying pressure. Fluid escaping from a very small hole can be almost invisible. Use paper or cardboard, not body parts, and wear heavy gloves to check for suspected leaks.
16 1007NT Great Plains Manufacturing, Inc. Electrical Connection Refer to Figure 6 (which depicts both European and North American style connectors - if your implement does not have the correct connector for your tractor, contact your Great Plains dealer) 13. Plug the drill lighting connector into tractor outlet. 14. Coil-up and tie-up excess cable, allowing enough slack for turns and ridges.
Great Plains Manufacturing, Inc. Operating Instructions 17 Operating Instructions This section covers general operating procedures. Experience, machine familiarity and the following information will lead to efficient operation and good working habits. Always operate farm machinery with safety in mind. Pre-Start Checklist Escaping fluid under pressure can have sufficient pressure to penetrate the skin. Check all hydraulic lines and fittings before applying pressure.
18 1007NT Great Plains Manufacturing, Inc. Drill Lift/Lower Raising and lowering the drill relies on one front cylinder, and one rear lift-assist cylinder. Both cylinders are on the same circuit and operate in unison, although at different rates front to back. When lowered, the rear lift-assist arms raise more rapidly than the front rockshaft, resulting in the rear caster wheels being off the ground during planting. The rear wheels play no role in setting planting depth.
Operating Instructions Great Plains Manufacturing, Inc. 19 Caster Pivot Locks Refer to Figure 9 To prevent side movement of the drill when transported by trailer, the lift-assist casters may be locked in their fullreversing orientation. A spring-loaded pin 1 engages a cutout 2 in the caster pivot plate, preventing rotation. Use this feature only for trailer transport. Do not use these locks for towing drill on own wheels or field operations.
20 1007NT Great Plains Manufacturing, Inc. Transporting The drill may be transported on its own wheels, or on a trailer. Transport on Drill Wheels Before transporting with a tractor, check these items: 1. Check that tractor is sufficient for towing the drill. Tractor must have at least 80 horsepower (60 kW). Use a tractor with adequate weight relative to drill. See the tables below for typical drill weights. 2. Unload drill boxes.
Great Plains Manufacturing, Inc. Operating Instructions 21 For Any Transport Keep Clearance in Mind Remember that the drill may be wider than the tractor. Allow safe clearance. Observe Road Rules Comply with all national, regional and local safety laws when traveling on public roads. Trailer Transport Loading Trailer 1. Hitch raised and locked drill to suitable tractor. 2. Carefully line-up the tractor, drill and trailer, so that: a. no turns are needed for the final movement, and b.
22 1007NT Great Plains Manufacturing, Inc. Loading Materials Fully loaded with dense seed and fertilizer, the drill weighs an additional 1970 lbs (894 kg). Include this weight when checking tractor capability. 3 2 1 The drill must be hitched for seed loading. Load slightly more material than needed, because consumption rates can vary between compartments even though the furrow rates are identical. 1 Main Seed Box Loading 1.
Operating Instructions Great Plains Manufacturing, Inc. 23 Unused Boxes Unless steps are taken, all meter shafts of all boxes are operating whenever the drill is lowered and moving. To prevent needless wear, disable any unneeded ground drive or box(es). 1 Ground Drive Lock-Up On a drill with Native Grass, both left and right ground drives will be operating unless one is disengaged.
24 1007NT Great Plains Manufacturing, Inc. Material Rates Overview Details of seed and fertilizer rate setting are found in the Seed Rate Manual, and rely on data from that manual. Rate setting controls are different for each box, but independent for each box. Some boxes have more than one control.
Operating Instructions Great Plains Manufacturing, Inc. 25 Acremeter Operation The acremeter counts shaft rotations whenever the shaft is rotating - this is with the drill lowered and in motion or during crank operation. The meter is programmed to display rotations as acres or hectares, when using all rows, factory-specified tires and tire inflations. Note: Unusual conditions and/or non-standard row spacings can cause the acremeter tally to vary from actual acres planted.
26 1007NT Great Plains Manufacturing, Inc. Field Operation 1. Hitch drill to a suitable tractor (page 14). Check depth and level (page 14). 2. Fully raise drill (page 18). 3. Rotate ground drive wheel. Check that feed cups, seed tubes and drives are working properly and free from foreign material. You may be severely injured or killed by being crushed between the tractor and drill. Do not stand or place any part of your body between drill and moving tractor.
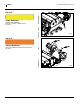
Adjustments Great Plains Manufacturing, Inc. 27 Adjustments To get full performance from your drill, you need an understanding of all component operations, and many provide adjustments for optimal field results. The 1007NT has double-disc 07 Series openers with depth-controlling press wheels mounted on floating opener frames. Opener bodies are staggered for easy soil flow. All openers pivot on a common axis to maintain consistent depth as the opener frame follows contours.
28 1007NT Great Plains Manufacturing, Inc. Coulter Adjustments Refer to Figure 15 A no-till coulter 1 , is mounted directly ahead of each opener on the drill. The coulters cut through heavy trash and make a groove in the soil for the openers. The coulters are mounted on the drill frame so coulter cutting depth changes as the drill is raised and lowered. To set drill seeding depth, you must: 1. Set group coulter depth by raising or lowering the front rockshaft with the depth control valve (next topic). 2.
Adjustments Great Plains Manufacturing, Inc. 29 Coulter Depth (All Rows) Refer to Figure 16 Group coulter depth is controlled by the height at which a depth control valve 1 stops retraction of the front (rockshaft) cylinders. Further adjustment is available at the front lift cylinder eyebolt. Falling Frame Hazard: Make adjustments with drill lowered, or locked up. Making adjustments with drill partially raised can result in sudden downward movement of frame, with risk of serious injury.
30 1007NT Great Plains Manufacturing, Inc. Front Eyebolt Adjustment Refer to Figure 18 6. Raise drill and install lock channels. Loosen jam nut 5. 7. Adjust stop nut 6 to raise eyebolt. The depth change per unit of eyebolt movement is 1.75in depth per inch of eyebolt, or 4.4 cm depth per cm of eyebolt. This is also about 3⁄16in (5mm) of depth change per turn of the adjust nut. 8. Re-tighten jam nut when desired depth is achieved. 9.
Adjustments Great Plains Manufacturing, Inc. 31 Coulter Spring Length Coulter springs are preset at 10in (25.4cm), giving coulters an initial operating force of 400 pounds before the spring compresses. This setting is adequate for many difficult no-till conditions. 1 In normal operation at target running depth, springs are at full extension or only slightly compressed. They compress briefly at obstructions and in denser soil.
32 1007NT Great Plains Manufacturing, Inc. Coulter Depth (Individual Rows) The running depth of all coulters is adjusted simultaneously by changing the tool bar height. Adjusting the height of a small number of coulters may be useful for rows in tire tracks. 3 2 Adjust individual coulters as follows. 1. On level ground, lower the drill until coulters just touch the ground. 2. Raise the drill by the extra amount you need to lower the rows in tracks. 1 Refer to Figure 20 3.
Adjustments Great Plains Manufacturing, Inc. 33 Calibration Overview Detailed calibration steps vary with each box. Details are found in the Seed Rate Manual. 1 Some general information applies to all boxes. Calibrate with Drill Raised Perform the calibration with the drill hitched and raised. Install cylinder locks. Calibrate for 1/10th Acre or Hectare 2 The number of revolutions per area is: Area Sampled Full Acre 1/10th Acre Full Hectare 1/10th Hectare Wheel Revolutions 491.6 49.2 1214.8 121.
34 1007NT Great Plains Manufacturing, Inc. Row Unit Adjustments Refer to Figure 23 (which depicts an 07 series row unit fully populated with all optional accessories [except Fertilizer and Seed-Lok] supported for use with the 1007NT drill; coulter is not part of opener assembly and is not shown) From front to back, a Great Plains 07 Series row unit can include the following capabilities (some optional): 2 6 8 3 9 1.
Adjustments Great Plains Manufacturing, Inc. 35 Disc Blade Adjustments Opener disc angle and stagger is not adjustable, but disc-to-disc spacing is, and may need attention as discs experience normal wear. Spacers must be reset when blades are replaced. Refer to Figure 24 The ideal spacing causes the blades to be in contact for about one inch. If you insert two pieces of paper between the blades, the gap between them should be 0 to 1.75in (0-4.4cm).
36 1007NT Great Plains Manufacturing, Inc. Opener Adjustments “W” Opener Down Pressure Opener springs provide the down pressure necessary for opener discs to open a seed trench. The springs allow the openers to float down into depressions and up over obstructions. Each opener spring can be adjusted for down pressure. This is useful when planting in tractor tire tracks. Refer to Figure 26 To adjust the pressure, remove “W” clip at bottom of spring.
Adjustments Great Plains Manufacturing, Inc. 37 Seed-Lok™ Lock-Up Optional Seed-Lok firming wheels provide additional seed-to-soil contact. The wheels are spring loaded and do not require adjusting. In some wet and sticky conditions the wheels may accumulate soil. To avoid problems associated with this, you can lock-up the firmers. Refer to Figure 28 (shown with an opener disc removed for clarity - this task can be performed with discs mounted) To lock up Seed-Lock wheels: 1. Pull catch wire aside 1 2.
38 1007NT Great Plains Manufacturing, Inc. Troubleshooting Problem Uneven seed spacing or uneven stand Uneven seed depth Opener discs not turning freely Actual material rate different than desired Excessive seed cracking 150-290M Cause Solution Excessive field speed. Reduce field speed. Feed cups plugging. Clean out feed cups. Seed tubes plugging. Clean out seed tubes. Opener discs not turning freely. See “Opener discs not turning freely” in this Troubleshooting section.
Troubleshooting Great Plains Manufacturing, Inc. Problem Cause Too wet or cloddy. Press wheels not compacting soil as desired Press wheel depth does not match coulter depth. Not enough down pressure on disc openers. 39 Solution Wait until drier weather or rework ground. Readjust press wheel depth, page 37. Increase down pressure on openers, page 36. Boxes not emptying evenly Some boxes do not have same num- Load more material than required.
40 1007NT Problem Acremeter inaccurate 150-290M Great Plains Manufacturing, Inc. Cause Solution Excess wheel slippage Check frame height. If correct, solution may be to wait for drier conditions. Passes misaligned. Check that planting passes are not leaving gaps (under-reporting area) or causing overlap (over-reporting area). Wheel slippage is varying from nominal. If variance is consistent, develop a correction factor for your conditions. Check that acremeter is for your drill.
Maintenance and Lubrication Great Plains Manufacturing, Inc. 41 Maintenance and Lubrication Maintenance Proper servicing and maintenance is the key to long implement life. With careful and systematic inspection, you can avoid costly maintenance, downtime and repair. Always turn off and remove the tractor key before making any adjustments or performing any maintenance. OFF You may be severely injured or killed by being crushed under the falling implement.
42 1007NT Great Plains Manufacturing, Inc. Materials Clean-Out Main Box Clean-Out Refer to Figure 30, which depicts the seed cup door handle in a normal operating position. 1. Set the Seed Rate Handle to zero (0). This moves the seed cup sprockets out of the seed path. 1 2. Position a tarp or bucket under each row or set of rows to be cleaned out. 3. At the seed cup for that row, pull the door handle 1 out of the operating detent range, and swing it down to position 2 . 4.
Great Plains Manufacturing, Inc. Maintenance and Lubrication 43 Small Seeds Box Clean-Out 1. Open lid of each box and scoop out as much seed as possible. 2. To recover remaining seed, place a collection tarp under the small seeds tubes at the openers. 3. Raise drill. 4. Set seed rate handle to 100. 5. At left gearbox, rotate calibration crank or ground drive wheel until no seed flows. 6. If a vacuum cleaner is available, remove any residual seed from top of meters.
44 1007NT Great Plains Manufacturing, Inc. Leveling Drill This operation requires a tape measure. 1. Move drill to level hard ground, ideally a paved surface or concrete pad. Accurate measurement for side-to-side level will be difficult on open soil. 2. Set/check eyebolts.
Great Plains Manufacturing, Inc. Maintenance and Lubrication 45 Disc Maintenance Coulter and opener disc blades wear in normal service, becoming smaller in diameter. Periodically check blade diameter, and replace when below the recommended limits. Discs can also be dented by unusual field hazards, or bent. Replace damaged blades immediately. Opener Disc Replacement Replace 15in (38.
46 1007NT Great Plains Manufacturing, Inc. Chain Maintenance Inspect and lubricate chains regularly. The slack of new chains tends to increase during the first few hours of operation due to seating. 1 All chains are #40 roller chains. 2 Chain Slack Check slack within the first 8 hours of operation and tighten idlers as necessary. Refer to Figure 33, which, for clarity, greatly exaggerates slack, and omits the idlers. 1.
Maintenance and Lubrication Great Plains Manufacturing, Inc.
48 1007NT Great Plains Manufacturing, Inc.
Maintenance and Lubrication Great Plains Manufacturing, Inc. 49 Felt Barrier Seals (Option) 30 1 seal at each fertilizer shaft end, 2 total Type of Lubrication: Oil Quantity: Soak seal Note: If Small Seeds is also installed, access these zerks from below or through the end wall gaps. 16381 Seed Cup Drive Shaft Sprocket 50 1 sliding sprocket Type of Lubrication: Oil Quantity: Coat thoroughly Move the Seed Rate adjustment handle back and forth to get oil into the square bore.
50 1007NT Great Plains Manufacturing, Inc.
Maintenance and Lubrication Great Plains Manufacturing, Inc. 51 Gearbox Upon Repair The gearbox is lubricated and sealed at the factory. Under normal conditions, it does not require maintenance or lubrication. If the gearbox has been opened for repair, repack all gears and around shaft bearings using at least 7 oz. of gear lube, Great Plains Part No. 788067. Keep moisture and dirt out of gearbox. Inspect (replace if needed) the rubber seals on gearbox drive and shifter shafts.
52 1007NT Great Plains Manufacturing, Inc. Options Hitches One or two hitch options may be specified at initial drill order. Hitch kits may also be ordered later for field conversion. If only one option is ordered, it is factoryinstalled. Description PINTLE HITCH OPTION CLEVIS HITCH W/BALL SWIVEL Option Part Number (81) 177-534A (82) 177-537A See “Adjust Hitch Height” on page 74.
Options Great Plains Manufacturing, Inc. 53 Seed Box Agitator An optional agitator can be added to the main seed box. It stirs the seed directly above the metering cups, separating soybeans that are sticky with innoculant, and helping prevent bridging of light, fluffy seeds (this is not a substitute for the optional Native Grass seed box). Agitators are not factory-installed. For concurrent field installation of Agitator and Fertilizer and/or Small Seeds, order the 118-250A or 118-899A kits.
54 1007NT Great Plains Manufacturing, Inc. Series II Native Grass Attachment This attachment, for 7.5in drills, is designed to seed fluffy, hard-to-plant grasses. Standard equipment includes dedicated ground drive and gearbox system, acremeter, 10 bushel box with Series II meters, Series II agitator, and seed tubes. Note: Native Grass is not compatible with the Fertilizer Option (or kits). Native Grass is compatible with an existing, concurrent, or subsequent installation of the Small Seeds attachment.
Options Great Plains Manufacturing, Inc. 55 Small Seeds Attachment The Small Seeds (SGS) attachment is designed to meter various small seeds in row. It is driven independently of other boxes on the drill. The standard attachment includes a drive system, 2.4 bushel box, meters and seed tubes.
56 1007NT Great Plains Manufacturing, Inc. Fertilizer The Fertilizer attachment is designed to meter dry fertilizer and apply it in row. It is driven independently of other boxes on the drill. The standard Fertilizer attachment includes a drive system, 9.2 cubic foot box, stainless steel meters, and delivery tubes.
Options Great Plains Manufacturing, Inc. 57 Seed Firmers The standard 1007NT drill includes seed flaps. A choice of firmers is an option in the product bundles, or may be field-installed as kits. Only one type of seed firmer may be installed at the same time. Order one firmer kit per opener. Seed-Lok® Seed Firmer Description Part Number Series Seed-Lok® kit 122-193K For operations, see “Seed-Lok™ Lock-Up” on page 37.
58 1007NT Great Plains Manufacturing, Inc. Appendix A - Reference Specifications and Capacities Row Spacing Rows per drill Swath Weight, empty Transport Width Transport Height Transport Length 1007NT-1575 1007NT-1906 7.5 in (19.1 cm) 15 112.5 in (285.8 cm) 6 in (15.2 cm) 19 114 in (289.6 cm) 6866-7822 lbs (3115-3548 kg)a 6985-7620 lbs (3168-3456 kg)a 118in (3.0m) 7ft 10in (238.8cm) 23ft 10in (7.26m) approx.
Appendix A - Reference Great Plains Manufacturing, Inc. 59 Torque Values Bolt Head Identification Bolt Head Identification Bolt Size Bolt Size Grade 2 1 4 Class 5.8 Class 8.8 Class 10.9 N-m ft-lb N-m ft-lb mm x pitch N-m ft-lb N-m ft-lb N-m 11 8 16 12 M 5 X 0.8 4 3 6 5 9 7 4-28 8.5 6 13 10 18 14 M6X1 7 5 11 8 15 11 ⁄4-20 N-m ft-lb ft-lb 16-18 15 11 24 17 33 25 M 8 X 1.
60 1007NT Great Plains Manufacturing, Inc.
Appendix A - Reference Great Plains Manufacturing, Inc. Chain Routing 61 Legend: Ground Drive Wheel to Jackshaft There is one (left) or two (both sides) of these assemblies on a 1007NT drill. The jackshaft output has one or two sprockets on a left ground drive, and one on a right ground drive. 34T 34i 56P Sprocket Tooth count Idler Tooth count Chain Pitch count Direction of chain in motion The [19T] / [60P] is to left (Native Grass) gearbox input. See page 69 for Native Grass gearbox chain routing.
62 1007NT Great Plains Manufacturing, Inc. Left Gearbox Input/Main Seed Box Drive This assembly is driven from the ground drive jackshaft (page 61) by the [61P] chain from the [19T] sprocket (the [14T] sprocket, if present, drives a separate chain to the agitator, fertilizer or small seeds). Applies to: All configurations The gearbox output drives the Main Seed Box jackshaft via the [72P] chain. The main box jackshaft drives the main box seed meters via the [109P] chain.
Appendix A - Reference Great Plains Manufacturing, Inc. 63 Ground Drive to Accessory Jackshaft (Option) Optional Main box Agitator, Fertilizer meters and Small Seeds meters are powered by a separate drive system at the Accessory Jackshaft [22T]. This shaft is driven by the [190P] chain from the [14T] sprocket on the ground drive jackshaft (page 61). Applies to drills with any of: • Main box agitator • Fertilizer • Small Seeds Shaft output is one [12T] sprocket (not shown).
64 1007NT Great Plains Manufacturing, Inc. Accessory Transmission (Option) Small Seeds When Small Seeds (but not Agitator Fertilizer, Native Grass) is installed, a [103P] chain runs from the [12T] accessory output sprocket to the [17T] Small Seeds jackshaft input sprocket. Applies to Drills: • with a Small Seeds option, • without Agitator, Fertilizer and Native Grass See page 68 for Small Seeds Box Drive.
Appendix A - Reference Great Plains Manufacturing, Inc. Small Seeds (with Native Grass) When Small Seeds and Native Grass are installed, a longer [179P] chain runs from the [12T] accessory output sprocket to the [17T] Small Seeds jackshaft input sprocket. 65 Applies to Drills: • with a Small Seeds option, • with a Native Grass option and; • without main seed box Agitator. See page 68 for Small Seeds Box Drive.
66 1007NT Great Plains Manufacturing, Inc. Fertilizer A [103P] chain runs from the [12T] accessory output sprocket to the [17T] Fertilizer jackshaft input sprocket. Applies to Drills: • with any factory-installed or field-installed Fertilizer option, See page 67 for Fertilizer Box Drive. • with or without Small Seeds, and; • without main seed box Agitator.
Appendix A - Reference Great Plains Manufacturing, Inc. Main Seed Box Agitator When no Fertilizer or Small Seeds are installed, the [68P] chain from the [12T] accessory output sprocket loops directly around the [17T] agitator input sprocket.
68 1007NT Great Plains Manufacturing, Inc. Small Seeds Box Drive (Option) See Figure 62 if Fertilizer is also installed. See page 65 for Accessory Jackshaft to Small Seeds chain detail. 60P 27T Accessory to Small Seeds chain: [103P] If Small Seeds (SGS) only [108P] SGS and main box Agitator [179P] SGS and Native Grass [184P] SGS, NG and Agitator (see Fig.
Appendix A - Reference Great Plains Manufacturing, Inc. 69 Native Grass Gearbox (Option) Gearbox input is driven by a [60P] chain from the ground drive. Gearbox output sprocket chain drives Native Grass jackshaft. Output sprocket [A] and chain [B] change with Rate Reduction. Native Grass jackshaft input sprocket [C] (the seed rate “DRIVEN” sprocket) is selected from the front storage towers and ranges from [15T] to [24T] in 1 Tooth steps. Native Grass jackshaft output sprocket drives final chain.
70 1007NT Great Plains Manufacturing, Inc. Native Grass Jackshaft to Meters (Option) See page 69 for native Grass gearbox input.
Appendix B - Initial Setup Great Plains Manufacturing, Inc. 71 Appendix B - Initial Setup Installation Instructions This sections covers initial setup items, and features, options and accessories ordered later or not factoryinstalled. Page Installation 72 Initial Setup 76 Scraper Installation Figure Callouts callouts identify components in the currently 1 to 9 referenced Figure or Figures. These numbers may be re-used from page to page. 11 to 43 callouts reference new parts.
72 1007NT Great Plains Manufacturing, Inc. Initial Setup These items are completed by the dealer prior to delivering the drill to the customer. Tools required • Basic hand tools • A tractor of sufficient size and horsepower with remote hydraulics. Refer to “Specifications and Capacities” in the Operator’s Manual. If the tractor to be used with the drill is not available during setup, obtain a measurement of its hitch height. • About 2.3 gallons (8.
Great Plains Manufacturing, Inc. Appendix B - Initial Setup 73 Hydraulic Setup Terminate Hoses Feed-line hoses terminate in 1⁄2in male NPT fittings. The drill does not include couplers. See hydraulic diagram on page 60. 12. Adapt the NPT fittings to the style and size of coupler required to connect the drill to a hydraulic source for system charging. 13.
74 1007NT Great Plains Manufacturing, Inc. Adjust Hitch Height Although the specified hitch option (clevis or pintle) is factory-installed, it may not be at ideal tractor height. If a clevis hitch was specified, it needs to be assembled on the tractor drawbar. Hitch Heights 1007NT Clevis 2211⁄16in 57.6cm 1911⁄16in 50.0cm 187⁄16in 46.8cm 1611⁄16in 42.4cm 157⁄16in 39.2cm 127⁄16in 31.6cm 1007NT Pintle 225⁄16in 56.7cm 195⁄16in 49.0cm 181⁄16in 45.9cm 165⁄16in 41.4cm 151⁄16in 38.3cm 121⁄16in 30.
Appendix B - Initial Setup Great Plains Manufacturing, Inc. 75 Adjusting Either Hitch If the proposed hitch adjustment does not involve the hole used for the safety chain, skip step 27 and step 32. Refer to Figure 66 (facing page) 26. Determine which tongue mounting holes and which hitch orientation provide the necessary height. 27.
76 1007NT Great Plains Manufacturing, Inc. Scraper Installation Optional carbide disc scrapers are not factory installed. Start with row 1 (left-most row unit): 31 1. Remove one or both disc blades to gain safe access to the mount 1 . Note the position of bushings and spacers for correct re-assembly (page 45). 33 2. Remove the existing slotted scraper. 38 Refer to Figure 70 3.
Appendix B - Initial Setup Great Plains Manufacturing, Inc. 77 Warranty Warranty Great Plains Manufacturing, Incorporated warrants to the original purchaser that this seeding equipment will be free from defects in material and workmanship for a period of one year from the date of original purchase when used as intended and under normal service and conditions for personal use; 90 days for commercial or rental purposes.
78 1007NT 150-290M Great Plains Manufacturing, Inc.
Index Great Plains Manufacturing, Inc. 79 Index A acre .............................................33 acremeter ....................................57 acremeter, operation ...................25 acres ............................................25 address, Great Plains ..................12 adjustment items .........................27 adjustments .................................27 agitator ........................................53 ASAE J560b ................................16 B backing up ..............
80 1007NT left-hand, defined ........................ 11 leveling ........................................ 16 lid, fertilizer .................................. 22 lid, main box ................................ 22 lid, Native Grass box ................... 22 lid, small seeds ........................... 22 lift-assist ...................................... 15 lighting connector ........................ 16 lights .............................................. 2 light, fluffy seeds .........................
Index Great Plains Manufacturing, Inc. transporting with tractor ...............20 transport, trailer ...........................21 treatments, liquid ...........................3 turbo ............................................52 U units of measure ..........................57 U.S. customary ............................57 W W clip ...........................................36 WARNING, defined .......................1 warranty, drill ...............................77 warranty, tire .....................
82 1007NT 150-290M Great Plains Manufacturing, Inc.
Blank
EOD Great Plains Manufacturing, Inc. Corporate Office: P.O.