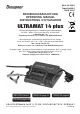
Best.-Nr. 6464 Order No.6464 Réf N°.6464 BEDIENUNGSANLEITUNG OPERATING MANUAL INSTRUCTIONS D´UTILISATION ULTRAMAT 14 plus Mikroprozessorgesteuertes Hochleistungs-Schnellladegerät für NiCd- / NiMH-, LiPo-/LiIo-/LiMn-/LiFe- und Pb-Akkus Ladestrom bis 5 A Eingebauter Balancer für Li-Akkus und NiMH/NiCd-Akkus Micro-processor controlled high-performance fast charger for Ni-Cd / Ni-MH, LiPo / LiIo / LiMn / LiFe and lead-acid batteries Max.
Kapitel 1. 2. 3. 4. 5. 6. 7. 8. 9. 10. 11. 12. 13. 14. 15. 16. 17. 18. 19. 20.
Sicherheits- und Warnweise z Das Ladegerät vor Staub, Feuchtigkeit, Regen, Hitze (z. B. direkte Sonneneinstrahlung) und Vibration schützen. Nur zur Verwendung im Trockenen! z Nicht für Kinder unter 14 Jahren, kein Spielzeug! z Die Schlitze im Gehäuse dienen der Kühlung des Geräts und dürfen nicht abgedeckt oder verschlossen werden. Das Gerät muss so aufgestellt sein, damit die Luft ungehindert zirkulieren kann. z Das Ladegerät ist sowohl für den Anschluss an eine 12 V-Autobatterie (12...
3. Allgemeine Betriebshinweise Laden von Akkus Beim Laden wird dem Akku eine bestimmte Strommenge zugeführt, welche sich aus dem Produkt aus Ladestrom x Ladezeit ergibt. Der maximal zulässige Ladestrom ist vom jeweiligen Akku-Typ abhängig und ist den Datenangaben des Akkuherstellers zu entnehmen. Nur bei ausdrücklich als schnellladefähig bezeichneten Akkus darf der Normalladestrom überschritten werden. Als NORMAL-LADESTROM wird der Strom bezeichnet, der 1/10 des Nennwertes der Kapazitätsangabe beträgt (z.
Haftungsausschluss Die Einhaltung der Betriebsanleitung sowie die Bedingungen und Methoden bei Installation, Betrieb, Verwendung und Wartung des Ladegerätes können von der Fa. GRAUPNER nicht überwacht werden. Daher übernimmt die Fa. GRAUPNER keinerlei Haftung für Verluste, Schäden oder Kosten, die sich aus fehlerhafter Verwendung und Betrieb ergeben oder in irgendeiner Weise damit zusammenhängen. 4.
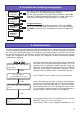
. Ladeprogramme Die verschiedenen Möglichkeiten des Ladegeräts sind in 4 Programm-Gruppen aufgeteilt, die Sie in nachfolgend aufgeführter Reihenfolge mit der MODE-Taste (2 sek. drücken) anwählen können. Ni-Cd-Akku-Programme: Aufladen, Balancieren. Ni-MH-Akku-Programme: Aufladen, Balancieren. LiPo/LiIo/LiFe-Akku-Programme: Aufladen Blei-Akku-Programme: Aufladen, Erhaltungsladung für Stand by Betrieb. 7.
8. Auswahl der Ladeprogrammgruppe NiCd AUTOMATIK Programm MODE MODE (2 sek.) NiMH AUTOMATIK Programm Die Lade- und Einstellmöglichkeiten des Ladegerätes sind übersichtlich und logisch in vier Programmgruppen unterteilt. Für die unterschiedlichen Akkutypen: NickelCadmium-, Nickel-Metal-Hydrid-, LiFe/LitiumIonen/LithiumPolymer und Pb (Blei)-Akkus steht jeweils eine eigene Programmgruppe zur Verfügung. MODE MODE (2 sek.) Lithium MANUELL Programm MODE MODE (2 sek.
10. Starten des Ladevorgangs 3 sek. L _i _P _o __M _a _n _u _e _l _ l_ _ _ _ _ L _: _2 _. _5 _A _ _ _ _ 2_ 0 _ 0_ 0 _m _A _h _ Zum Laden, Balan cieren wählen Sie das gewünschte Programm wie nachfolgend beschrieben aus und stellen die passenden Werte dazu ein. Schließen Sie, wenn vorhanden, den Balancerstecker des Akkus an den Balancereingang (BALANCER CONNECTOR) an. Achten Sie dabei auf die richtige Polung.
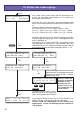
11. NiCd-Programme NiCd AUTOMATIKProgramm MODE NiCd MANUELLProgramm MODE NiCd Balancierprogramm MODE NiCd MODE ∆ delta-peak Abschaltspannung Komfortable Ladeprogramme für die Aufladung von im Modellbau üblichen Nickel-Cadmium-Akkus. Ist das Programm beendet, so erscheint bis zum Abklemmen des Akkus das Ladeprogramm abwechselnd mit dem Schriftzug “*ENDE*” im Display, die Ladezeit, der letzte Ladestrom, die geladene Kapazität sowie Akkuspannung werden angezeigt.
NiCd-Balancier-Programm N _i _C _d __B _a _l _a _n _c _ e_ r ____ sp _ _a _n _n _u _n _g __= _ _ 1_ . _2 _0 _V _ + INC DEC START 2 sek. * _* _I _N _F _O _R _M _A _T _I _ O_ N _* _* _* _ B _A _L _A _N _C _E _R __A _N _ G_ . ____ 2 sek. B _L _C ___2 _8 _: _3 _0 __0 _1 _4 _2 _5 _ _C _+ _0 _. _0 _0 _A _ _0 _7 _ ._ 7 _1 _7 _V _ N Dieses Programm dient zur Angleichung der Zellenspannungen der einzelnen Akkuzellen für Akkupacks mit 2-6 Zellen.
12. NIMH-Programme NiMH AUTOMATIKProgramm MODE NiMH MANUELLProgramm MODE NiMH Balancierprogramm MODE NiMH MODE ∆ delta-peak Abschaltspannung Komfortable Ladeprogramme für die Aufladung von im Modellbau üblichen Nickel-Metall-HydridAkkus. Ist das Ladeprogramm beendet, so erscheint bis zum Abklemmen des Akkus das Ladeprogramm abwechselnd mit dem Schriftzug “*ENDE*” im Display, die Ladezeit, der letzte Ladestrom, die geladene Kapazität sowie Akkuspannung werden angezeigt.
NiMH-Manuell-Programm N _i _M _H __M _a _n _u _e _l _ l_ _ _ _ _ L: _ _2 _. _5 _A ______ _____ + INC DEC Bei diesem Programm wird der Akku mit dem eingestellten Ladestrom aufgeladen. Der maximale Ladestrom kann vor dem Anstecken des zu ladenden Akkus mit den INC / DEC-Tasten von 0,1A -5A eingestellt werden. Beachten Sie die Angaben des Akkuherstellers! Laden Sie die Akkus auf keinen Fall mit mehr als 2C! Bsp.: NiMH 6N-4200, max. Ladestrom 8,4A, empfohlener Schnellladestrom für Graupner-Akkus 4,2A.
∆ Peak) Ansprechspannung NiMH-Delta-Peak (-∆ N _i _M _H __D _e _l _t _a __ P_ e _a _k __ V_ o_ l_ t__ =1 0m / Z_ e _ __ _V __ _l _l _e _ + INC DEC Die Ansprechspannung (in mV pro Zelle!) der Abschaltautomatik für NiMH-Akkus kann eingestellt werden. NiMHAkkus haben gegenüber NiCd-Akkus einen weniger ausgeprägten Spannungsrückgang. Als praktikabel haben sich Spannungseinstellungen von 5 ... 25mV/Zelle herausgestellt.
13. Lithium-Programme Die Ladeprogramme sind nur zum Laden von LiFePO4 (LiFe) -Akkus mit einer Zellenspannung von 3,3 V/Zelle, Lithium Ionen-Akkus mit einer Zellennennspannung von 3,6 V/Zelle, Lithium Polymer- und Lithium Mangan-Akkus mit einer Zellen Nennspannung von 3,7 V/Zelle geeignet. Lithium-Akkus zeichnen sich vor allem durch ihre, im Vergleich zu anderen Akkutypen, wesentlich höhere Energiedichte aus.
Lithium-Manuell-Programm L _i _P _o __M _a _n _u _e _l _ l_ _ _ _ _ L_ :_ 4.0 A__4 0 0_ m _ ___ _0 __ _A _h __ + INC DEC + INC DEC ENTER Bei diesem Programm wird der Akku mit dem eingestellten Ladestrom aufgeladen. Vor dem Anstecken des zu ladenden Akkus wird mit den INC / DEC-Tasten der Ladestrom (0,10...5,00A, links im Display) und nach dem Drücken der ENTER-Taste wird mit den INC / DEC-Tasten die Kapazität des Akkus eingestellt (50 ... 8000mAh, rechts im Display).
Lithium-Typ-Auswahl-Programm Dies ist das wichtigste Einstellprogramm für Lithiumakkus. In dieser Auswahl wird der Akkutyp eingestellt. Dieser ist sehr sorgfältig einzustellen und zu überprüfen, da das Ladegerät aus diesen Einstellungen alle anderen Ladeparameter ableitet. Die Einstellung des Akkutyps (LiPo, LiIo oder LiFe) beeinflusst die Abschaltspannung. Sollte ein Lithium-Akku wider Erwarten nur zu 2/3 aufgeladen werden, so haben Sie vielleicht hier den falschen Akkutyp eingestellt.
Pb-Manuell-Programm P _b __M _a _n _u _e _l _l __ _____ L_ :_ 2_ .5 A _____ _____ _ __ + INC DEC Bei diesem Programm wird vor dem Anstecken des zu ladenden Akkus mit den INC / DEC-Tasten der für den Akku maximal zulässige Ladestrom (maximal Ladestrom) eingestellt. Diese Einstellung legt nur die Obergrenze fest, den das Ladegerät dem Akku zumuten darf. Gibt der Akku-Hersteller einen kleinen Ladestrom an, so muss auch der Ladestrom begrenzt werden, da u. U.
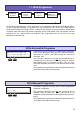
15. Displayanzeigen Programm Kapazität in mAh Ladezeit min.:s. M _a _n _. __1 _2 _: _5 _6 __0 _0 _3 _2 _1 _ N _C _+ _4 _. _5 _0 _A __1 _1 _. _9 _8 _5 _V _ Akkutyp Ladestrom Akkuspannung Die während der Ladung / des Balanciervorganges wichtigen Daten werden übersichtlich auf der zweizeiligen Flüssigkristallanzeige wiedergegeben und sind bis zum Abklemmen des zu ladenden Akkus sichtbar. Wird ein weiterer Akku geladen sind die vorher angezeigten Werte nicht mehr abrufbar. 16.
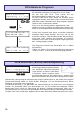
Anzeige der Eingangsspannung und des Innenwiderstandes INC DEC Eingangsspannung ___________ _____ _3 _. _6 _2 _V ______ _____ 1 Innenwid. Batt. _25m __________ _____ Die aktuelle Eingangsspannung und der Innenwiderstand des Akkus (nur im NiCd-und NiMH- Manuell-Modus) kann jederzeit durch gleichzeitiges Drücken der INC- und DEC-Tasten abgerufen werden. Durch drücken der INC- oder DEC-Taste wechseln Sie die Anzeige zum Innenwiderstand, den Einzelzellenspannungen oder zur Eingangsspannung.
17. Fehler- und Warnmeldungen Das Ladegerät ist mit einer Vielzahl an Schutz- und Überwachungseinrichtungen zur Kontrolle der einzelnen Funktionen und der Geräteelektronik ausgestattet. Eine Überschreitung von Grenzwerten führt in einigen Fällen zur automatischen Reduzierung der Geräteeinstellungen (z.B. Lade- oder Entladestrom) oder zur Abschaltung des Ladevorganges (z.B. bei leerwerdender Autobatterie). Die Ursachen dafür werden im Fehlerfall auf der Flüssigkristallanzeige angezeigt.
* *_ *_ ** FE HL R *_ * __ __ __ _E __ _* _* _* _ B a_ l_ .S p_ g_ .ü e r_ s __ __ _b __ _c _h _. _ __ __ __ _E __ _* _* _* _ * *_ *_ ** FE HL R *_ * B a_ l_ .S p_ g_ .u t e_ r __ __ _n __ _s _c _h _ *_ _ *_ *_ ** __ FE __ HL _E __ R *_ * _* _* _* _ B _A _L _A _N _C _E _R __N _. _ _A _N _G _. _ Stellt das Ladegerät eine zu hohe Zellenspannung am Balancereingang fest, so erscheint diese Fehlermeldung.
18. Reinigung und Wartung Das Ladegerät arbeitet wartungsfrei und benötigt daher keinerlei Wartungsarbeiten. Bitte schützen Sie es jedoch in Ihrem eigenen Interesse unbedingt vor Staub, Schmutz und Feuchtigkeit! Zur Reinigung das Ladegerät von Autobatterie und Akku trennen und nur mit einem trockenen Lappen (keine Reinigungsmittel verwenden!) leicht abreiben. 19. Hinweise zum Umgang mit Akkus • Das Laden einzelner NiCd- oder NiMH-Zellen oder Batterien mit 1...
20. Technische Daten Akku: Ladeströme / Leistung 100 mA bis 5,0 A / max. 50 W mit Netzanschluss 100~240VAC 100mA bis 5,0A / max. 50W mit 11...15VDC-Anschluss am Eingang Ni-Cd & Ni-MH-Akkus: Zellenzahl Kapazität 1 - 14 Zellen ab 0,1 Ah bis 8,0 Ah Lithium-Akkus: Zellenzahl Zellenspannungen Kapazität 1-6 Zellen 3,3V (LiFe), 3,6 V (LiIo) bzw.
Chapter 1. 2. 3. 4. 5. 6. 7. 8. 9. 10. 11. 12. 13. 14. 15. 16. 17. 18. 19. 20.
2. Warnings and safety notes z This product isn‘t designed for use by children under the age of 14, it isn‘t a toy! z Protect the charger from dust, damp, rain, heat (e.g. direct sunshine) and vibration. It should only be operated in dry indoor conditions. z The case slots serve to cool the charger, and must not be covered or enclosed; set up the charger with space round it, so that cooling air can circulate unhindered.
3. General notes on using the charger Charging batteries When a battery is charged, a particular quantity of electrical energy is fed into it. The charge quantity is calculated by multiplying charge current by charge time. The maximum permissible charge current varies according to the battery type, and can be found in the information provided by the battery manufacturer.
Liability exclusion As manufacturers, we at GRAUPNER are not in a position to ensure that you observe the correct methods of operation when installing, using and maintaining this charger. For this reason we are obliged to deny all liability for loss, damage or costs which are incurred due to the incompetent or incorrect use and operation of our products, or which are connected with such operation in any way. 4.
6. Charge programs The various facilities of the charger are divided up into four program groups which you can select by holding the MODE button pressed in for two seconds. The sequence is shown in the flow chart below. Ni-Cd battery programs: charging, balancing cells. Ni-MH battery programs: charging, balancing cells. LiPo / LiIo / LiFe battery programs: charging cells. Lead-acid battery programs: charging, trickle charge for stand-by operation. 7.
8. Selecting the charge program group NiCd AUTOMATIC program MODE MODE (2 sec.) NiMH AUTOMATIC program MODE In the interests of clarity, the charge and set-up facilities of the ULTRAMAT 14 plus are divided into four logical program groups. A separate program group is provided for each of the different battery types: Nickel-Cadmium, Nickel-Metal-Hydride, LithiumIon / Lithium-Polymer / LiFePO4 (LiFe) and Pb (lead-acid) batteries. MODE (2 sec.) Lithium MANUAL program MODE MODE (2 sec.
10. Starting the charge process 3 sec. L _i _P _o __m _a _n _u _a _l _ _____ C _: _2 _. _5 _A _ _ _ _ 2_ 0 _ 0_ 0 _m _A _h _ For charging / discharging, or conditioning a pack, select the desired program as described below, and then set suitable values. If the battery does have a balancer connector, connect the balancer connector to the balancer input (BALANCER CONNECTOR) of the charger. Make sure for the right polarity.
11. Ni-Cd programs NiCd AUTOMATICprogram MODE NiCd MODE MANUALprogram NiCd balancing program MODE NiCd MODE ∆ delta-peak trigger voltage A set of convenient charge programs for recharging Nickel-Cadmium batteries, as commonly used for modelling purposes.
NiCd discharge balancing program N _i _C _d __b _a _l _a _n _c _ e_ _ c _u _t _ o = _ 1_ . 0V _f _f __v _o _l _t ___ _2 __ _ + INC DEC START 2 sec. * _* _I _N _F _O _R _M _A _T _I _ O_ N _* _* _* _ B _A _L _A _N _C _E _R __C _O _ N_ . ____ 2 sec. _B _L _C _ _ _2 _8 _: _3 _0 _ _0 _1 _4 _2 _5 _N _C _+ _0 _. _0 _0 _A _ _0 _7 _. _7 _1 _7 _V The balancing program does balance up to 6 cells of a battery pack. The final discharge voltage for the balancer can be set within the range 1.20 … 1.
12. NIMH-programs NiMH AUTOMATICprogram MODE NiMH MANUALprogram MODE NiMH balancing program MODE NiMH MODE ∆ delta-peak trigger voltage A set of convenient charge programs for recharging Nickel-Metal-Hydride batteries, as commonly used for modelling purposes.
Ni-MH manual program N _i _M _H __m _a _n _u _a _l _ _____ C: _ _2 _. _5 _A ______ _____ + INC DEC Select this program when you simply wish to recharge a battery using the set charge current. You can adjust the charge current using the INC / DEC buttons, but only before you connect the pack for charging. The range available is 0.1 A to 5 A. Never use a maximum charge current higher as the value described in the battery instruction, never higher as 2C! Never charge transmitter batteries with more as 2A! f.
∆ Peak) trigger voltage Ni-MH-Delta-Peak (-∆ N _i _M _H __d _e _l _t _a __ p_ e _a _k __ v_ o_ l_ t__ = _ 5_ m V_ / c_ e _ __ _l _l __ + INC DEC It is possible to adjust the trigger voltage (in mV per cell!) of the automatic termination circuit for Ni-MH batteries. However, Ni-MH batteries have a less pronounced voltage drop than Ni-Cd cells, and a practical range has proved to be 5 ... 25 mV / cell.
13. Lithium programs These programs are only suitable for charging and discharging LiFePO4 batteries with a voltage of 3.3 V / Cell, Lithium-Ion batteries with a voltage of 3.6 V / cell, and Lithium-Polymer and Lithium-Manganese batteries with a voltage of 3.7 V / cell. The outstanding feature of Lithium batteries is their much higher capacity compared to other battery types.
Lithium manual program L _i _P _o __m _a _n _u _a _l _ _____ C_ :_ 4_ .0 A____ 4_ 0 0_ 0 _ __ _m _A _h _ + INC + INC DEC DEC ENTER This program charges the battery using the capacity (charge current) which you set. Before you initiate the actual program you must set the charging current (range 0.1A...5.0A, left of the screen) and the capacity of the pack (range 50...8000 mAh, right on the screen) using the INC / DEC buttons.
Lithium type select program This is actually the most important set-up program for Lithium batteries. In the Select program you enter the battery type and battery capacity. It is vital to enter this information with the greatest care. Check it very thoroughly, as the charger derives all the other charge parameters from the settings you enter here.The battery type you select (LiPo, LiIo or LiFe) affects the charge termination voltage.
Pb manual program P _b __m _a _n _u _a _l ___ _____ C_ :_ 2_ .5 A _____ _____ _ __ + INC DEC In this program you can set the maximum permissible charge current using the INC / DEC buttons, but only before you connect the lead-acid battery for charging. This setting only determines the top limit which the charger is permitted to feed to the battery.
15. Screen displays Chargetime (min.:sec.) Program Capacity (mAh) C _H _G ___1 _2 _: _5 _6 __0 _0 _3 _2 _1 _ N _C _+ _4 _. _5 _0 _A __1 _1 _. _9 _8 _5 _V _ Battery type Charge current Battery voltage The two-line liquid-crystal screen displays in a clear form the important information generated during the charge / balancing process. The information remains visible on-screen until you disconnect the battery that is being charged.
Input voltage and Battery resistance display INC DEC I _n _p _u _t __V _o _l _t _a _ g_ e ____ 1 _3 _. _6 _2 _V ______ _____ _Battery _ _ _ _ _ _Res. ____ _____ _25m __________ _____ The current input voltage and battery resistance can be called up at any time by pressing the INC and DEC buttons simultaneously. Change the display with INC or DEC button to input voltage, the battery resistance display (only in NiCd- and NiMH- manual modes) and to the single cell voltages and backwards.
17. Error messages and warnings The Charger incorporates a wide range of protective and monitoring systems designed to check the charger’s functions and monitor the state of its electronics. If any of the unit’s limit values are exceeded, the charger responds accordingly: in some cases the unit’s settings are automatically reduced (e.g. charge current / discharge current); in others the charge process is switched off (e.g. car battery almost flat). The liquid crystal screen displays the cause of the error.
*_ _ *_ *_ ** __ ER __ RO _R __ * *_ * _* _* _* _ ba l. o_ l_ t__ t_ o o_ _ _ h_ i_ . _ __ _v __ *_ _ *_ *_ ** __ ER __ RO _R __ * *_ * _* _* _* _ ba l. o_ l_ t__ t_ o o_ _ _ l_ o_ w _ __ _v __ *_ _ *_ *_ ** __ ER __ RO _R __ * *_ * _* _* _* _ o_ p_ e_ n__ b_ a_ la c e_ r _ _n __ ____ If the charger detects an excessive cell voltage at the balancer input, this error message appears. The error message appears at the following voltages: LiPo > 4.3 V, LiIo > 4.2 V, LiFe > 3.9 V, NiCd / NiMH > 2.
18. Cleaning and maintenance The charger is entirely maintenance-free in use, and requires no servicing of any kind. However, it is in your own interests to protect the unit from dust, dirt and damp. To clean the charger, disconnect it from the car battery and any other battery, and wipe it clean with a dry cloth (don’t use cleaning agents!). 19. Notes on handling rechargeable batteries • Charging single Ni-Cd or Ni-MH cells, and packs consisting of 1 ...
20. Specification Battery: Charge currents / power 100 mA to 5.0 A / max. 50 W with internal power supply 100 mA to 5.0 A / max. 50 W with external 11...15V DC power supply Ni-Cd & Ni-MH batteries: Cell count Capacity 1 - 14 cells min. 0,1 Ah to 8,0 Ah Lithium batteries: Cell count Cell voltage Capacity 1-6 cells 3,3 V (LiFe), 3,6 V (LiIo) / 3,7 V (LiPo/LiMn) min. 0,05 Ah to 8,0 Ah Lead-acid / lead-gel batteries: Cell count Battery voltage Capacity 1, 2, 3, 6 cells 2, 4, 6, 12 V min.
Chapitres 1. 2. 3. 4. 5. 6. 7. 8. 9. 10. 11. 12. 13. 14. 15. 16. 17. 18. 19. 20.
2. Avertissements et conseils de sécurité z Ce chargeur ne convient pas aux enfants en dessous de 14 ans, ce n‘est pas un jouet! z Protéger le chargeur de la poussière, de l’humidité, de la pluie et de la chaleur ; par ex. sous le rayonnement solaire direct. Utilisez-le uniquement dans un endroit sec. z Les ailettes sur le boîtier servent au refroidissement de l’appareil et ne devront pas être recouvertes ou obturées.
3. Conseils généraux d‘ utilisation Charge des accus Pour charger un accu, il doit emmagasiner une certaine quantité de courant qui est le produit donné par Courant de charge x Temps de charge. Le courant de charge maximal admissible dépend de chaque type d’accu et il est à relever dans les données techniques du fabricant. Seuls les accus expressément désignés comme étant adaptés pour la charge rapide pourront être chargés en dépassant le courant de charge normal.
Exclusion de responsabilité : Le respect des instructions d’utilisation, ainsi que les méthodes d’installation, de fonctionnement et d’entretien de ce chargeur ne peuvent pas être surveillés par la Firme Graupner. En conséquence, nous déclinons toute responsabilité concernant la perte, les dommages et les frais résultants d’une utilisation incorrecte ainsi que notre participation aux dédommagements d’une façon quelconque. 4.
6. Programmes de charge Les différentes possibilités du chargeur sont réparties en 4 groupes de programmes qui pourront être sélectionnés dans l’ordre indiqué à la suite avec la touche MODE (pression durant 2 sec.). Programme accus NiCd : Charge, Balancer Programme accus NiMH : Charge, Balancer Programme accus LiPo/LiIo/LiFe : Charge Programme pour accus au plomb : Charge ou charge d’entretien en attente d’utilisation. 7.
8. Sélection des groupes de programmes de charge NiCd Programme Automatique MODE MODE (2 sec.) NiMH Programme Automatique MODE MODE (2 sec.) Lithium Programme Manuel MODE MODE (2 sec.) Pb Programme Manuel MODE (2 sec.) Les possibilités de charge et de décharge de l’ULTRAMAT 14 plus sont clairement et logiquement réparties dans les quatre groupes de programmes.Un groupe de programmes propre à chacun des différents types d’accu NiCd, NiMH, LiPo/LiPo/LiFe et Pb (Plomb) està disposition.
10. Départ du processus de charge 3 sec. L _i _P _o __M _a _n _u _e _l _ _____ C _: _2 _. _5 _A _ _ _ _ 2_ 0 _ 0_ 0 _m _A _h _ Pour la charge/décharge et le cyclage, sélectionnez le programme désiré comme décrit à la suite et placez les valeurs adaptées.
11. Programme NiCd NiCd Programme Automatique MODE NiCd Programme Manuel MODE NiCd Programme du Balancer MODE NiCd MODE Coupure ∆ delta-peak Confortable programme pour la charge des accus au Nickel-Cadmium couramment utilisés en modélisme. Lorsque le programme de charge est terminé, l’inscription ‘’ENDE’’ (FIN) apparaît sur l’affichage, avec le temps de charge, le dernier courant de charge, la capacité emmagasinée ainsi que la tension de l’accu jusqu’à la déconnexion de celui-ci.
NiCd-Programme du balancer N _i _C _d __T _e _n _s _i _o _ n_ _ d _e __ b a l a n c e r = 1 . 2 ___________ ___0 _V _ + INC DEC START 2 sec. _* _I _N _F _O _R _M _A _T _I _ O_ N _* _* _* _ * B _A _L _A _N _C _E _R __C _O _ N_ . ____ 2 sec. _B _ __ L _C _ _ _2 _ 8 _: _ 3_ 0_ 0 1 _4 _ 2 _5 C _+ _ 0_ . _0 _ 0 _A _ _ 0 _7 . 7 _1 _ 7 _V _N _ __ Ce programme sert pour la coordination de la tension des différents éléments pour les packs d’accus de 2-6 éléments. Placer la tension de fin du Balance 1.20…1.
12. Programme NiMH NiMH Programme Automatique MODE NiMH Programme Manuel MODE NiMH Programme du Balancer MODE NiMH MODE Coupure ∆ delta-peak Confortable programme pour la charge des accus Nickel-Métal-Hybrides couramment utilisés en modélisme. Lorsque le programme de charge est terminé, l’inscription ‘’ENDE’’ (FIN) apparaît sur l’affichage, avec le temps de charge, le dernier courant de charge, la capacité emmagasinée ainsi que la tension de l’accu jusqu’à la déconnexion de celui-ci.
Programme manuel NiMH N _i _M _H __M _a _n _u _e _l _ _____ C: _ _2 _. _5 _A ______ _____ + INC DEC Avec ce programme, l’accu sera chargé avec le courant de charge réglé. Le courant de charge maximal pourra être réglé de 0,1 A à 5 A avec les touches INC/DEC, avant la connexion de l’accu.
∆ Peak) Coupure Delta-Peak (-∆ N _i _M _H __D _e _l _t _a __ P_ e _a _k __ T_ e_ n_ s. = _ 5_ m V_ / e_ l _ __ __ _e _m _. _ + INC DEC La tension d’intervention (en mV par élément) de la coupure automatique pour les accus NiMH pourra être réglée. Les accus NiMH ont une perte de tension plus faible par comparaison aux accus NiCd. Le réglage d’une tension de 5…25 mV/élément s’est révélé être le mieux adapté.
13. Programme Lithium Ce programme de charge est adapté uniquement pour la charge et la décharge des accus au LiFePO4 (LiFe) avec une tension de 3,3 V/élément, des accus au Lithium-Ion avec une tension de 3,6 V/élément, des accus au Lithium-Polymer et au Lithium-Manganèse avec une tension de 3,7 V/élément. Les accus au Lithium se distinguent surtout par une plus forte capacité, par comparaison aux autres types d’accus.
Programme manuel Lithium L _i _P _o __M _a _n _u _e _l _ _____ C_ :_ 4.0 A__4 0 0_ m _ ___ _0 __ _A _h __ + INC DEC + INC DEC ENTER Avec ce programme, l’accu sera chargé avec le courant de charge réglé. Avant de connecter l’accu à charger, le courant de charge (0,10…5,00 A, à gauche sur l’affichage) sera réglé avec les touches INC/DEC et après avoir pressé la touche ENTER, la capacité de l’accu (50…8000 mAh, à droite sur l’affichage) sera réglé avec les touches INC/DEC.
Programme de sélection des types Lithium C’est le programme de réglage le plus important pour les accus au Lithium. Le type d’accu sera déterminé dans cette sélection. Celui-ci sera soigneusement réglé et vérifié, car le chargeur travaille sur tous les autres paramètres de charge pour ces réglages. Le réglage des types d’accus (LiPo, Lilo ou LiFe) influence la tension de coupure. Si un accu au Lithium n’est rechargé qu’au 2/3 de sa capacité, c’est qu’un mauvais type d’accu a été réglé.
Programme manuel Pb P _b __M _a _n _u _e _l ___ _____ C_ :_ 2_ .5 A _____ _____ _ __ + INC DEC Avec ce programme, le courant de charge maximal admissible pour l’accu à charger sera réglé avec les touches INC/DEC, avant sa connexion sur le chargeur. Ce réglage place seulement la limite supérieure, car le chargeur doit sonder l’accu.
15. Indications de I‘affichage Temps de charge (min.: sec.) Programme Capacité (mAh) M _a _n _. __1 _2 _: _5 _6 __0 _0 _3 _2 _1 _ N _C _+ _4 _. _5 _0 _A __1 _1 _, _9 _8 _5 _V _ Type d‘accu Courant de charge Tension de I‘accu Durant la charge/décharge, des données importantes seront clairement lisibles sur l’affichage à cristaux liquides à deux lignes jusqu’à la dé-connexion de l’accu. Avec la charge d’un autre accu, les valeurs précédemment affichées ne seront plus appelables. 16.
Affichage de la tension d‘ entrée et de rés. d‘accu INC DEC T _E _N _S _I _O _N __D _´ _E _ N_ T _R _É _E _ 1 _3 _, _6 _2 _V ______ _____ _RÉS. _ _ _ D_ ´ACCU ______ _____ _25m __________ _____ Le tension d’entrée et la résistance actuelles de l’accu (seulement dans le mode manuel NiCd et NiMH) pourront être appelées à tout moment en pressant simultanément les touches INC et DEC.
17. Avertissements d‘erreur Le chargeur est équipé d’une multitude de réglages de protection et de surveillance pour le contrôle de chacune des fonctions et de l’électronique de l’appareil. Un dépassement des valeurs limites conduit dans certains cas à la réduction automatique des réglages de l’appareil (par ex. courant de charge et de décharge) ou à l’arrêt du processus de charge (par ex. batterie de voiture se vidant). En cas d’erreur, la cause sera indiquée sur l’affichage.
* *_ *_ ** ER RE R *_ * __ __ __ _U __ _* _* _* _ T e_ n_ s. b_ a_ l. é p_ a __ __ _d __ _s _s _é _ *_ _ *_ *_ ** __ ER __ RE _U __ R *_ * _* _* _* _ T_ ._ b_ al ._ t_ ro _ __ _p _ _ b_ a _s _s _e _ Si le chargeur envoi une trop haute tension par élément sur l’entrée du Balancer, il apparaît cet avertissement d’erreur.
18. Nettoyage et entretien Ce chargeur travaille sans entretien et nécessite aucune surveillance particulière. Dans votre propre intérêt, protégez-le cependant de la poussière, des salissures et de l’humidité ! Pour nettoyer le chargeur, déconnectez-le de la batterie de voiture et de l’accu et essuyez-le avec un chiffon doux et sec (N’utilisez aucun produit de nettoyage !). 19.
20. Caractéristiques techniques Accu: Courant de charge / Puissance 100 mA jusqu à 5,0 A / max. 50 W avec courant sector 100~240V AC 100 mA jusqu à 5,0 A / max. 50 W avec courant sector 11...
Art. n. 6464 INSTRUZIONI PER L`USO ULTRAMAT 14 plus Caricabatterie di grandi prestazioni, rapido, computerizzato per la carica di celle NiCd / NiMH, LiPo / LiIo / LiMn / LiFe e al Piombo Corrente di carica fino a 5 A , Equilibratore integrato per accumulatori al Litio ed accumulatori NiMH/NiCd tensione d’ingresso 100~240V AC tensione d’ingresso 11...15V AC G R A U P N E R GmbH & Co.
Capitolo 1 1.. 2. 3. 4. 5. 6. 7. 8. 9. 10. 11. 12. 13. 14. 15. 16. 17. 18. 19. 20.
2. Precauzioni e avvertenze per la sicurezza Proteggete il caricabatterie dalla sporcizia, dall’umidità, dalla pioggia, dal calore intenso (per es. dall’esposizione diretta ai raggi del sole) e dalle vibrazioni. Usatelo solamente in ambienti asciutti! Il caricabatterie non è adatto a ragazzi sotto i 14 anni. Non è un giocattolo! Le griglie sull’involucro servono per il raffreddamento dell’apparecchio e non devono esser coperte od ostruite.
3. Notizie generali per funzionamento Carica degli accumulatori Nel processo di carica, all’accumulatore viene fornita una detrminata quantità di corrente, risultante dal prodotto della corrente di carica per il tempo di carica. La massima corrente di carica ammessa dipende dal tipo di accumulatore ed è comunicata nei dati tecnici del produttore. Solamente per gli accumulatori espressamente indicati come idonei per la carica rapida può essere superata la normale corrente di carica.
Esclusione della responsabilità L’osservanza delle istruzioni per il funzionamento ed il metodo d’installazione, utilizzoe manutenzione non possono essere da noi controllati. Perciò la ditta Graupner declina ogni responsabilità per perdite, danni o costi derivanti da un utilizzo o un funzionamento errato o ad essi conseguenti. 4. Cavi di ricarica consigliati, polarità Esigenze diverse nell’uso e nella connessione degli accumulatori ricaricabili richiedono anche spinotti di collegamento diversi.
6. Programmi carica Le diverse possibilità del caricabatterie sono ripartite in due gruppi di programmi, che potete scegliere con il tasto MODE (tener premuto per 2 sec.) nella seguente sequenza. Programmi per accumulatori NiCd: carica, equilibratura. Programmi per accumulatori NiMH: carica, equilibratura. Programmi per accumulatori LiPo / LiIo / LiFe: carica o per la selezione delle celle. Programmi per accumulatori al piombo: carica, carica di mantenimento per il funzionamento stand by. 7.
8. Scelta del gruppo del programma di carica NiCd Programma AUTOMATICC MODE MODE (2 sec.) NiMH Programma AUTOMATICC MODE MODE (2 sec.) Lithium Programma MANUALE MODE (2 sec.) Pb Programma MANUALE MODE (2 sec.) MODE Le possibilità di carica e scarica dell’ULTRAMAT 14 plus sono suddivise in modo chiaro e logico in quattro gruppi di programmi.
10. Avvio dei processi di carica 3 sec. L _i _P _o __M _a _n _u _e _l _ l_ _ _ _ _ L _: _2 _. _5 _A _ _ _ _ 2_ 0 _ 0_ 0 _m _A _h _ START 2 sec. * _* _I _N _F _O _R _M _A _T _I _ O_ N _* _* _* _ B _A _L _A _N _C _E _R __A _N _ G_ . ____ Per la carica, la scarica e la formattazione scegliete il programma desiderato come descritto in seguito e impostate i valori adatti. Informazione equilibratore collegato Equilibratore non collegato.
11. Programmi NiCd NiCd Programma AUTOMATICC MODE NiCd Programma MANUALE MODE NiCd Progr. con equilibratura MODE NiCd MODE ∆ Delta-peak Tens.riferim Programmi semplici da usare per la carica degli accumulatori NiCd solitamente usati nel modellismo.
NiCd Balancerspannung (Programma Tensione equilibratore) N _i _C _d __B _a _l _a _n _c _ e_ r ____ sp ._ 2_ 0_ V _ _a _n _n _u _n _g __= _ _ 1_ _ + INC DEC START 2 sec. * _* _I _N _F _O _R _M _A _T _I _ O_ N _* _* _* _ B _A _L _A _N _C _E _R __A _N _ G_ . ____ 2 sec. B_ L_ C___ 2_ 8_ :3 0_ 0 1_ 4_ 2_ 5 _ __ __ N _C _+ _0 _. _0 _0 _A __0 _7 _. _7 _1 _7 _V _ Questo programma serve per equilibrare le tensioni delle singole celle di pacchi batterie con 2-6 celle.
12. Programmi NiMH NiMH Programma AUTOMATICC MODE NiMH Programma MANUALE MODE NiMH Progr. con equilibratura MODE NiMH MODE ∆ Delta-peak Tens.riferim Programmi semplici da usare per la carica degli accumulatori NiMH solitamente usati nel modellismo.
NiMH-Programma manuale N _i _M _H __M _a _n _u _e _l _ l_ _ _ _ _ L: _ _2 _. _5 _A ______ _____ + INC DEC Con questo programma l’accumulatore viene caricato con la corrente di carica impostata. La corrente di carica massima può essere impostata con i tasti INC / DEC da 0.1 A a 5.0 A prima di collegare l’accumulatore. Il processo di carica termina in accordo con i valori impostati per la tensione di spegnimento del delta peak.
∆ Peak) NiMH-Tensione di riferimento del Delta-Peak (-∆ N _i _M _H __D _e _l _t _a __ P_ e _a _k __ Vo _ _l _t __= _1 _0 _m _V _/ _ Z_ e _l _l _e _ + INC 80 DEC La tensione di riferimento (in mV per cella!) dello spegnimento automatico per gli accumulatori NiMH può essere impostata. Gli accumulatori NiMH tuttavia hanno una caduta di tensione inferiore agli accumulatori NiCd. Si sono rivelati accettabili valori di impostazione della tensione di 5 … 25 mV/cella.
13. Programmi Litio Programmi sono adatti solo per la carica di accumulatori agli di LiFePO4 (LiFe) con una tensione di 3,3 V/cella ed Ioni di litio con una tensione di 3,6 V/cella ed ai Polimeri di litio ed al Litio-Biossido di Manganese con una tensione nominale di 3,7 V/cella. Gli accumulatori al litio si distinguono dagli altri tipi di accumulatori soprattutto per la loro notevolmente maggiore capacità.
Litio-Programma manuale Mediante questo programma l’accumulatore viene ricaricato con la corrente di carica impostata. Prima di collegare l’accumulatore da ricaricare è necessario impostare la corrente di carica (0,10...5,00A, a sinistra nel display) tramite i tasti INC / DEC. Premete successivamente il tasto ENTER ed utilizzate i tasti INC / DEC per impostare la capacità dell’accumulatore (50 ... 8000mAh, a destra nel display).
Litio-Programma di scelta del tipo Questo è il più importante programma di impostazione per i pacchi batteria al litio. In questo programma viene impostato il tipo di accumulatore. Questa impostazione va fatta con molta attenzione e verificata, poiché da essa il caricabatterie ricava tutti gli altri parametri per la carica. L’impostazione del tipo di accumulatore (LiPo o LiIo o LiFe) determina la tensione di spegnimento.
Pb-Programma-manuale Con questo programma si può impostare, prima di collegare l’accumulatore, con i tasti INC / DEC, la massima corrente di carica ammessa (corrente di carica massima). + Questa impostazione fissa solamente il limite superiore, INC DEC che il caricabatterie può fornire all’accumulatore.
15. Indicazioni del display Tempo di carica (min.: sec.) Programma Capacità (mAh) M _a _n _. __1 _2 _: _5 _6 __0 _0 _3 _2 _1 _ N _C _+ _4 _. _5 _0 _A __1 _1 _, _9 _8 _5 _V _ Tipo accumulatore Corrente di carica Tensione accumulatore I dati essenziali relativi alla carica e scarica vengono visualizzati chiaramente sulle due righe del display a cristalli liquidi e sono mantenuti fino allo scollegamento dell’accumulatore.
Indicazione della tensione d‘ingresso e la resistenza interna dell‘accumulatore INC DEC Eingangsspannung ___________ _____ _3 _, _6 _2 _V ______ _____ 1 Innenwid. Batt. _25m __________ _____ L’attuale tensione d’ingresso e la resistenza interna dell’accumulatore (solo nella modalità NiCd o NiMH manuale) può essere richiamata, in qualsiasi momento, con la contemporanea pressione dei tasti INC e DEC .
17. Segnalazioni di errore ed avvertenze Il caricabatterie è dotato di un grande numero di protezioni e di controlli per monitorare le singole funzioni ed i circuiti elettronici. Un superamento dei valori limite provoca in certi casi la riduzione automatica delle impostazioni del caricabatterie (per es. della corrente di carica / scarica) o allo spegnimento del processo di carica (per es. quando la batteria dell’auto è completamente scarica).
** _ _* _* _* _F _E _H _L _E _R _ *_ * _* _* _* _ Ba _ _l _. _S _p _g _. _ü _b _e _ r_ s _c _h _. _ _* _* _* _* _F _E _H _L _E _R _ *_ * _* _* _* _ * B _a _l _. _S _p _g _. _u _n _t _ e_ r _s _c _h _ ** _ _* _* _* _F _E _H _L _E _R _ *_ * _* _* _* _ B _A _L _A _N _C _E _R __N _. _ _A _N _G _. _ 88 Questo messaggio di errore appare quando il caricabatterie rileva una tensione delle celle troppo elevata in ingresso all’equilibratore.
18. Pulizia e manutenzione Il caricabatterie funziona senza alcuna necessità di manutenzione. Nel vostro interesse proteggetelo da polvere, sporcizia e umidità. Per pulirlo, dopo averlo scollegato dalla batteria dell’auto, passate con delicatezza un panno asciutto (non usate detersivi!). 19.
20. Caratteristiche tecniche Accumulatore: Corrente di carica / rendimento 100 mA - 5,0 A / max. 50 W (Tensione d‘ ingresso 100~240V AC) 100mA - 5,0A / max. 50W (Tensione d‘ ingresso 11...15V DC) Accumulatori Ni-Cd & Ni-MH: Numero di celle Capacità 1 - 14 celle da 0,1 Ah - 8,0 Ah Accumulatori al litio: Numero di celle Tensione delle celle Capacttà 1-6 celle 3,3 V (LiFe) / 3,6 V (LiIo) rispettiv.
Konformitätserklärung / Conformity Declaration / Déclaration de conformitè / Dichiarazione di conformità EG-Konformitätserklärung Für das folgend bezeichnete Erzeugnis EMV: EN 61000-6-1 / EN 61000-6-3 EN 55014-1 / EN 55014-2 LVD: EN 60950-1 Ultramat 14 plus; Best.-Nr.
Wir gewähren auf dieses Erzeugnis eine / This product is / Sur ce produit nous accordons une Garantie von warrantied for garantie de 24 Die Fa. Graupner GmbH & Co. KG, Henriettenstraße 94-96. 73230 Kirchheim/Teck gewährt ab dem Kaufdatum auf dieses Produkt eine Garantie von 24 Monaten. Die Garantie gilt nur für die bereits beim Kauf des Produktes vorhandenen Material- oder Funktionsmängel.