
Operation Manual


not match the product (e.g. transmitter update fi le instead of receiver fi le), then the pop-up window “Pro-
duct code error” will appear, and you will not be able to start the update procedure.
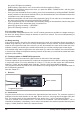
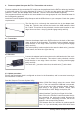
Press the “Program” button in the software.
Transmitter: press the BIND / RANGE button, and switch the transmitter on while you hold it pressed
in.
Receiver: press the SET button, and switch the receiver on while you hold it pressed in.
After a few seconds the Status screen displays the message “Found target device…”; you can now
release the button, and the fi rmware update process commences.
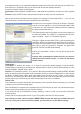
If the device is not recognised, if the pop-up window “Target de-
vice ID not found” appears, or if the process fails before 100%
is reached, you must restart the update procedure. Repeat all
the steps as described above.
The Status display and the Progress bar show the progress of
the fi rmware update. The update is completed when the mes-
sage “Complete…100%” or “Complete!!” appears.
During the update process both LEDs on the transmitter glow
constantly. When it is complete, the red LED goes out and you
will hear a brief confi rmation melody. Both LEDs on the receiver
also light up; when the process is complete, the green LED
goes out, and the red LED starts fl ashing.
Switch your transmitter / receiver off, and disconnect the ad-
apter lead.
Caution: after completing an update process, you must in-
itialise the device before using it, i.e. reset it to the factory
default values,.
Initialisation:
Transmitter: To initialise the system, i.e. to reset it to the factory default settings, locate the BIND /
RANGE button on the back of the transmitter, hold it pressed in while you switch the transmitter on, then
release the BIND / RANGE button again.
Receiver: To initialise the system, i.e. to reset it to the factory default settings, locate the BIND / RANGE
button on the back of the transmitter, hold it pressed in while you switch the transmitter on, then release
the BIND / RANGE button again. Now immediately press and hold the SET button on the receiver,
switch it on, and release the SET button again. After about two or three seconds the green LED on the
receiver lights up to confi rm that your radio control system has been re-initialised.
Please note:
The initialisation procedure erases ALL the settings you have entered. Where necessary, you will need
to program your preferred settings again.
When initialisation is complete, the transmitter will be in Fail-Safe set-up mode. You can therefore imme-
diately continue by programming your fail-safe settings.
If you previously set your transmitter’s Country setting to “France” mode, you must also re-enter the
Country setting.
Please refer to the appropriate section in your RC system instructions for the procedure.
Any settings you have entered using the SMART-BOX are also lost when you initialise the recei-
ver. If you carry out a receiver fi rmware update, you will need to re-enter these settings.
Getting Started Graupner HoTT 2.4 07