
User manual


49
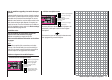
Program description: reserving a new memory
rectly to the corresponding option. For more detailed
information on binding a receiver please refer to pag-
es 61 and 70.
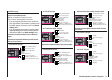
The warning “BIND. n/v” just described is now fol-•
lowed for a few seconds by this warning …
fail safe
setup
t.b.d
… as an indication that no Fail-Safe settings have
been entered. F
or more information on this please re-
fer to page 116.
If the warning …•
throttle
too
high !
… appears on the screen, move the throttle stick (or
the limiter - by def
ault the rotary knob CTRL 7 - if set-
ting up a helicopter) back to idle. This warning only
appears in accordance with the settings you have en-
tered in the “Motor at Ch1” or “Collective pitch min.”
section of the “Basic settings” menu, as described
on pages 56 and 67. If you are setting up a non-pow-
ered fi xed-wing model, enter “none” or “none/inv” at
this point; this disables the throttle warning message,
and makes available the “Brake ¼ NN *“ mixers in
the “Wing mixers” menu, which would otherwise be
suppressed; you should also do this if you wish to
use servo socket 1 for the second fl ap servo.
If the transmitter’s model memories are already occu-•
pied, then a pictogram of the selected model type ap-
pears in the appropriate model memory, followed by
press the central SET button of the right-hand four-way
button briefl y in confi rmation. This initialises the chosen
model type for the model memory you have just se-
lected, and you can now start programming your model
in this memory.
It is now only possible to change this memory to a dif-
ferent model type if you fi rst erase the model memory
(“Model memory” menu, page 52).
Notes:
If you wish to erase the model memory which is cur-•
rently active in the basic display, you will have to de-
fi ne one of the two model types “fi xed-wing” or “heli-
copter” immediately after completing the erase
procedure. You cannot avoid making this choice by
switching the transmitter off. If you wish to remove
a model memory which you inadvertently occupied,
you can simply erase it from a different model mem-
ory.
However, if you erase a model memory which is not
currently active, after the procedure you will see the
memory marked as “
ÄÄfreeÄÄ” under Model Se-
lect.
After the selected model memory has been initial-•
ised with your preferred basic model type, the screen
shifts to the newly reserved model memory. At the
same time the following warning appears for a few
seconds …
BIND N/A
OK
… as an indication that this memory has not yet been
bound to a receiver
. A brief press of the central SET
button of the right-hand four-way button takes you di-
* NN = Nomen Nominandum (name to be stated)
a blank line, or the model’s name if a name has al-
ready been entered in the “Basic settings” menu
(pages 56 and 64), together with an indicator that the
memory is bound to a receiver, if appropriate.
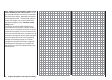
If the battery voltage is too low, the software prevents •
you switching model memories in the interests of
safety. In this case the screen displays this message:
not possible now
voltage too low
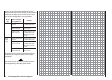
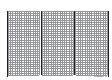
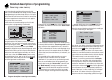
Basically there are now four different options for assign-
ing the four control functions aileron, ele
vator, rudder
and throttle / airbrakes (fi xed-wing model), and roll,
pitch-axis, tail rotor and throttle / collective pitch (model
helicopter) to the two primary dual-axis sticks. Which of
these options is adopted depends on the personal pref-
erence of the individual model pilot. This function is set
in the “Stick mode” line for the currently active model
memory in the “Basic settings” menu (page 56 or 64):
mod Name
stick mode
motor at C1
1
no
tail type normal
aile/flap 1aile
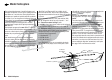
As mentioned earlier, for maximum fl exibility the trans-
mitter controls 5 and 6 are by def
ault not assigned to
transmitter controls, and can be assigned to any chan-
nels you like; this also helps to avoid accidental mishan-
dling.
This means that in the default state of the equipment
only those servos connected to receiver outputs 1
… 4 can usually be controlled by the two dual-axis