
User manual


147
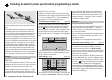
Programming example - fi xed-wing model
the “Wing mixers” menu the mixers “Brake ¼ NN*”
and all mixers “from” and “to” fl aps are activated.
The warning message “Throttle too high” - see page
28 - and the “Motor stop” option in the “base sett.”
menu is disabled.
“none/inv”:•
The brake system is “retracted” at the back posi-
tion of the throttle / brake stick; in the “Wing mixers”
menu the “Brake ¼ NN*” mixers are activated.
In the “Aileron/fl ap” line of the “base sett.” menu it is
possible to select “1AL”, “2AL” and “2AL 2FL”, and in
the “Wing mixers” menu the mixers “Brake ¼ NN*”
and all mixers “from” and “to” fl aps are activated.
The warning message “Throttle too high” - see page
28 - and the “Motor stop” option in the “base sett.”
menu is disabled.
“Throttle min. forward or rear”:•
Ch 1 trim works forward or back. If the throttle stick
is too far in the direction of “full-throttle” when you
switch the transmitter on, you will be warned of this
with the message “Throttle too high” and the “Motor
stop” option in the “base sett.” menu is activated.
In the “Aileron/fl ap” line of the “base sett.” menu it
is only possible to select “1AL” or “2AL”, and in the
“Wing mixers” menu the mixers “Brake ¼ NN*” and
all mixers “from” and “to” fl aps are disabled.
Note:
As mentioned previously, selecting “motor” or “no motor”
affects not only the range of mixers available in the
“Wing mixer” menu, but also the maximum number of
wing servos which can be addressed. For this reason we
shall initially consider “none” (no motor) in the following
programming example.
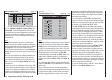
In the next two lines you select the basic arrangement
of the servos in the model, and inform the transmitter of
your choice:
stick mode
motor at C1
1
no
tail type normal
aile/flap
mod name
2aile
tail type: “normal”, “V-tail”, “delt/FlW” or
“2ele
v sv”
aile/fl ap: 1 or 2 aileron servos and 0 or 2 fl ap
servos
Note:
If your model is fi tted with only one camber-changing
fl ap servo, you should still select “… 2FL”. Later, in the
“Fixed-wing mixers” menu (see page 88), you should
select the “AIL ¼ FL” mixer and set it to 0%. You can still
exploit all the other mixers available at that point in the
usual way.
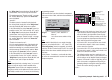
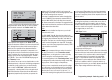
At this juncture - if not before - you should check that
the servos are connected to the receiver in the standard
Graupner sequence:
Right aileron servo
Receiver power supply
Receiver power supply
Airbrakes or throttle / speed
controller (electric),
alternatively right flap servo
Rudder servo or V-tail
Aileron servo or left aileron servo
Elevator servo or V-tail
Free or flap servo or
left flap servo
Notes:
If you set up a V-tail, but the “up / down” and / or “left •
/ right” functions work the wrong way round, please
refer to the table in the right-hand column on page
44 for the remedy. The same procedure can be used
if you set up fl aperons (superimposed ailerons and
fl aps), and they work the wrong way round.
If you select “2AL”, the second aileron servo should •
be connected to output 5; in this case a telemetry
sensor cannot be connected.
If you select “2AL 2FL”, the second fl ap servo should •
be connected to output 1; in this case a throttle or air-
brake servo cannot be connected.
The following settings apply to a model with a “nor-•
mal” tail and no motor (“none”); if your model has a V-
tail, the settings can be adopted virtually unchanged.
However, if the model is a delta or fl ying wing, the sit-
uation is not quite so straightforward. A special pro-
gramming example covering this model type will be
found in the section starting on page 158.
In the …
* NN = Nomen Nominandum (name to be stated)