
Installation Guide


8
9
If you are installing the Hexpander with an Acousti-Phonic pre-amp, these may
be installed together now.
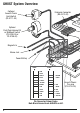
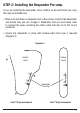
Hexpander Plugged on Top of
Acousti-Phonic Pre-amp.
Diagram 3.
STEP 3: Installing the Hexpander with the Acousti-
Phonic Pre-amp
Plug the Hexpander on to the top of the Acousti-Phonic pre-amp (Diagram 3).
The two can be secured together with double-sided foam tape if required.
•
Follow the instructions in the Acousti-Phonic manual to install the combined
unit and the battery.
•
Consider carefully where you will position the new controls and run the wires,
including the Interface Wiring Harness that will run to the 13 -pin connector.
Because of the extra size of the Hexpander, and because of the extra wires, you
may need to enlarge the control cavity to allow everything to t. Alternatively, a
new cavity may be routed out.
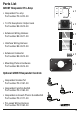
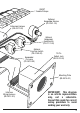
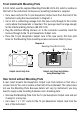
STEP 4: Installing the 13-Pin Hexaphonic Output Jack
The 13-pin Hexaphonic Output Jack may be installed now (BE-0510-00).
Because of the size of the connector you will likely need to route a new cavity
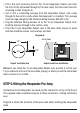
for it. There are two basic options; installing from the front using the supplied
mounting plate (BE-0514-00, Diagram 4), or installing from the rear and not
using the mounting plate (Diagram 5). Read through the instructions before
deciding which is best for you.
Hexpander
Pre-amp
Acousti-Phonic
Pre-amp